Checking VBS Status in Windows 11
You can use several ways to check the status of Virtualization Based Security (VBS) in Windows 11:
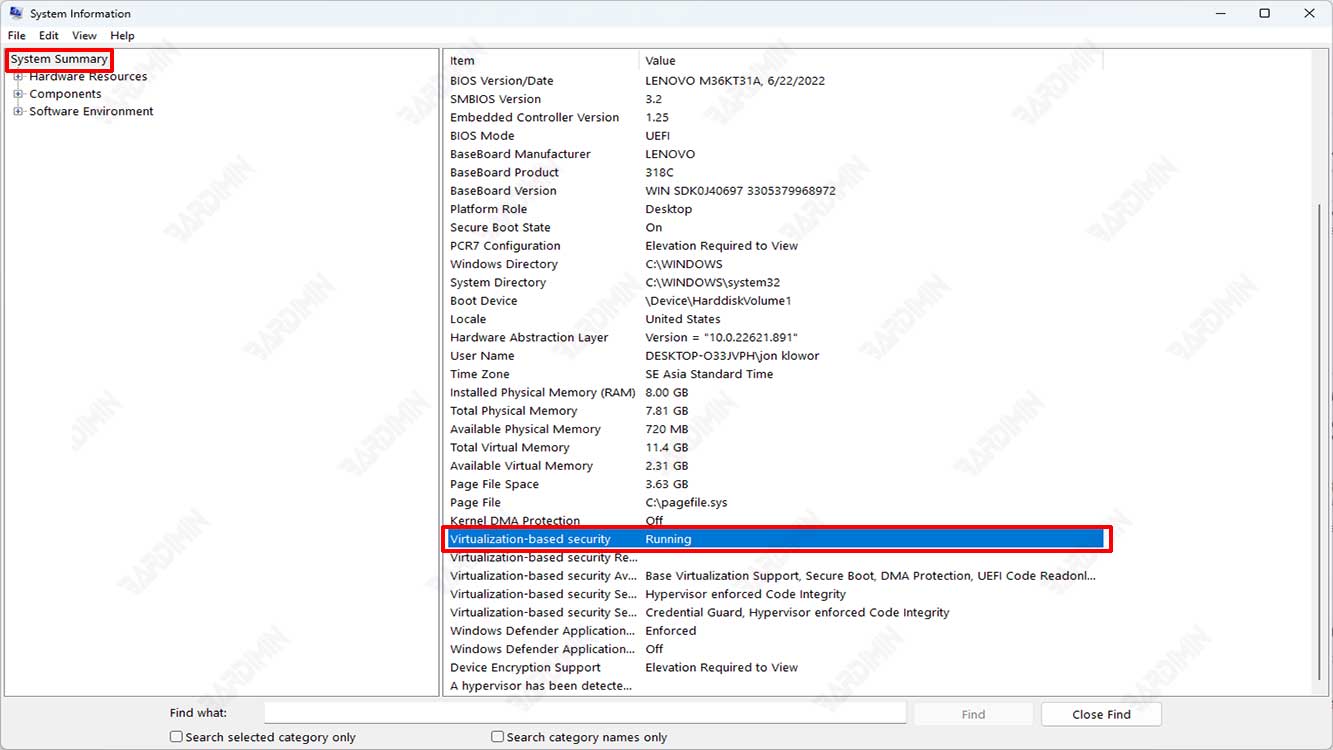
1. Through the System Information menu:
- Open the Start menu and type “System Information” in the search field, then click the System Information application that appears in the search results.
- In the System Information window, click on the System Summary category on the left side of the window.
- In the right part of the window, check that there is information “Virtualization-based security” and that the status is listed “Running” or “Not running”.
2. Via Command Prompt:
- Open Command Prompt by typing “cmd” in the Start search field, then right-click on the Command Prompt application and select “Run as administrator”.
- Type this command and press enter on the keyboard.
systeminfo
- Find the section “Virtualization-based security enabled” on the command output result. If the status is “Yes”, VBS has been enabled.
3. Via PowerShell:
- Open PowerShell by typing “PowerShell” in the Start search field, then right-click on the PowerShell application and select “Run as administrator”.
- Type the following command and press enter on the keyboard.
Get-CimInstance -ClassName <strong>“Win32_DeviceGuard”</strong> | Select-Object SecurityServicesRunning
- If the command output results show the value “CredentialGuard, DeviceGuard, VirtualSecureMode”, meaning VBS has been enabled
How to Disable VBS in Windows 11
Virtualization Based Security (VBS) can be disabled in Windows 11 through Windows security settings. Here are the steps to disable VBS in Windows 11:
- Open “Settings” by pressing the keyboard key (WIN + I) on the keyboard.
- Select “Privacy & Security > Windows Security”.
- On the right panel, click the button “Open Windows Security”.

- In the new window that opens, select “Device Security”.
- Then on the right panel, click the link “Core isolation details” in the “Core isolation”.
- Then in the “Memory integrity”, slide the switch button to the left to turn it off.

- After you turn it off, a warning message may appear that disabling VBS may affect system security, select “Yes” to continue.
- Restart your system to enable the changes.
How to Disable VBS in Windows 11 with Command Prompt
- Open Command Prompt by typing “cmd” in the Start search field, then right-click on the Command Prompt application and select “Run as administrator”.
- Type the following command and press enter on the keyboard.
bcdedit /set hypervisorlaunchtype off
Other Interesting Articles
How to Disable VBS in Windows 11 via Group Policy Editor
- Press the keyboard key (Win + R) and type “gpedit.msc”. Then click the OK button to open the Group Policy Editor.
- Then navigate to “Local Computer Policy > Computer Configuration > Administrative Templates > System > Device Guard”.

- In the right pane, double-click “Turn On Virtualization Based Security”.
- Next in the dialog box, select “Disabled” to disable.
- Click the OK button to save the changes.
- Restart your computer.
