A stable boot system on Windows 11 is essential to ensure a smooth and productive user experience. When the computer is turned on, the boot process is the first step that allows the operating system to load and run applications. If the boot system is experiencing problems, users can face various symptoms, such as a black screen, error messages, or a computer stuck in a restart cycle.
The impact of this boot problem is very significant on user productivity. The time lost while fixing this problem can interfere with work and daily activities. Additionally, system instability can lead to losing important data and reducing users‘ trust in their devices.
Understanding the Boot Partition Structure in Windows 11
What is EFI System Partition?
EFI System Partition (ESP) is a special partition used in UEFI (Unified Extensible Firmware Interface) based boot systems. This partition serves as a storage place for the files needed to start the operating system. ESPs are typically around 100MB in size and formatted with the FAT32 file system.
The main function of EFI System Partition is to provide a secure environment for UEFI firmware to find and load the operating system bootloader. When the computer is turned on, the firmware will look for the boot files inside this partition to start the boot process. With ESP, the boot process becomes more structured and secure, reducing the risk of malware infections that can damage the boot system.
Boot Configuration Database (BCD)
Boot Configuration Database (BCD) is a dataset that contains information about Windows boot settings. The BCD stores information regarding the location of the installed operating system, boot parameters, and recovery options. It replaces the boot.ini file used on previous versions of Windows.
BCD plays a crucial role in the boot process by providing instructions to Windows on how to start the operating system. If there is a problem with the BCD, such as corrupted or missing files, the user may have difficulty booting. In such situations, commands such as Bootrec /RebuildBCD can be used to repair or rebuild this database.
Windows 11 Partition Structure
To give you a clear idea of the partition structure on a Windows 11 system, here is a simple diagram:
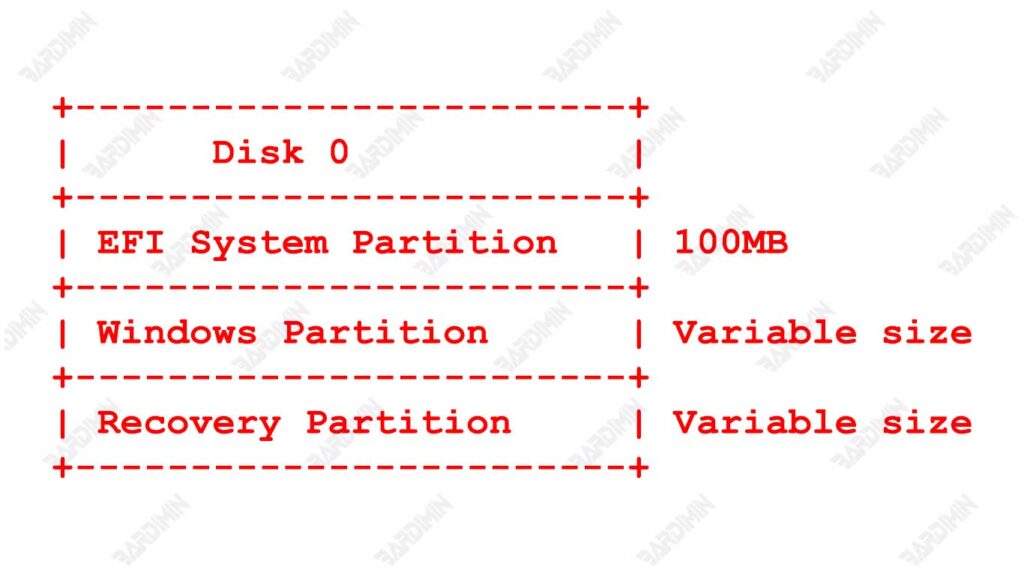
The diagram above shows that on Disk 0 there are three main partitions: EFI System Partition, Windows Partition, and Recovery Partition. This structure helps maintain the security and efficiency of the boot process in Windows 11.
Common Symptoms of Boot Problems in Windows 11
Boot problems in Windows 11 can come in many forms, and recognizing these symptoms is the first step to making the right fix. Here is a list of common symptoms that indicate a problem with the boot process:
1. Black Screen at Startup
One of the most common symptoms of boot problems is the appearance of a black screen when the computer is turned on. This can happen after the Windows logo appears, and the user cannot proceed to the desktop. This black screen is often accompanied by an unclickable cursor, indicating that the system is unable to complete the boot process.
2. BCD Error Message Not Found
An error message stating that Boot Configuration Database (BCD) is not found is a clear sign that there is a problem with the Windows boot settings. BCD serves to store important information about the installed operating system and how to get started. The user will have difficulty starting the system when the BCD is lost or corrupted.
3. Computer Stuck in Restart Loop
Another symptom is a computer that is stuck in a restart cycle without ever successfully booting into the operating system. In this situation, the computer will try to start but then shut down and try to start again repeatedly. This could be caused by corruption in system files or incorrect boot configuration.
Preparation Before Fixing Boot Problems
Before making any repairs to boot issues in Windows 11, it is important to perform a few preparatory steps. This will help ensure that the repair process runs smoothly and reduce the risk of data loss.
Back up important data
Before making repairs, the first step to take is to back up important data. The repair process can potentially lead to data loss, especially if there is any damage to the partition or system files. By having a backup, users can restore important files in case something goes wrong during the repair process.
Backups can be done using a variety of methods, such as:
- Use a cloud service (such as Google Drive or OneDrive).
- Stores data on an external hard drive.
- Use backup software to create a system image.
Using a USB Recovery Drive
After performing the backup, the next step is to create and use a USB Recovery Drive. USB Recovery Drive is a very useful tool for recovering your system when you encounter boot problems.
How to Make a USB Recovery Drive
- Make sure you have a USB flash drive with a capacity of at least 32GB. All data inside the USB will be erased, so be sure to back up important data first.
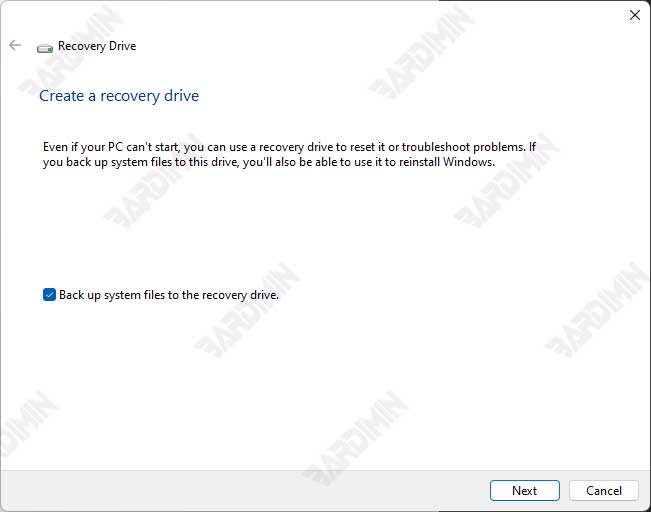
- Click on the Search icon (Search) on the taskbar or press the Windows key on your keyboard, then type “create a recovery drive” and select the appropriate search result.
- If the User Account Control window appears, click Yes to continue.
- In the Recovery Drive window, make sure to check the option Back up system files to the recovery drive if you want to include system files. Then click Next.
- Windows will search for the connected USB flash drive. Select the USB drive you want to use as a recovery drive and click Next.
- You will be notified that all data on the USB drive will be erased. Click Create to start the Recovery Drive creation process.
- This process may take a few minutes to an hour depending on the speed of the USB and the size of the data being backed up. When you’re done, you’ll see a message that the Recovery Drive has been successfully created.
- Store the USB Recovery Drive in a safe place, so that it can be used to restore the system in case of future problems.
How to Use a USB Recovery Drive for Recovery
- Plug the USB Recovery Drive into the problematic computer.
- When the computer is turned on, press the appropriate key (usually F2, F12, or ESC) to enter the boot menu.
- Select the USB Recovery Drive from the list of boot devices.
- After booting from the USB, select the appropriate recovery option to fix the boot issue, such as using the Command Prompt to run the restore command.
Steps to Fix Boot Problems
To fix boot issues in Windows 11, you need to access Recovery Console. Here are the steps:
- Plug the USB Recovery Drive into the problematic computer.
- When the computer is turned on, press the appropriate key (usually F2, F12, or ESC) to enter the boot menu.
- Select the USB Recovery Drive from the list of boot devices.
- After booting from USB, you will enter the Windows recovery environment. Select the appropriate recovery option to fix the boot issue, such as using the Command Prompt to run the restore command.
Once you’re in the Recovery Console, you can use some basic commands to repair the Boot Configuration Database (BCD):
- Bootrec /RebuildBCD: This command rebuilds the BCD database by scanning the drive for valid Windows installations. You will be prompted to add the found Windows installation, press “Y” to continue.
- Bootrec /FixMBR: This command creates a new Master Boot Record for the disk and should be used if the MBR file is corrupted.
- Bootrec /FixBoot: This command writes a new boot sector to the disk and should be used if the disk boot sector is corrupted.
- Bootrec /ScanOS: This command can be used if your Windows 11 installation is not found. This command searches for the installation of the operating system and reports what it finds.
Here is an example command to rebuild a BCD:
Bootrec /RebuildBCDThis command will scan the drive for valid Windows 11 installations and rebuild the BCD database based on those findings.
Troubleshooting EFI and BCD Partition Issues
Fix EFI System Partition
If you are facing issues with EFI System Partition, such as corrupted or missing boot files, you can follow these steps to fix them:
- Use a USB Recovery Drive or Windows installation media to boot into the Recovery Console.
- From the Troubleshoot menu, select Advanced options, then select Command Prompt.
- Type diskpart and press Enter to open the disk management tool.
- Type list disk to see all connected disks. Make a note of the disk number that contains the Windows installation (usually Disk 0).
- Type select disk 0 (replace 0 with the corresponding disk number if different).
- Type list volume to see a list of all partitions on the selected disk. Look for a partition formatted with FAT32, usually, this is an EFI partition.
- Type select volume=X (replace X with the volume number of the EFI partition).
- Type assign letter=F to assign a temporary drive letter to the EFI partition.
- Type exit to exit the diskpart.
- Type F: to move to the drive you just assigned.
- Then type cd \EFI\Microsoft\Boot\ to access the boot folder.
- Type ren BCD BCD.old to rename an existing BCD file, so you have a backup in case you need it.
- Type bootrec /RebuildBCD to rebuild the boot configuration database. If any Windows installations are found, press Y to add them.
- Repeat steps 4-6, but this time type remove letter=F to remove the drive letter from the EFI partition.
Using Diskpart to Manage Partitions
Diskpart is a very useful tool for managing disks and partitions in Windows. Here’s an example of using the Diskpart command:
diskpart
list disk
select disk 0
The above commands will do the following:
- Open Diskpart.
- Displays a list of all disks connected to the computer.
- Select disk 0 (replace it with the corresponding disk number if different).
Using Diskpart, you can perform various operations on partitions, including fixing issues with EFI System Partition and Boot Configuration Database (BCD) in Windows 11.
Conclusion
The discussion on how to fix boot problems in Windows 11 includes the important steps that must be followed to resolve issues with EFI System Partition and Boot Configuration Database (BCD). These steps include access to the Recovery Console, the use of commands such as Bootrec /RebuildBCD, and partition management using Diskpart.
To prevent future boot issues, it is recommended to regularly back up your data, update your system regularly, use a reliable antivirus, and monitor the health of your hard drive. By following these repair steps and recommendations, users can keep their Windows 11 system in good working order and reduce the risk of possible boot issues.