Disabling Bing search in Windows 11 Start Menu isn’t just about speed. It’s about privacy and system efficiency. By turning off this feature, you prevent Windows from sending search queries to Microsoft servers, save bandwidth, and speed up local search results on your PC.
Since the major Windows 11 24H2 update, Bing Search integration in the Start Menu has become even stronger. This feature automatically connects your local searches with web results from Bing. For professional users, technicians, or gamers, this is often considered disruptive and inefficient, especially when you only want to find files or applications on your local device.
By default, when you type something in the Start Menu search box, Windows will display results from applications, documents, settings, and also from the web using Bing. These online results are typically marked with a “Search the web” arrow icon. While it seems practical, this search means every keyword you type is sent to Microsoft servers.
From a privacy and performance perspective, this feature can be an additional burden. Microsoft uses Bing Search as part of its advertising and content personalization ecosystem. If you don’t want your search activity sent to the cloud, disabling Bing integration is a recommended step.
Technical Note: In corporate or enterprise network environments, IT administrators often disable Bing Search through Group Policy or Registry to ensure compliance with internal data policies.
Why You Should Disable Bing in Windows 11
- Better privacy protection – No local search data is sent to Microsoft servers.
- Faster search response – Reduces latency because the system no longer waits for web results.
- Reduces RAM and CPU usage – Background Bing Search processes will stop.
- Full system control – You control the search sources, not Bing’s algorithm.
How to Disable Bing Search in Windows 11
There are three effective methods to disable Bing Search integration in Windows 11, depending on your preference and level of control desired.
1. Disable Bing Through Settings
This method is the fastest and safest for general and professional users. However, this setting only partially disables Cloud content search functions.
- Open Settings by pressing the (Win + I) keys.
- Go to the Privacy & security → Search permissions menu.
- In the Cloud content search section, slide the toggle to the Off position for both Microsoft account and Work or School account.
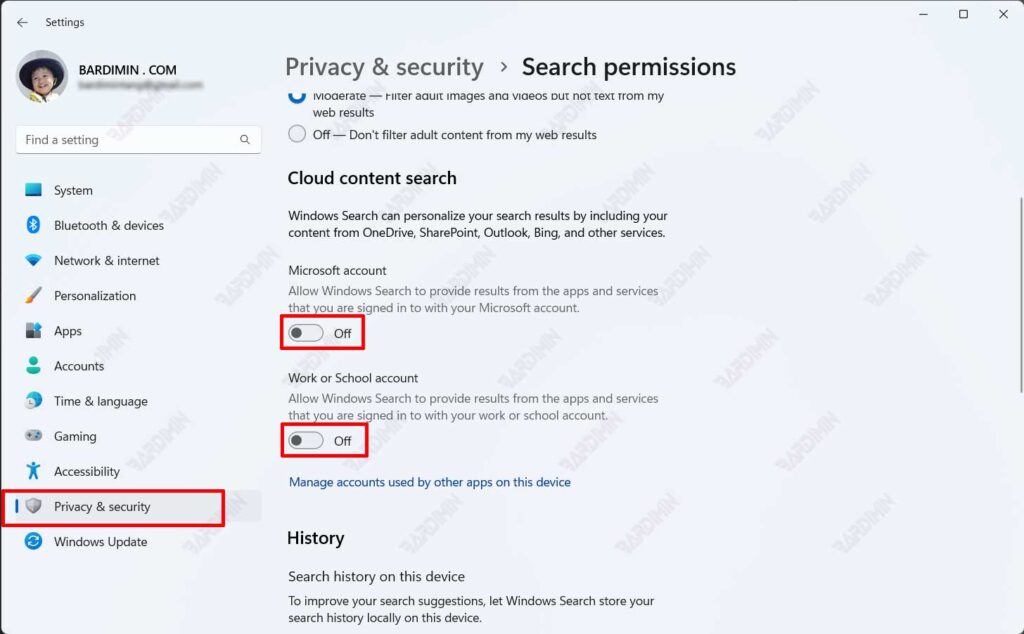
Note: This method doesn’t completely disable Bing. To completely block web results, use the following two advanced methods.
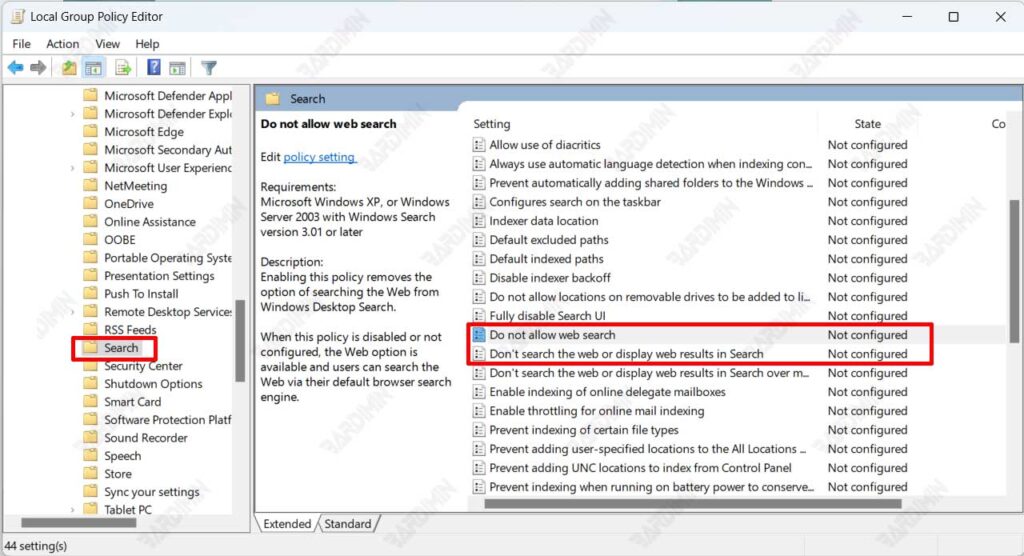
2. Disable Bing Through Group Policy Editor
This method is suitable for IT administrators or users of Windows 11 Pro and Enterprise editions. With this policy, you force the system to not display web results at all.
- Open the Run dialog box with the (Win + R) keys.
- Type gpedit.msc then press Enter.
- Navigate to Computer Configuration → Administrative Templates → Windows Components → Search.
- Find and double-click the following two policies:
- Do not allow web search
- Don’t search the web or display web results in Search
- Change the status of both to Enabled, then click Apply and OK.
After applying the policies, restart your computer to ensure the changes are fully active.
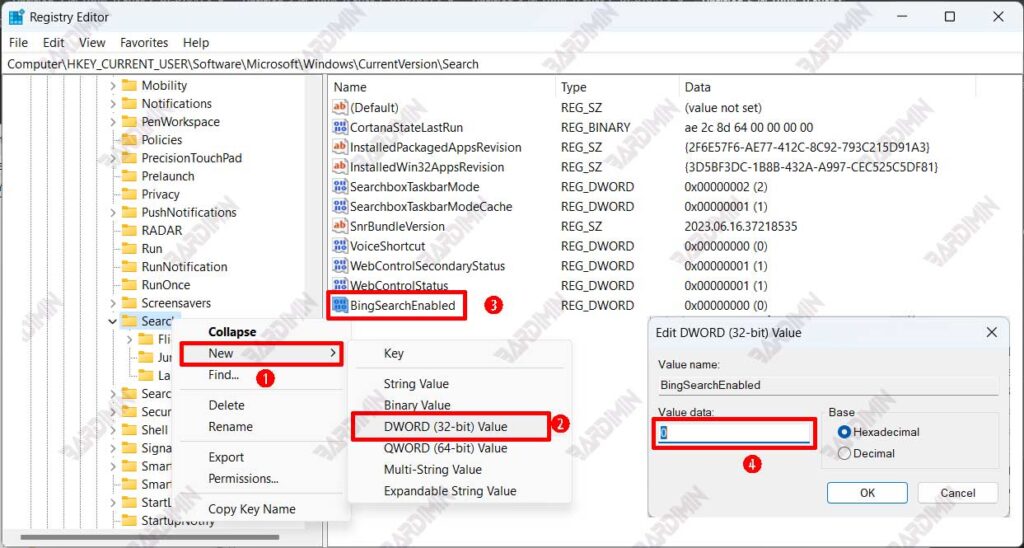
3. Disable Bing Through Registry Editor
If you’re using Windows 11 Home, the Group Policy Editor option isn’t available by default. As an alternative, you can manually disable Bing through Registry Editor.
- Open the Run dialog (Win + R).
- Type regedit and press Enter.
- Navigate to the following location:
Computer\HKEY_CURRENT_USER\Software\Microsoft\Windows\CurrentVersion\Search - Right-click the Search folder then select New → DWORD (32-bit) Value.
- Name it: BingSearchEnabled.
- Double-click it and change the value to 0.
- Close Registry and restart your computer.
After the system reloads, the Start Menu will no longer show the Search the web option. If you want to re-enable it, simply delete the BingSearchEnabled value.
Conclusion
Disabling Bing Search in Windows 11 is a smart move for those who prioritize speed, privacy, and system efficiency. With the methods above, you can adjust the level of control according to your needs, from simple settings in Settings to advanced configurations in Group Policy or Registry.
For professional users, this configuration also improves stability and security in work environments, especially on systems with sensitive data policies or closed networks.