Network security is important, especially for Windows 11 users who frequently connect to Public Networks such as Wi-Fi in cafes, airports, or hotels. Public networks are typically less secure, making them vulnerable to cyberattacks. One of the biggest risks is exposed Inbound Connections, which allow other devices in the network to access your system without permission.
Without proper settings, Inbound Connections can be an opening for hackers to steal data, spread malware, or take over your device. Some common threats on public networks include Man-in-the-Middle (MitM) attacks, sniffing data, and ransomware attacks. This risk is even greater if the security features in Windows 11 are not enabled.
One effective way to protect your device is to block Inbound Connections when using Public Networks. This feature prevents unwanted incoming connections, significantly reducing the risk of cyberattacks.
What are Inbound Connections in Windows 11?
An inbound connection goes to a Windows 11 device from the outside, such as when another device tries to access a file, printer, or service on your computer. In Windows 11, these connections are set up through Windows Defender Firewall and other network settings, which allow or block incoming access.
The main difference between Inbound and Outbound Connections is the direction of the connection. Inbound Connections come from outside your device, while Outbound Connections are connections you make to the outside, such as when visiting a website. Security settings in Windows 11 should prioritize Inbound Connections, especially in vulnerable networks.
Restricting Inbound Connections in Public Networks is essential to prevent unauthorized access. Public networks, such as Wi-Fi in public places, are vulnerable to cyberattacks such as man-in-the-middle attacks and data theft. By strictly regulating Inbound Connections, you can protect your devices and personal data from cyber threats.
How to Block All Inbound Connections for Public Networks in Windows 11
Blocking incoming connections on public networks in Windows 11 is essential to keeping your device secure.
Windows Defender Firewall is a built-in tool in Windows 11 that allows you to set up incoming and outgoing connections. Here are the steps:
Steps to Access Windows Defender Firewall:
- Press the keyboard keys Windows + S, type Control Panel, then open the app.
- In the Control Panel, search for and click Windows Defender Firewall.
- On the left side, click Advanced Settings to access more settings.
Creating New Rules to Block All Incoming Connections on Public Networks:
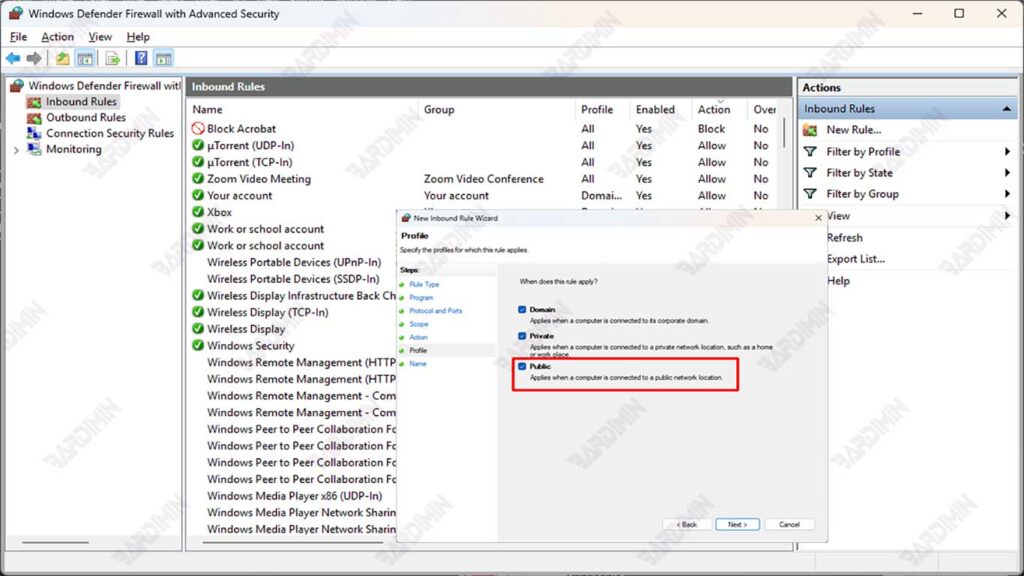
- In the Windows Defender Firewall with Advanced Security window, select Inbound Rules in the left pane.
- Click New Rule in the right panel.
- Select Custom and click Next.
- In Profile, make sure to select Public as the network profile to be applied.
- In the Action, select Block the connection.
- Follow the next steps, give the rule a name (for example, “Block All Public Login Connections”), and click Finish.
Once you’ve created a rule, make sure it’s active by checking the Inbound Rules list. To test this, try accessing your device from another device connected to the same network. If successful, the connection will be rejected.
Creating New Rules to Block Certain Inbound Connections on Windows 11 Public Networks
You can create custom rules to block specific incoming connections based on apps, ports, or IP addresses, in addition to blocking all Inbound Connections. It gives you more control in setting up network security on a Public Network without having to disconnect all incoming connections.
Steps to Create a New Rule in Windows Defender Firewall:
- Open Windows Defender Firewall Advanced Settings as in the previous method.
- Create a new rule in Inbound Rules. Select Inbound Rules in the left pane and then click New Rule…. in the right pane.
- Select the Type of Rule to Create:
- Program: To block incoming connections based on specific apps.
- Port: To block incoming connections based on a specific port number.
- Predefined: To block certain Windows services, such as File and Printer Sharing.
- Custom: To block connections based on a combination of protocols, IPs, and other rules.
Example 1: Blocking Certain Apps on Public Networks
- Select Program, then click Next.
- Select This program path, then click Browse…. to select the app you want to block.
- Click Next, then select Block the connection.
- In the Profile, check Only Public, then click Next.
- Give the rule a name, for example, Block Apps on Public Network, then click Finish.
Example 2: Blocking Certain Ports on a Public Network
- Select Port, then click Next.
- Select TCP or UDP as needed.
- Enter the port number you want to block, e.g. 445 for File Sharing.
- Click Next, then select Block the connection.
- In the Profile, check Only Public, then click Next.
- Give the rule a name, for example, Block Port 445 on Public Networks, and then click Finish.
Example 3: Blocking Specific IP Addresses on Public Networks
- Select Custom, then click Next.
- In the Scope, enter the IP address of the source you want to block.
- Click Next, then select Block the connection.
- In the Profile, check Only Public, then click Next.
- Give the rule a name, for example, Block Specific IPs on Public Networks, and then click Finish.