Do you want to print documents, photos, or other files from your computer without having to connect a cable to the printer? If yes, then you need a network printer, which is a printer that is connected to a local network (LAN) or internet and can be accessed by several devices simultaneously.
With a network printer, you can print from anywhere in your home or office, as long as you are connected to the same network as the printer. You can also print from a mobile device, such as a smartphone or tablet, by using a dedicated app.
To be able to use a network printer, you must first install it on your computer. This process may vary depending on the type and model of printer you’re using, but in general, there are two main ways to install a network printer in Windows 11:
- Use the Add a printer or scanner feature in Settings.
- Use the CD or driver that came with your printer, or download it from the printer manufacturer’s website.
In this article, Bardimin will explain both ways in full and step by step, so you can install a network printer on Windows 11 easily and quickly. We will also provide some tips and tricks to solve problems you may face when installing a network printer.
Preparation Before Installing Network Printer
Before you start installing a network printer, there are a few things you should prepare, namely:
- Network printer. Make sure that your network printer supports the network protocol that corresponds to your device, such as TCP/IP, AppleTalk, or Bonjour. You must also know the IP address and hostname of your network printer. You can find this information in the user manual, printer label, or printer settings menu.
- The device to which the network printer will be connected. The device that will connect to the network printer must have an operating system that is compatible with the printer, such as Windows, Mac OS, Linux, or Android. You should also make sure that your device is connected to the same network as the printer, either via Wi-Fi, Ethernet, or Bluetooth.
- Printer drivers. A printer driver is software that allows your device to communicate with a printer. You must install the printer driver that corresponds to your printer model and operating system. You can download printer drivers from the official website of the printer manufacturer, such as HP, Brother, Canon, or Epson. You can also use the CD that came with the printer, or let your device detect and install printer drivers automatically.
Once you’ve prepared all of the above, you’re ready to install a network printer on your device.
How to Install a Network Printer Using the Add a printer or scanner Feature
The first way to install a network printer in Windows 11 is to use the Add a printer or scanner feature in Settings. This feature will search for available printers on your network, and allow you to add them to your computer with just a few clicks. Here are the steps:
- Make sure your printer is on and connected to the same network as your computer. You can check this by looking at the indicator light on the printer, or by printing a test page from the printer.
- Open the Settings on your computer, by pressing the Windows key on the keyboard, then click the gear icon in the Start menu. You can also press Windows + I simultaneously on the keyboard.
- In the Settings window, click Devices in the left menu, and then click Printers & scanners in the right menu.
- In the Printers & scanners section, click the Add device button below the list of printers already installed on your computer.
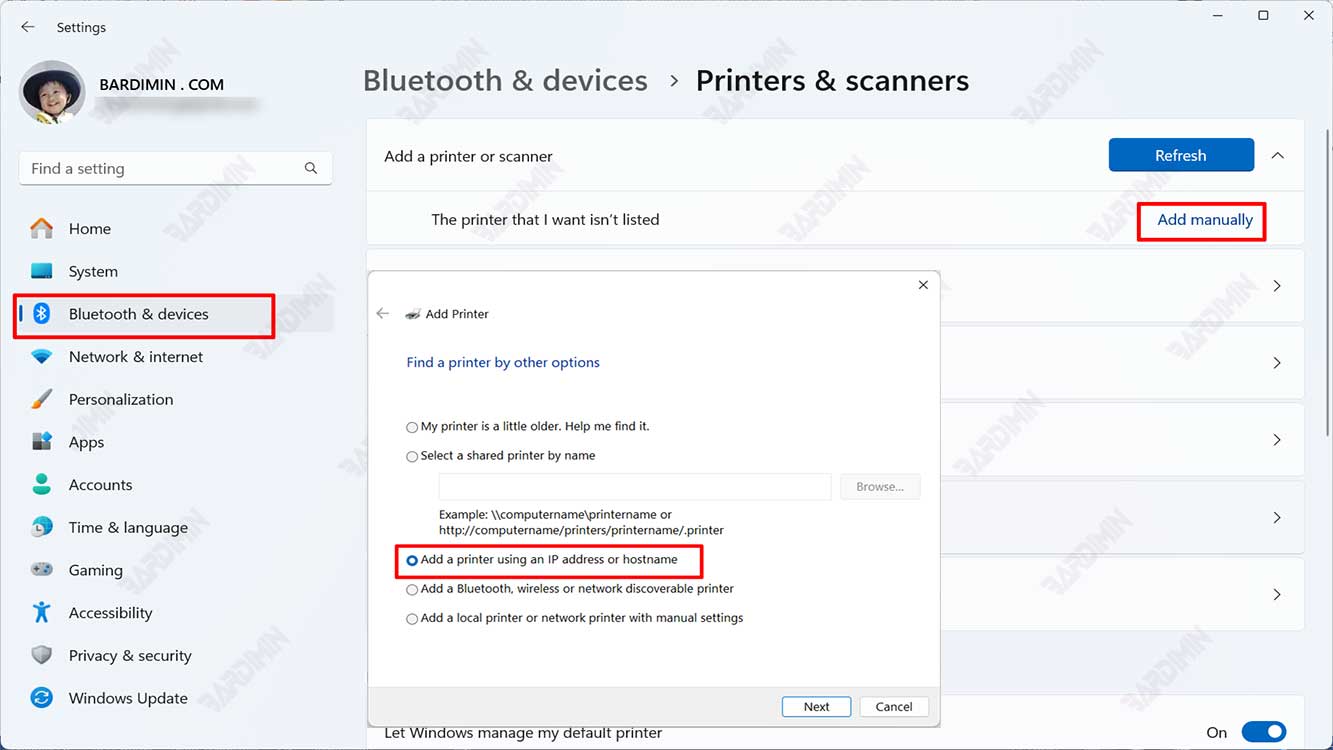
- Wait a few moments, until Windows 11 finds an available printer on your network. If your printer appears in the list, click its name, then follow the onscreen instructions to complete the installation process. If your printer doesn’t appear in the list, click the Add manually button next to The printer that I want isn’t listed, then go to the next step.
- In the Add Printer window, select the option Add a printer using a TCP/IP address or hostname, or Add a local printer or network printer with manual settings, depending on your printer type and model. You can also refer to the instruction manual or printer manufacturer’s website for more information.
- Follow the instructions that appear on the screen to complete the installation process. You may be asked to select a driver that matches your printer or download it from the internet. You may also be asked to name your printer or set your printing preferences.
- After the installation process is complete, click Finish. Now, you can print documents, photos, or other files from your computer to the network printer you just added.
