Windows 11 supports Local Security Authority (LSA) to prevent attackers from gaining unauthorized access to your system.
The Local Security Authority (LSA) is an essential component in the Windows operating system that is responsible for security and authenticity management at the local level. LSAs store important security information such as security policies, user account data, and credentials.
The Local Security Authority Subsystem Service (LSASS) is a Windows process that runs at the system level and is responsible for authenticating users trying to log into the system, managing security tokens, and enforcing security policies. LSASS serves to ensure that authenticated users have proper access rights.
Credential Guard is a security feature introduced by Microsoft in Windows 10 and Windows Server 2016. It is designed to protect credentials by storing them in an isolated environment that cannot be accessed by malware or processes running on the primary system. Using technologies such as Virtualization Based Security (VBS) and Secure Kernel Mode (SKM), Credential Guard helps protect credentials from attacks targeting credential storage.
Kerberos is a network security protocol used by Windows to authenticate users and resources on a secure network. Kerberos works with LSAs to allow or deny access to resources based on valid authentication.
Security Accounts Manager (SAM) is a database that stores local user account information on Windows systems. This includes hashes of user passwords, local security groups, and other security settings. LSAs interact with the SAM to authenticate users and manage local user accounts.
How to Enable or Disable Local Security Authority (LSA) in Windows
1] Enable or Disable Local Group Policy Editor
Making changes to the Local Group Policy Editor may affect your system configuration. Make sure you know exactly what you’re doing and back up important data before editing policy settings.
To enable LSA Protection by using the Local Group Policy Editor in Windows, follow these steps:

- Open the “Local Group Policy Editor”:
- Press (WIN + R) to open the “Run” window.
- Type “gpedit.msc” (without quotes) and press Enter. This will open the Local Group Policy Editor.
- Navigate to LSA Protection Settings:
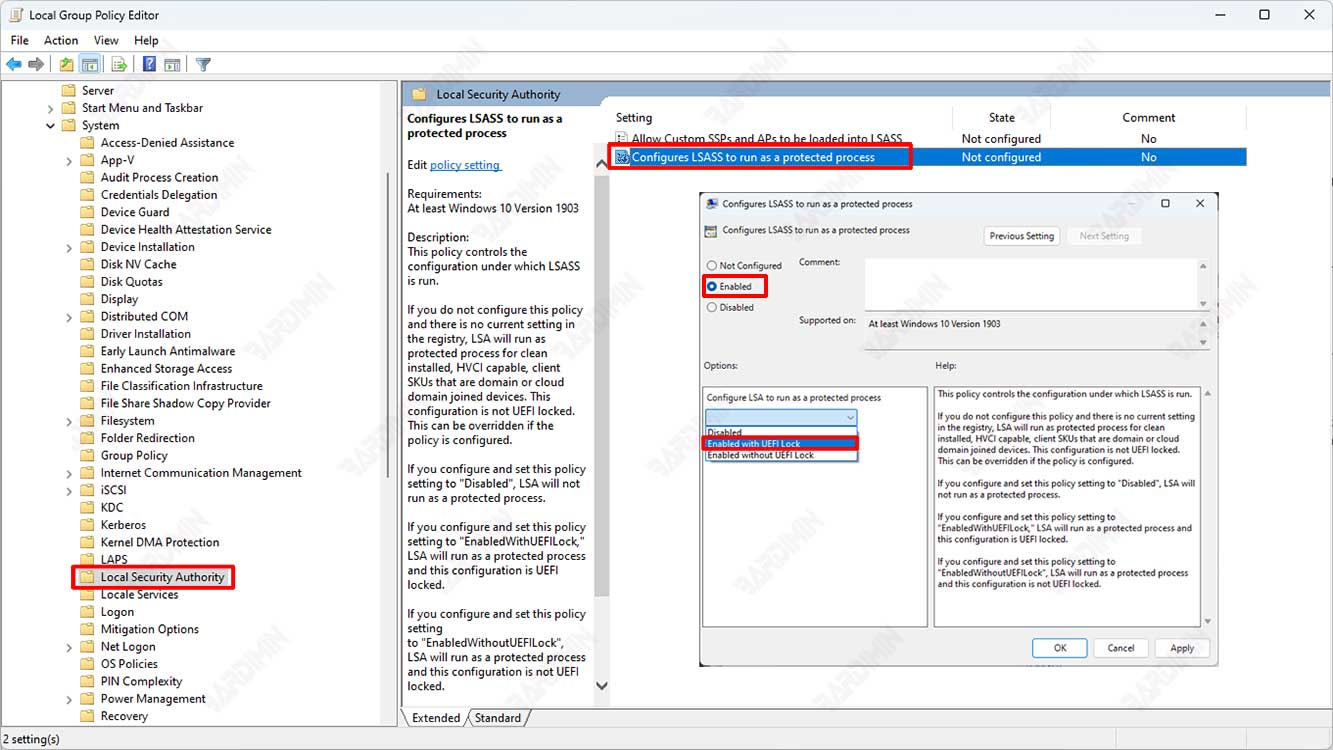
- In the Local Group Policy Editor window, navigate to “Computer Configuration > Administrative Templates > System > Local Security Authority”.
- Enable LSA Protection:
- Look for an entry named “Configure LSASS to run as a protected process”.
- Double-click on the entry to open it.
- Select Settings:
- Select the “Enabled” option to enable LSA Protection.
- Then select the “Enabled with UEFI Lock” option.
- Click “OK” to save changes.
- Restart:
- After you enable LSA Protection, you may need to restart your computer for the changes to take effect.
Once the above steps are followed correctly, LSA Protection will be enabled on your system.
2] Enable or Disable LSA Through the Registry
If you want to enable LSA Protection through Registry Editor in Windows, follow these steps carefully. Keep in mind that editing the registry can have an impact on system stability, so be sure to follow these steps correctly and be sure to back up the registry before proceeding.

- Press (WIN + R) to open the “Run” window.
- Type “regedit” (without quotes) and press Enter. This will open Registry Editor.
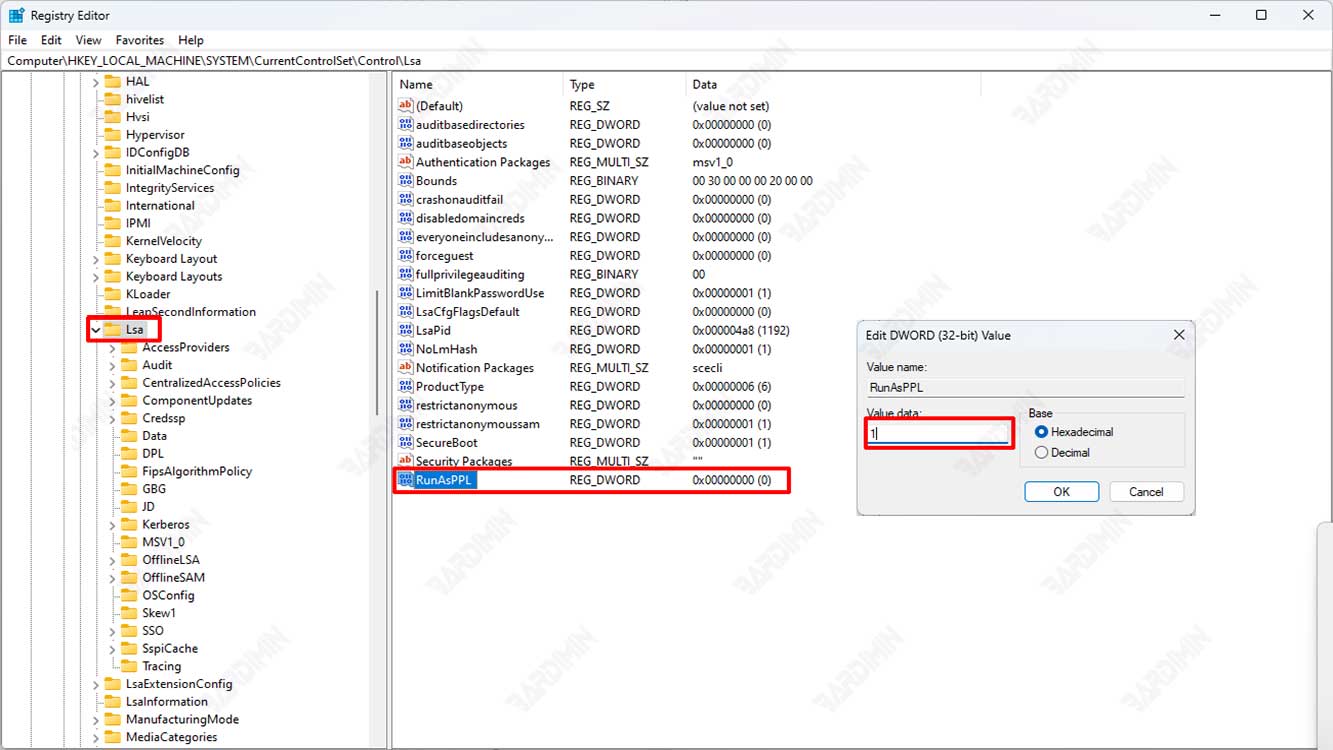
- In Registry Editor, navigate to the following registry key:
HKEY_LOCAL_MACHINE\SYSTEM\CurrentControlSet\Control\Lsa
- On the right side of the Registry Editor window, find the registry value with the name “RunAsPPL”. If this value does not exist, you need to create it.
- To create a new “RunAsPPL” value, right-click in an empty area on the right side of the window, select “New”, and then select “DWORD (32-bit) Value”.
- Name the new DWORD value “RunAsPPL”.
- Double-click on the newly created “RunAsPPL” value and set the value data to 1.
- Click “OK” to save changes.
- Close Registry Editor.


