In everyday life, especially after reinstalling the operating system or deleting a problematic user account, you may be unable to access files, folders, or even entire disks. This issue often arises due to Windows’ Ownership features, which restrict other users’ access for security reasons.
Windows automatically assigns an owner to each file and folder based on the user account that created or manages it. If the account is deleted, or if the files are moved to another device, ownership rights may change or not be recognized by the system. This can lead to error messages such as “Access Denied”, “You need permission to perform this action”, or even not being able to open the file at all.
This problem can certainly interfere with work, especially if the locked file contains important documents or data that cannot be recovered. Therefore, it is important to understand how to change the ownership of files and folders in Windows 11.
What is Ownership in Windows?
Ownership is a security feature in Windows that determines who has full access to files, folders, or disks in the system. This feature aims to protect user data, so that only the original owner or an account with certain permissions can access and modify files.
When a file or folder is created, Windows automatically assigns the user account that created it as the owner. This owner has the full right to:
- Read, edit, or delete files
- Change access permissions for other users
- Determine who can access the file
However, this feature can also be a problem, especially in the following situations:
- After reinstalling Windows, the new account doesn’t have permission to files from the old account.
- When moving data from one device to another, the system may not recognize the old file owner.
- When a file comes from another administrator or network, access can be restricted.
- Certain files or folders owned by System or TrustedInstaller to prevent modifications that could damage the system.
If you’ve lost access to a file that was previously openable, the problem is most likely with Ownership. Fortunately, Windows allows you to change the ownership of files and folders, so you can regain control of that data.
In the next section, we will discuss how to check and change ownership in Windows 11, either through GUI settings, Command Prompt (CMD), or PowerShell.
How to Change Ownership in Windows 11
1. Changing Ownership Manually in Windows
Manually changing the ownership of a file or folder is the most straightforward way to regain access to a locked file. This method uses Graphical User Interface (GUI) Windows, making it suitable for users who are not familiar with the command line.
Steps to Change Ownership in Windows:
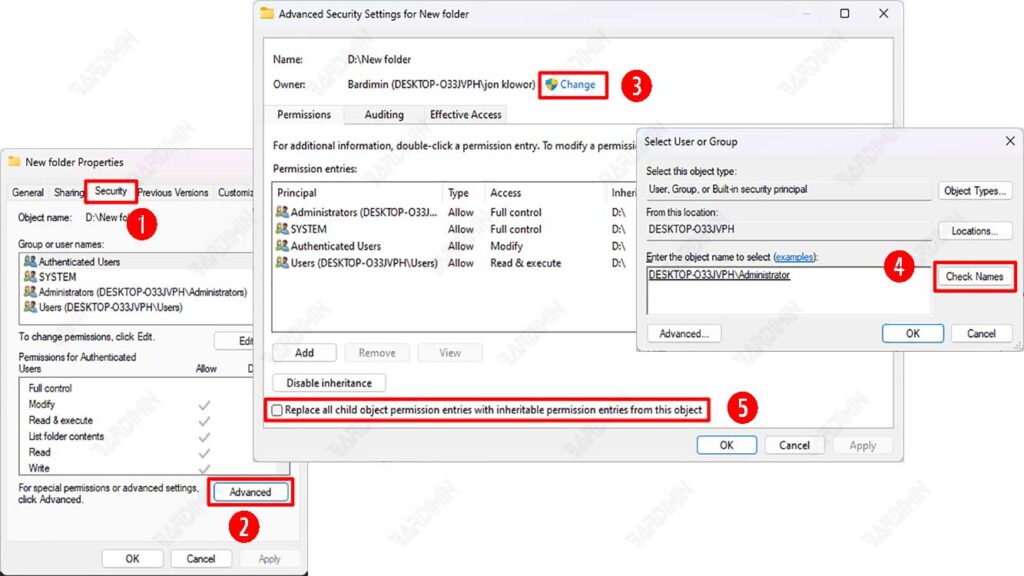
- Right-click the file or folder you want to take ownership of, then select Properties.
- Go to the Security tab, then click the Advanced button.
- At the top of the Advanced Security Settings window, find Owner and click the Change button.
- The Select User or Group window will appear. Click Advanced → Find Now, then select the user account you want to own. You can also type in your username manually, then click OK.
- After selecting an account, click OK until you return to the Advanced Security Settings window.
- (Optional) If you want to apply the changes to all files and subfolders within that folder, check the option Replace all child object permission entries with inheritable permission entries from this object.
- Click Apply, then OK to save your changes.
Make sure that the user account you selected is correct, so that you can still access the file.
If you change the ownership of a system or Windows folder, be careful because it can cause problems with the operating system.
Some files owned by System or TrustedInstaller may still require additional permissions even after they’ve been taken over.
If this method doesn’t work or isn’t flexible enough for your needs, you can use Command Prompt (CMD) or PowerShell, which will be described in the next section.
2. Using Command Prompt (CMD) to Change Ownership
If you’re more comfortable using the command line, then Command Prompt (CMD) is a quick and efficient way to change the ownership of a file or folder. This method is especially useful if you want to change ownership in large quantities or access files that cannot be changed through the GUI method.
Steps to Change Ownership Using CMD:
- Open Command Prompt as Administrator (Run as Administrator).
- Use the following command to take ownership of a file or folder:
takeown /f “C:\Path\To\Folder” /r /d y- takeown: Change the ownership of a file or folder.
- /f “C:\Path\To\Folder”: Specify the location of the file/folder you want to change.
- /r: Apply changes to all subfolders and files in them (recursive).
- /d y: Confirm changes automatically without asking for user input.
- After changing ownership, run the following command to grant full access to the Administrator account:
icacls “C:\Path\To\Folder” /grant Administrators:F /t- icacls: Commands to manage file/folder permissions.
- /grant Administrators:F : Provides full access (Full Control) to the Administrator account.
- /t: Apply changes to all files and subfolders.
3. Using Windows PowerShell to Change Ownership
In addition to CMD, you can also use Windows PowerShell, which is more flexible and often used in system administration automation.
Steps to Change Ownership Using PowerShell:
- Open PowerShell as Administrator (Run as Administrator).
- Run the following command to take ownership of a file or folder:
takeown /f “C:\Path\To\File”This command is similar to CMD, but can be used in more complex automation scripts.
- After becoming the owner of the file, use the following command to grant full access to the Administrator:
icacls “C:\Path\To\File” /grant Administrators:FJust like in CMD, this command gives full access to the Administrator account.
Advantages of PowerShell over CMD:
- It can be used in automation scripts and supports more parameters.
- It can be combined with other PowerShell cmdlets to manage permissions and file ownership in a more advanced way.
- It can be used to change the ownership of files on other computers in the network.
Example PowerShell Script to Change Ownership of Multiple Files at Once:
If you want to take ownership of all the files in a specific folder:
Get-ChildItem “C:\Path\To\Folder” -Recurse | ForEach-Object { takeown /f $_.FullName }- Get-ChildItem -Recurse : Retrieves all files and subfolders inside a folder.
- ForEach-Object { takeown /f $_.FullName } : Taking ownership of each file individually.
Conclusion
Changing the ownership of files and folders in Windows 11 is an effective way to solve the problem of blocked access. The ownership feature in Windows aims to maintain the privacy and security of user data. However, in some circumstances, such as after reinstalling the system or deleting a user’s account, this feature can block access to important files. By understanding how ownership works and following this guide, you can easily regain access to previously locked files or folders.