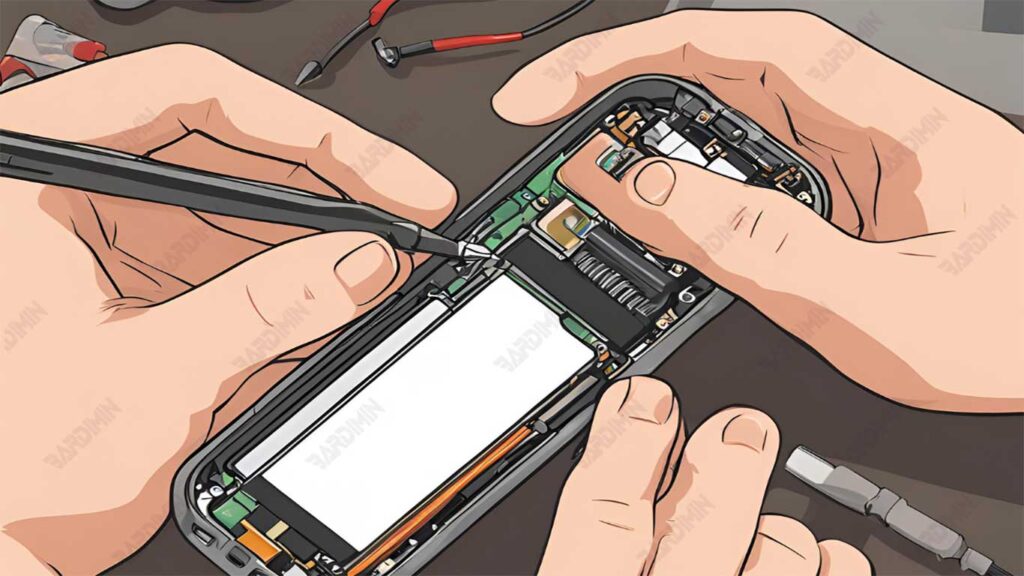
Battery charging problems are one of the things that mobile phone users often experience. The symptoms of this problem can vary, ranging from a battery that doesn’t charge at all, a charging sign that appears but the battery doesn’t increase, to the appearance of the message “Not Charging” or “Bad Connecting Charging” when the charger is connected. Some phones can also get hot while charging.
Battery Charging Problems
Battery charging faults can come in many forms. Some common signs that often occur include:
1. The battery does not charge at all
This is a situation in which the phone does not react when connected to the charger. No charging signs appear on the screen, the lights don’t turn on, and the phone stays off or shows a very low battery percentage. This indicates a serious problem that is blocking the electric current from reaching the battery.
2. There is a charge sign but the battery does not increase
In this condition, the phone indicates that the charging process is in progress. You may see a lightning icon on the battery, a charging animation, or a battery percentage that looks like it’s increasing.
However, after a while, you will realize that the battery percentage does not really go up, or it can even decrease even when the charger is connected. This indicates that despite indications, the battery is not getting any power, or very little power is received.
3. When the charger is plugged in, the message “Not Charging” appears:
When you connect the charger, the mobile phone system displays the message “Not Charging”. This message indicates that the phone has detected a problem with the charger, connection, or internal components that are blocking the charging process. The system intentionally does not allow charging the battery to prevent further damage.
4. When the charger is connected, the message “Bad Connecting Charging” appears:
The message “Bad Connecting Charging” indicates that there is a problem with the quality of the connection between the charger and the phone’s charging port. This problem can be caused by a dirty, loose, rusty, or damaged charger connector. The system detects that the connection is unstable and cannot provide enough power.
5. When the charger is plugged in, the phone gets hot:
This condition occurs when the temperature of the phone increases significantly while charging. This overheating can be caused by a short circuit, faulty components, or efficiency issues in the charging circuit. If not addressed immediately, excessive heat can damage the battery and other internal components.
Solutions to Battery Charging Problems
Here are the steps you can take to solve battery charging problems on your phone, from the easiest to the most complicated:
1. Replace the Charger and Check the Voltage
The simplest first step is to try another charger that works fine. Make sure the charger matches your phone and has the right voltage output.
How to Do:
- Look for another charger with the same or better specifications than the problematic charger.
- Check the label on the charger to make sure the voltage output is in the range of 5 to 7 Volts.
- Connect the new charger to the phone and see if charging is working normally.
2. Clean or Replace the Charger Connector
Dirty or loose charger connectors can interfere with the power flow. Cleaning or repairing the connector can help resolve the charging issue.
How to Do:
- Use a small brush or cotton swab slightly soaked in alcohol to clean the charger connector on your phone. Be careful not to let any liquid get into your phone.
- If the connector is damaged, you need to replace it with a new one.
3. Use 3.6 Volt Zener Diode for False Charging
False Charging is a situation where the phone shows a charge mark (such as a lightning bolt icon on the battery or an increasing percentage), but the battery is not getting a charge, so the battery percentage does not increase, it can even decrease.
This can happen due to a malfunction in the charging circuit that makes the phone incorrectly detect charging.
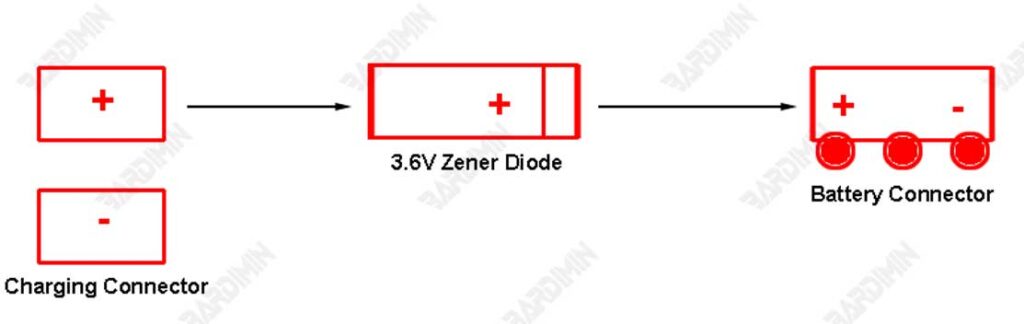
The use of a 3.6 Volt Zener Diode is a way to deliver power directly to the battery, bypassing a problematic charging circuit. A Zener Diode is a special diode that allows an electric current to flow in the opposite direction if the voltage exceeds a certain limit (in this case, 3.6 Volts).
How it Works (Requires Expertise and Scheme):
- You need to find the right point on the phone’s motherboard to do direct charging. This is usually in the diagram scheme of the phone as per your model.
- Connect the Zener Diode 3.6 Volt in series between a power source (such as a charger or external power source) and the phone battery. Make sure the Zener Diode polarity is correct. The Zener Diode’s anode (positive foot) must be connected to a power source, and the cathode (negative leg) must be connected to the positive (+) terminal of the battery.
- The Zener Diode will keep the voltage coming into the battery no more than 3.6 Volts, preventing overcharging and damage to the battery.
This is an advanced method and can damage the phone if not done correctly. It should be done by an experienced technician.
4. Check and Replace the Battery
If the previous steps didn’t work, it may be the battery problem. An old or damaged battery may not be able to receive or store power properly.
How to Do:
- Get a new battery that is original or of good quality according to your phone model.
- Replace the old battery with a new one.
- Try charging your phone and see if the problem is resolved.
5. Check the Voltage of the Battery Connector with a Multimeter
Checking the voltage on the battery connector can help to know if there is a problem with the charging line.
How to Do (Need Tools):
- Use a multimeter set to DC voltage measurement mode.
- Attach the multimeter probe to the positive (+) and negative (-) terminals on the battery connector on the phone’s motherboard.
- Check that the rated voltage is in the range of 1.5 to 3.7 Volts. If the voltage is outside this range or there is none at all, there is a problem with the charging line.
6. Check the Charging Line
If there is no current on the battery connector, there may be disconnected or damaged components in the charging line.
How to Do:
- You need a schematic diagram for your phone model. This scheme shows the charging path and the position of the components.
- Use a multimeter to check the continuity of the charging line and components.
- Find the damaged component and replace it with a new one. It requires special skills and tools.
7. Check the Fuse, Coil, and Regulator
Fuses, coils, and regulators are important components in charging circuits. Damage to any of these components may cause charging problems.
How to Do:
- Use a multimeter to check the fuse. A broken fuse must be replaced.
- Check the coil and regulator to make sure everything is working properly.
- Replace the damaged components with new ones.
8. Warm up or Replace the Charging IC
The Charging IC is the component that regulates the charging process. If the Charging IC is damaged, the phone cannot charge the battery.
How to Do (Requires Advanced Skills):
- Heating the charging IC with a heating device may temporarily fix the poor connection problem.
- Replacing the charging IC with a new one is a more permanent solution.
- This process requires high soldering skills and specialized tools. It should be done by an experienced technician.
9. Heat, Re-ball, or Replace Power IC
The Power IC regulates the power distribution in the mobile phone. Damage to the Power IC can affect various functions, including charging.
How to Do (Requires Advanced Skills):
- Heating the power IC can temporarily fix the problem of poor connection.
- Re-balling is the process of replacing the lead ball on the IC to ensure a good connection.
- Replacing the power IC with a new one is a more permanent solution.
- This process requires high soldering skills, specialized tools, and an understanding of mobile phone schemes. It should be done by an experienced technician.
Repairing the inside of a phone requires technical expertise, the right tools, and knowledge of phone diagrams. If you are in doubt or inexperienced, it is best to leave the repair to an experienced technician.
Doing repairs yourself may result in your phone’s warranty becoming invalid. Be sure to always exercise caution and follow the correct safety precautions when using electronic equipment.