You’re preparing for an important presentation, but the screen suddenly freezes because you must quickly open the browser to check the data. Or maybe you’re frustrated that you can’t see the notes while showing the slides to the audience? PowerPoint’s full-screen mode is practical, but it limits the flexibility of professional presentations!
72% of presenters admit to having trouble multitasking when PowerPoint is in full screen. The solution is simple: display the slides in windowed mode. With this feature, you can:
- Open other apps without minimizing presentations
- View speaker notes while displaying slides
- Easier screencast for webinars or live demos
This article will unpack the powerful method of enabling window mode in PowerPoint. Plus, a troubleshooting solution if the feature doesn’t appear in your version!
Window Mode vs Full Screen: Which Is Superior?
When you present using Microsoft PowerPoint, you have two main viewing options: Full Screen mode and Windowed Mode. Each has its advantages and limitations, depending on the needs and context of its use.
To help you understand the differences practically, here is a comparison table of the features of the two:
| Feature | Window Mode | Full Screen |
| Multitasking | Can open other apps freely | Limited to only slide views |
| Dual Monitor Support | Freely adjust the position of the window on any screen | Must use Presenter View |
| Compatibility | Only available on the PowerPoint desktop | Supported in all versions of PowerPoint |
Use windowed mode in the following situations for optimal results:
- Webinars and live streams that require dual views, such as speaker faces + slides.
- Technical presentations or software demos, so you can still open other applications without stopping the presentation.
- Teach online, so you can monitor notes, participant chats, or reference additional materials at the same time.
Steps to Display PowerPoint Slides in Window Mode
For those of you who want to present a PowerPoint presentation without locking the screen completely, the windowed slide show feature can be enabled directly from the presentation settings. This feature allows slideshows to appear in a separate window instead of in full-screen mode, so you can still freely access other apps while the presentation is taking place.
The following is a step-by-step guide for Windows users:
- Open your presentation file in the Microsoft PowerPoint app (desktop version).
- Click the Slide Show tab at the top of the menu.
- Select the menu Set Up Slide Show.
- In the Set Up Show window, find the Show type section, and then select an option:
Browsed by an individual (window)
(Meaning: the impression will be displayed in a window instead of the full screen)
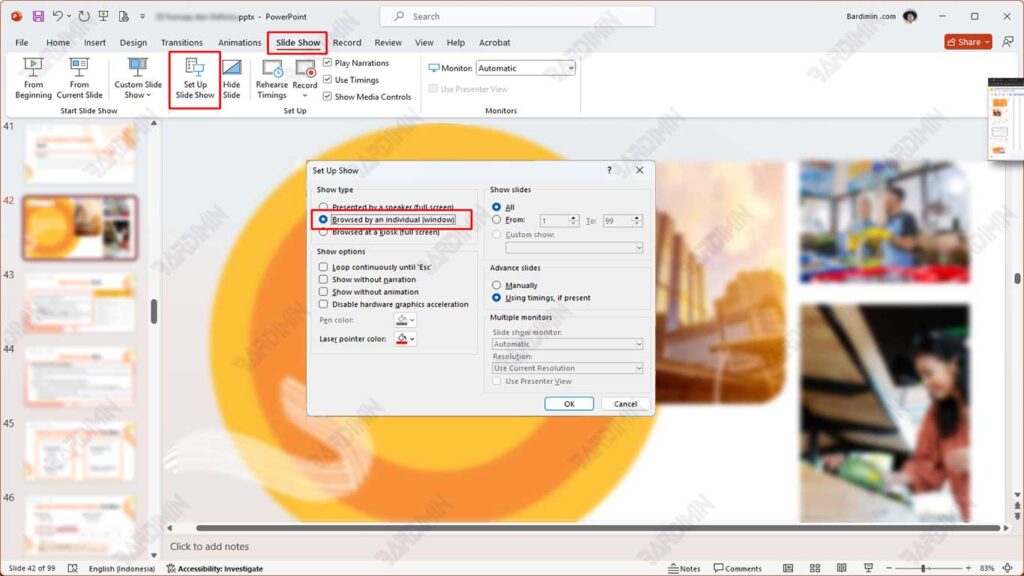
- Click the OK button to save the settings.
- Press the F5 key on your keyboard to start the presentation.
Now, the slides will appear in a window that can be manually resized and positioned.
Slide Window Size and Position Customization
Once you’ve successfully enabled windowed mode in PowerPoint, the next step is to optimize the appearance of the presentation window to suit your needs. The goal is to keep your presentation comfortable to look at while still allowing you to easily access other apps.
How to Manually Set Window Size
- Once window mode is on, you’ll see the slides go live in a regular PowerPoint window.
- Hover over the corner of the presentation window, then click and drag to resize as desired.
- To move the position of the window, click the top (title bar) and drag it to the area of the screen you want, for example, to the second screen if you are using a dual monitor setup.
These tips are especially useful if you want to split your screen between PowerPoint and other apps like browsers, notes, or video chat.
Use Alt+Tab for Efficient Multitasking
When you’re presenting in windowed mode, you can easily move to another app using the combination of Alt + Tab keys.
Usage example:
- Open the reference document in Microsoft Word.
- Check participant questions on the Zoom or Google Meet application.
- Run a live demo of the app while still displaying slides on the screen.
This combination of buttons is very beneficial for keeping the flow of your presentation, especially when you need to respond to your audience in real-time.
Tips for Maintaining Performance When Opening Multiple Apps
To keep the system stable and the impression not lagging, pay attention to the following:
- Close any applications that are not needed during the presentation.
- Use a laptop or computer with at least 8 GB of RAM for optimal multitasking performance.
- Make sure no heavy processes are running in the background, such as video rendering or automatic updates.
Enable “Do Not Disturb” mode to avoid intrusive notifications during presentations.
Solutions for Certain Versions of PowerPoint That Don’t Provide This Option
While the windowed mode feature is available by default on most desktop versions of Microsoft PowerPoint, not all platforms support this option. Users of PowerPoint Online or devices with the macOS operating system may not find the feature directly. However, that doesn’t mean you can’t display presentations in a flexible window.
Alternatives for PowerPoint Online Users
If you’re using PowerPoint Online through a browser like Google Chrome or Microsoft Edge, window mode isn’t available natively. However, you can still get around it in the following ways:
- Run the presentation as usual in the browser.
- Once the slide is displayed, click the Pop-out icon (if available) to split the window.
- Alternatively, right-click on the browser tab > “Move tab to new window”, so you can view the slides in a separate window.
- Use the F11 button to enter and exit the browser’s full-screen mode when needed.
Tips for macOS Users
On Mac devices, the Set Up Slide Show view with the option “Browsed by an individual (window)” isn’t always available in certain versions of PowerPoint. To overcome these limitations, here are the alternatives:
1. Use Dual Monitor Setup:
- Enable Presenter View in PowerPoint.
- Point the slideshow to the external screen, while you can still see the notes and controls on the main screen.
2. Use QuickTime Player or Keynote as a Support:
- Export the presentation to a video or use Keynote to rotate the slides in a window if supported.
3. Use Virtual Display Apps (Optional):
- Apps like Display Menu or Duet Display can help create additional virtual screens for more flexibility.
Use OBS Studio or a Third-Party App to Capture the Presentation Window
If you need to display PowerPoint slides in a window for video recording, live streaming, or webinar needs, then a professional solution is to use screen recording software such as:
OBS Studio (Open Broadcaster Software):
- Use the Window Capture feature to select a specific PowerPoint window.
- Make sure that presentation mode is enabled, then set the layout of the show in OBS freely.
Camtasia, XSplit, or Streamlabs can also be used to capture the view of presentations in window format.