Have you ever been annoyed that the Windows Start Menu suddenly falls apart? App icons are missing, tiles are changing, or settings you’ve tidied up again for no reason? Many Windows users, both beginners and experts, have encountered this issue, particularly in a work environment or on a shared computer.
Windows doesn’t, by default, lock the Start Menu layout. This means that anyone, or even a system update, can change the layout without your knowledge. But don’t worry, in this article, you’ll learn how to lock the Start Menu Layout in Windows 11 with methods that are rarely discussed, ranging from Group Policy, Registry Editor, to PowerShell.
If you’re an IT admin, locking the Start Menu can prevent employees from shuffling important settings. If you are a home user, this will maintain productivity and convenience. This trick is also useful for fixing the Start Menu issue that often resets after Windows updates.
Method 1: Start Menu Key Using Group Policy Editor (Windows Pro/Enterprise Only)
“If you’re using the Pro/Enterprise version of Windows, you have a secret weapon called the Group Policy Editor!”
This built-in Windows feature is super powerful for controlling various system settings, including securing the Start Menu layout from unwanted changes.
Steps to Lock the Start Menu via Group Policy
Here’s how to activate Start Menu Lock with Group Policy Editor:
1. Open the Group Policy Editor
- Press Win + R to open the Run
- Type gpedit.msc and then press Enter
- (If UAC appears, click Yes to grant admin permission)
2. Navigate to Settings Location
In the Group Policy window, navigate to the following paths:
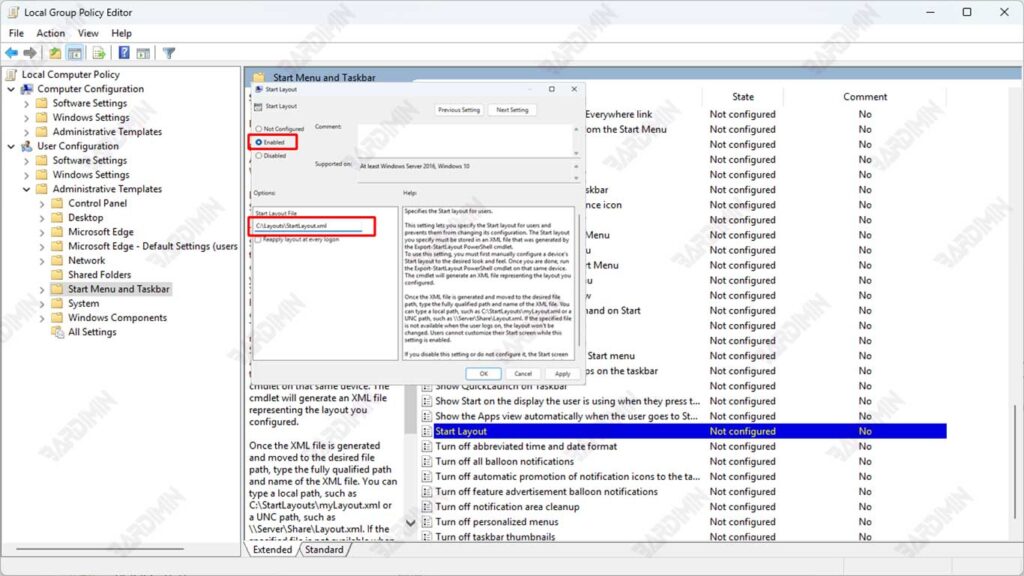
User Configuration > Administrative Templates > Start Menu and Taskbar3. Enable the “Start Layout” Setting
- Look for a policy named “Start Layout” in the right pane.
- Double-click on the option to open the settings window.
- Select Enabled to enable this policy.
4. Determine the Location of the XML Layout File
In the fields provided, enter the full path of the XML layout file that you created or exported earlier.
Example:
C:\Layouts\StartLayout.xmlThis XML file must contain the desired Start Menu layout configuration. You can create it by using the following PowerShell command:
Export-StartLayout -Path “C:\Layouts\StartLayout.xml”The XML file will store all the app shortcuts that you’ve arranged in the Start Menu.
5. Restart the Computer
- New changes will be active after the restart
- (Tip: Use the shutdown /r /t 0 command in CMD for a quick restart!)
Method 2: How to Lock Start Menu with Registry Editor (Applicable to All Windows Versions)
Not all Windows users have access to Group Policy Editor features, especially Windows 11 Home Edition users. However, that doesn’t mean you can’t lock the Start Menu layout. Microsoft provides an alternative way that can be used by all Windows users, namely through the Registry Editor.
Steps to Lock Start Menu via Registry Editor
The following is a complete and systematic guide to locking the Start Menu using Registry Editor:
1. Open the Registry Editor
- Press Windows + R to open the Run dialog.
- Type regedit, then press Enter.
- If you see a warning from User Account Control (UAC), click Yes to continue.
2. Navigate to the Following Registry Path
Log in to the following path in the Registry Editor:
HKEY_CURRENT_USER\Software\Microsoft\Windows\CurrentVersion\Policies\ExplorerIf the Explorer folder doesn’t already exist in the Policies directory, you can create one manually:
Right-click on the Policies folder
- Select New > Key
- Name: Explorer
3. Create a New Value: LockedStartLayout
- Right-click on the right-hand panel.
- Select New > DWORD (32-bit) Value
- Name it LockedStartLayout (without spaces).
4. Set the LockedStartLayout Value
- Double-click on LockedStartLayout.
- Change Value data to 1.
- Click OK to save the changes.
5. Restart the Computer
Method 3: Lock the Start Menu via PowerShell (For Advanced Users)
For those of you who are used to working with the command line or managing systems through automation scripts, PowerShell is a very powerful and flexible tool. One of its uses is to make direct and efficient system configuration modifications, including locking the Start Menu layout without the need to manually open the Registry Editor.
Steps to Lock Start Menu with PowerShell
The following is an easy and quick way to lock the Start Menu using PowerShell in Administrator mode:
1. Open PowerShell as Administrator
- Click Start Menu, type powershell.
- Right-click on Windows PowerShell, then select Run as administrator.
- If you see a notification from User Account Control (UAC), click Yes to continue.
2. Run the following command
Enter the following PowerShell command directly into the terminal:
New-ItemProperty -Path “HKCU:\Software\Microsoft\Windows\CurrentVersion\Policies\Explorer” -Name “LockedStartLayout” -Value 1 -PropertyType DWORD -ForceBrief explanation of the command:
- New-ItemProperty: Creates or updates a value in the registry.
- -Path: Indicates the location of the key registry.
- -Name: The name of the property that was added, i.e., LockedStartLayout.
- -Value 1: Value 1 means enabling lockout.
- -PropertyType DWORD: The type of data used.
- -Force: Force value creation even though it exists before.
3. Restart explorer.exe or System
For the changes to be implemented effectively, you need to do one of two things:
- Restart Explorer only (faster):
- Or restart your computer for definitive results.
Start Menu Locking Effect: What’s Changed?
“Locking the Start Menu doesn’t mean freezing everything! It’s the boundaries and flexibility that you still have.”
When you enable Start Menu locking through any method (Group Policy, Registry, or PowerShell), there is a change in system behavior that you need to understand in detail:
Blocked Activity
Here are the things that users can’t do after the Start Menu is locked:
1. Tile Modification/Application Display
- Add a new tile to the Start Menu
- Delete an existing tile
- Resize tiles (small/medium/wide/large)
- Moving tile/group positions
2. Changes in Group Structure
- Create a new app group
- Delete an existing group
- Change the group name
- Move apps between groups
3. Pinned Apps Manipulation
- Unpin the app from the Start Menu
- Change the order in which the pinned apps are on the left
Activities That Can Still Be Done
Even if it’s locked, some of these flexibilities are still available:
1. Basic Display Customization
- Change the width of the Start Menu (2 columns/3 columns)
- Adjust transparency and color through Settings
- Enable/disable full-screen display
2. Interaction with Applications
- Open an existing app in the Start Menu
- Search from the Start Menu
- Access All Apps list
- Click the power/user button
3. Other System Changes
- Install/uninstall new apps (tiles will automatically appear/disappear according to the lock policy)
- Receive Windows updates that may modify built-in icons