Method 2: Using the Group Policy Editor (for Pro/Enterprise)
This feature is only available for Windows 11 Pro and Enterprise. If you’re using the Home version, see the alternatives at the end of the article.
Step 1: Open the Group Policy Editor
- Press Win + R (Windows key + R together)
- Type gpedit.msc and press Enter.
Step 2: Getting to AppLocker
Navigate through the following paths like a digital adventure:
Computer Configuration → Windows Settings → Security Settings → Application Control Policies → AppLockerStep 3: Create a Rule to Block the Program
- Within the AppLocker folder, select the type of rule you want to create, for example:
- Executable Rules → for .exe files (main programs)
- Windows Installer Rules → for .msi file (installer)
- Script Rules → for .vbs, .ps1, etc. files
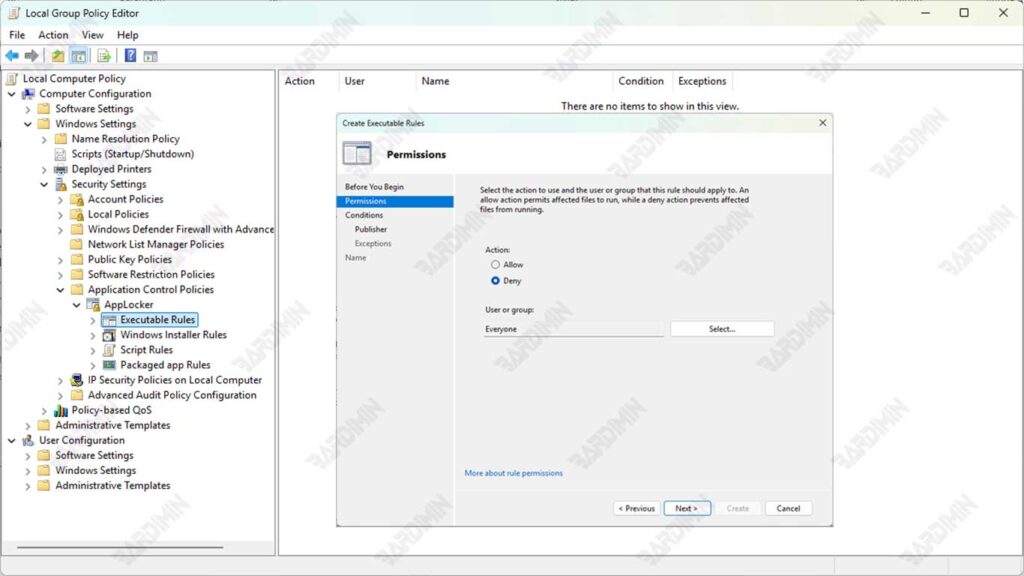
- Right-click on that rule type, and then select Create New Rule.
- Follow the wizard that appears, then select:
- Deny (not Allow) as an Action
- Specify the users or user groups that will be subject to the rule.
- Enter the file path of the program you want to block manually, for example: C:\Program Files\UnwantedApplications\app.exe
- Click Next until you’re done, then click Create.
Step 4: Fine-Tuning Rules (Expert Tips!)
In the rule creation window, take advantage of these advanced features:
- Publisher Condition: Block/allow based on digital certificates (more secure!)
- Path Condition: Block entire folders (e.g., C:\Games\)
- File Hash: Block certain versions of the program, even if the name is changed
Example:
- Action: Deny
- Path: %USERPROFILE%\Downloads\.exe
- → Block all .exe files from the Downloads folder!
Additional Steps: Run the “Application Identity” Service
For AppLocker rules to be active, you must make sure the following services are running:
- Press Win + R, type services.msc, and then press Enter.
- Look for a service named Application Identity.
- Right-click and select Start.
Without running this service, AppLocker rules will not work.
How to Whitelist Programs in Windows 11
If you want to make sure that only certain programs are allowed to run on Windows 11-based computers, such as at work, school, or public computers, then the best solution is to whitelist your apps. One of the safest and most efficient ways to do this is to take advantage of the Software Restriction Policy (SRP) feature available in the Windows 11 Pro and Enterprise editions.
Step 1: Go to Local Security Policy
- Press the Win + R button to open the Run window.
- Type the following command: secpol.msc and then press Enter. Then a window will open the Local Security Policy.
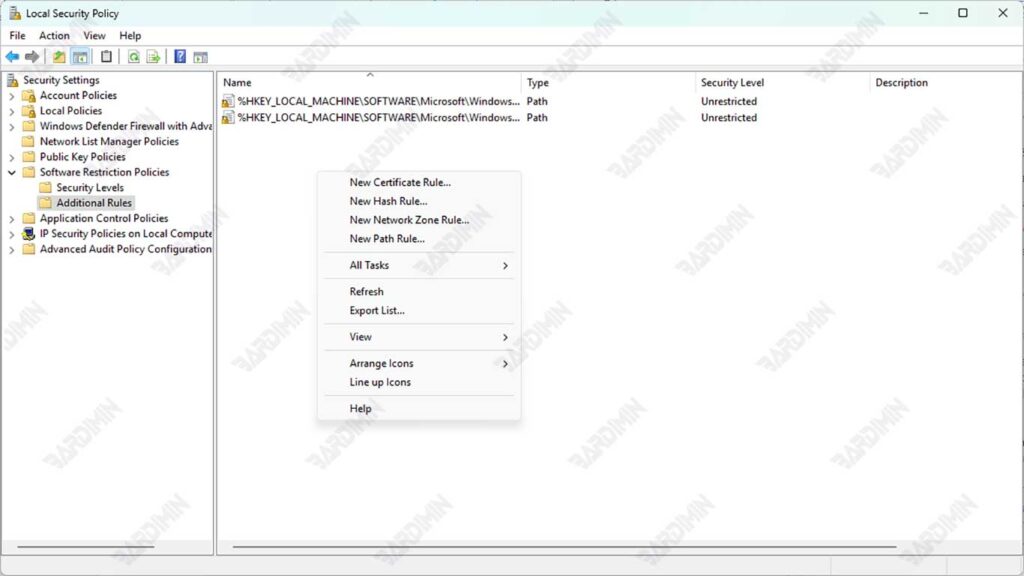
Step 2: Access Software Restriction Policies
- In the left panel, navigate to:
Security Settings → Software Restriction Policies- If you don’t already have a policy, right-click on Software Restriction Policies, then select New Software Restriction Policies.
Once the policy is active, you’ll see new folders like “Security Levels” and “Additional Rules.”
Step 3: Create Additional Rules to Allow Specific Apps
- Click on the Additional Rules folder.
- Right-click → select New Path Rule or New Certificate Rule.
- Enter the file path or folder location of the program you want to allow. For example:
C:\Program Files\OfficialApplication\- In the Security Level section, select Unrestricted for the program to run.
- Click OK to save the rule.
This rule will allow only the apps that are in that path to run, while others will be automatically blocked.
If you want to make sure only certain versions of an app can run (e.g., an unmodified official version), you can use the Hash Rule.
How: Right-click → New Hash Rule → Select the file .exe → The system will calculate its hash → Save as a rule.
Before applying this policy to the main computer, it is highly recommended to test it on a Virtual Machine (VM) first.
