RSAT or Remote Server Administration Tools is a collection of tools that allow you to manage server roles and features from client computers running Windows 11. Using RSAT, you can access and configure a remote server without having to log in to the server directly. This is especially useful if you have multiple servers that you need to manage from one place.
However, RSAT is not available by default in Windows 11. You have to install it manually from Settings or using PowerShell. In addition, you can also delete RSAT if you don’t need it anymore. In this article, Bardimin will explain how to install and remove RSAT on Windows 11 easily and quickly.
How to Install RSAT on Windows 11 from Settings
The easiest way to install RSAT on Windows 11 is from Settings. Here are the steps:
- Open Settings by pressing Windows + I on your keyboard or by clicking the Settings icon on the Start Menu.
- Select System in the left menu, then click Optional features on the right.
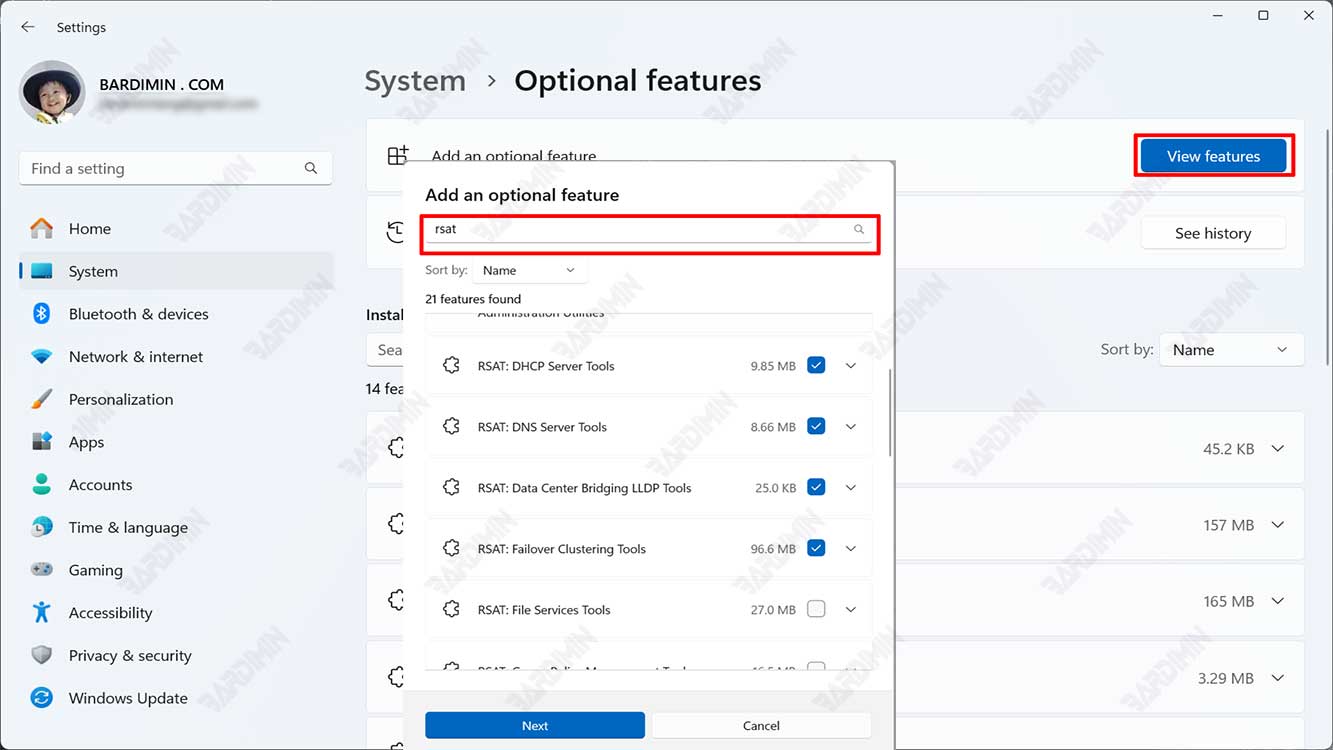
- On Add an optional feature, click the View features button next to it.
- In the window that appears, then type RSAT in the search box. You’ll see a list of all RSAT tools available for Windows 11.
- Select the RSAT tool you want by checking the box next to it, then clicking Next at the bottom, and then clicking Install. You can select more than one tool RSAT at a time. If you want to install all RSAT tools, you can search and select RSAT: Remote Server Administration Tools which includes all RSAT tools.
- Wait for the installation process to complete. You can see the installation status on the Optional features page. When you’re done, you can close the Settings.
- To access the RSAT tools you have installed, you can go to the Start Menu and search for the name of the RSAT tool you want, such as Active Directory Users and Computers or DHCP Server Tools. You can also find RSAT tools in the Windows Administrative Tools folder in the Start Menu.
How to Install RSAT on Windows 11 with PowerShell
Another way to install RSAT on Windows 11 is to use PowerShell. Here are the steps:
- Open PowerShell as administrator by pressing Windows + X on your keyboard and selecting Windows PowerShell (Admin) from the menu that appears. You can also right-click on the Start Menu icon and select Windows PowerShell (Admin) from the menu that appears.
- Type the following command to install all RSAT tools at once, and then press Enter:
Get-WindowsCapability -Name RSAT* -Online | Add-WindowsCapability -Online
- Wait for the installation process to complete. You’ll see an Operation completed message if successful. If you get an Error message, you can try running the command again or install RSAT from Settings.
- Close PowerShell. You can access the RSAT tools you have installed in the same way as above.
How to Remove RSAT in Windows 11 from Settings
If you don’t need RSAT anymore, you can easily remove it from Windows 11 from Settings. Here are the steps:
- Open Settings in the same way as above.
- Select System in the left menu, then click Optional features on the right.
- Find and select the RSAT tool you want to remove by clicking the RSAT tool name, and then clicking Uninstall at the bottom. You can remove more than one RSAT tool at a time by checking the box next to the RSAT tool’s name and then clicking Uninstall at the bottom. If you want to remove all RSAT tools, you can search for and select RSAT: Remote Server Administration Tools which includes all RSAT tools, then click Uninstall at the bottom.
- Wait for the deletion process to complete. You can see the status of the deletion on the Optional features page. When you’re done, you can close the Settings.
How to Remove RSAT in Windows 11 with PowerShell
Another way to remove RSAT in Windows 11 is to use PowerShell. Here are the steps:
- Open PowerShell as administrator in the same way as above.
- Type the following command to remove all RSAT tools at once, and then press Enter:
Get-WindowsCapability -Name RSAT* -Online | Remove-WindowsCapability -Online
- Wait for the deletion process to complete. You’ll see an Operation completed message if successful. If you get an Error message, you can try running the command again or remove the RSAT from Settings.
- Close PowerShell.
Conclusion
That’s how to install and remove RSAT on Windows 11 easily and quickly. By using RSAT, you can manage the server remotely from a client computer running Windows 11. You can install RSAT from Settings or by using PowerShell. You can also remove RSAT from Settings or by using PowerShell if you don’t need them anymore. Hope this article is useful and good luck.