Packet loss is a serious problem that can negatively impact various applications and services. It is important to know how to test and fix Packet Loss to ensure that you have a stable and reliable connection.
Packet loss is a term used to describe a situation when a portion of data sent or received over a network does not reach its destination. Packet loss can occur for a variety of reasons, such as signal interference, hardware errors, configuration errors, network overloads, or DDoS attacks. Packet loss can cause various problems, such as decreased quality of VoIP calls, video buffering, lag in online games, or file transfer errors.
To find out if you experience packet loss or not, you can use some of Windows’ built-in tools, such as Command Prompt, PowerShell, or Resource Monitor. These tools can help you measure packet loss between your computer and the destination server, as well as identify weak points in your network path.
Here are the steps to use those tools:
Using Command Prompt
Command Prompt is a command-line tool that lets you execute various commands to manage your system and network. One of the commands you can use to measure packet loss is ping.
A ping is a command that sends a small packet of data to the destination IP address or domain name and waits for a reply. Pinging can tell you how long it took for data packets to go back and forth, as well as how many packets were lost in the process.
To use ping, follow these steps:
- Open Command Prompt by pressing the Windows + R key, typing cmd, and pressing Enter.
- Type the following command, where <target> is the IP address or domain name you want to test, for example google.com:
ping <target>- Press Enter and wait for the result. You will see several lines of output indicating the response time (in milliseconds) and the status of the packet (either successful or failed). Examples are as follows:
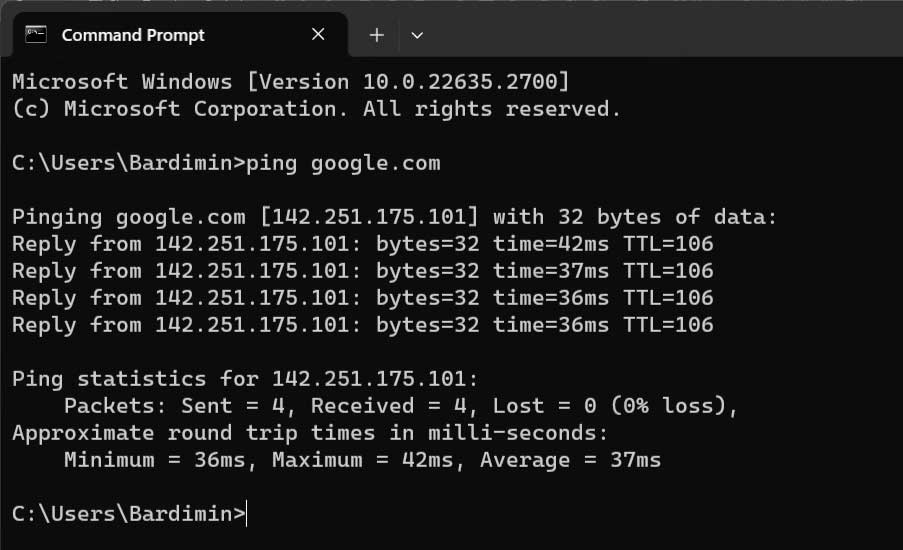
- Pay attention to the last line showing ping statistics. You can see how many packets were sent, received, and lost, as well as the percentage of packet loss. If you see a number other than 0% in the packet loss section, you are experiencing packet loss. The higher the percentage, the worse your connection will be.
Use PowerShell
PowerShell is a more advanced command-line tool than Command Prompt, which allows you to run various scripts and modules to manage your system and network. One of the modules you can use to measure packet loss is Test-NetConnection. Test-NetConnection is a command that tests a network connection to a destination IP address or domain name, and provides detailed information about the results, including packet loss.
To use Test-NetConnection, follow these steps:
- Open PowerShell by pressing Windows key + X, and select Windows PowerShell or Windows PowerShell (Admin) from the menu that appears.
- Type the following command, where <target> is the IP address or domain name you want to test, for example google.com:
Test-NetConnection -ComputerName <target> -InformationLevel Detailed- Press Enter and wait for the result. You will see several lines of output showing information about your network connection, such as local IP address and distance, protocol, port, status, response time, and packet loss. Examples are as follows:
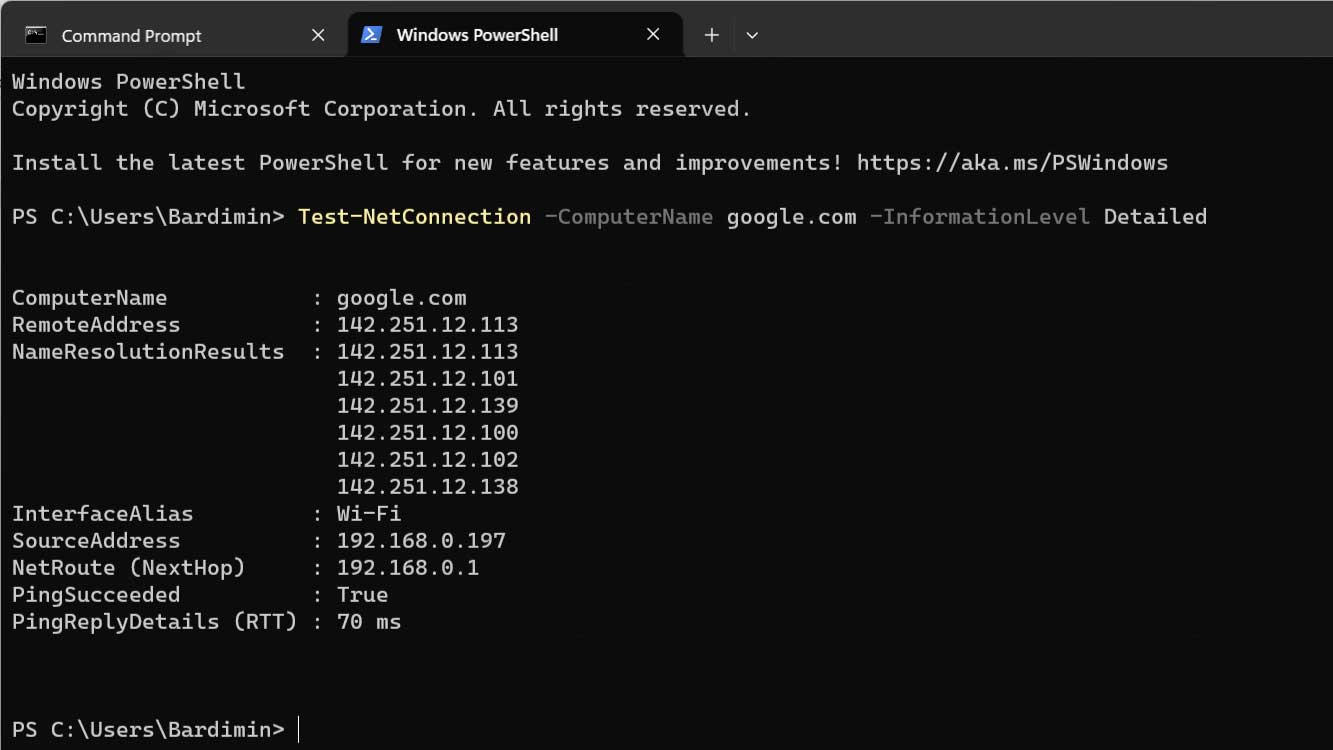
- Note the lines that indicate PingSucceeded and PingReplies. You can see whether the ping was successful or not, as well as details about each ping reply, including packet size, response time, and status. If you see a TimedOut or DestinationUnreachable status in one of the ping replies, you’re experiencing packet loss. You can also calculate the packet loss percentage by dividing the number of packets lost by the number of packets sent, and multiplying it by 100.
Use Resource Monitor
Resource Monitor is a graphical tool that allows you to monitor your system and network resource usage in real-time. You can use Resource Monitor to view your network connection statistics, including packet loss, easily and intuitively. Resource Monitor can also help you identify what processes or applications are using your network bandwidth, and whether anything is interfering with your connection.
To use Resource Monitor, follow these steps:
- Open Resource Monitor by pressing Windows key + R, typing resmon, and pressing Enter.
- Select the Network tab at the top of the Resource Monitor window.
- At the bottom of the window, you’ll see several panels that display information about your network connection, such as processes, addresses, ports, protocols, and statistics. You can click on each pane to expand or narrow it, or click on each column to sort the data based on specific criteria.
- Pay attention to the TCP Connections panel, which shows the active TCP connection between your computer and the destination server. You can view the destination IP address or domain name, port used, connection status, and connection statistics, such as sending and receiving speed, latency, and packet loss. You can click on each row to select a specific connection, or use the checkboxes in the Processes with Network Activity pane to filter connections based on specific processes or applications.
- Note the column that shows Packets Lost (%). You can see the packet loss percentage for each TCP connection. If you see a number other than 0% in this column, you have packet loss. The higher the percentage, the worse your connection will be.
How to Fix Packet Loss on Windows
Once you know whether you have packet loss or not, the next step is to try to fix it. Packet loss can be caused by a variety of factors, either on your side, on the server side, or in between. Therefore, you need to take some steps to isolate and resolve the problem. Here are some steps you can try:
Checking Your Internet Connection
The first step you should take is to check your internet connection, and make sure that no one is bothering it. You can do the following:
- Restart your modem and router by turning them off, waiting a few seconds, and turning them back on. This can help update your network configuration and fix temporary issues.
- Use an Ethernet cable to connect your computer directly to your modem or router, if possible. This can help reduce signal interference and improve the stability of your connection.
- Avoid using congested, weak, or unstable Wi-Fi networks. If you must use Wi-Fi, make sure you are within good range of the router, and that there are no obstructions or other devices that can interfere with the signal.
- Close or stop applications or processes that may use your network bandwidth excessively, such as streaming videos, downloading files, or updating systems. You can use Resource Monitor to see what applications or processes are using your network bandwidth and stop them if necessary.
- Do a test of your internet speed, using an online tool like [Speedtest] or [Fast]. You can see the speed of your sending and receiving, as well as your latency or ping. If you see numbers that are far below your standards or expectations, then there is a problem with your internet connection.
Check Your Network Configuration
The second step you should do is check your network configuration, and make sure that nothing is wrong or inappropriate. You can do:
- Update your network card drivers, by visiting your network card manufacturer’s website, and downloading and installing the latest version of the drivers. Outdated or corrupted drivers can cause your network performance and compatibility issues.
- Reset your network settings, by using Command Prompt or PowerShell. You can run several commands that can help fix your network configuration issues, such as ipconfig /flushdns, ipconfig /release, ipconfig /renew, netsh winsock reset, and netsh int ip reset. After running these commands, restart your computer to apply the changes.
- Change your DNS address by using Control Panel. DNS is a service that converts domain names into IP addresses, and vice versa. If the DNS you’re using is problematic or slow, you may experience packet loss or other connection problems. You can try using a faster and more reliable public DNS, such as [Google DNS] or [Cloudflare DNS]. To change your DNS address, follow these steps:
- Open Control Panel by pressing Windows key + R, typing control, and pressing Enter.
- Select Network and Internet, and then select Network and Sharing Center.
- On the left side of the window, click on Change adapter settings.
- Right-click on the network connection you’re using, and select Properties.
- Under the Networking tab, double-click on Internet Protocol Version 4 (TCP/IPv4).
- Under the General tab, select the Use the following DNS server addresses option.
- Enter the DNS address you want, for example 8.8.88.8 and 8.8.4.4 for Google DNS, or 1.1.1.1 and 1.0.00. 1 for Cloudflare DNS.
- Click OK to save the settings, and close all windows.
Check Your Destination Server
The third step you should do is check your destination server, and make sure that nothing is wrong or inappropriate. You can do the following:
- Check the status of your destination server, using an online tool such as [DownDetector] or [IsItDownRightNow]. You can see if your destination server is experiencing any issues, glitches, or maintenance, which could lead to packet loss or other connection problems. You can also view reports from other users who are experiencing the same issue as you, and see if the issue is local or global.
- Contact your destination server service or support provider, using email, phone, or social media. You can report the issue you’re experiencing, and ask for help or solutions. You can also request information about the cause, impact, and duration of the issue, as well as steps you can take to resolve it.
- Try another destination server, if possible. If you experience packet loss when accessing a particular website, app, or game, you can try accessing another similar website, app, or game, and see if the problem persists. If not, then the problem is on the server side of your destination, and you should wait until they fix it. If it is, it means that the problem is on your side, and you have to find another solution.
Tips and Tricks to Optimize Your Internet Connection and Avoid Packet Loss
Once you have successfully fixed packet loss on Windows, you can do several things to optimize your internet connection and avoid packet loss in the future. Here are some tips and tricks you can try:
- Use a VPN, or Virtual Private Network, to encrypt and protect your data when sending or receiving over the network. A VPN can help you avoid censorship, restrictions, or interference from your internet service provider, government, or third parties. A VPN can also help you change your virtual location, and connect you to a closer or faster server. You can use online tools like [VPNTest] or [VPNCompare] to choose a VPN that suits your needs and preferences.
- Use firewalls, antivirus, and anti-malware, to protect your computer from cyberattacks, such as viruses, trojans, worms, spyware, ransomware, or DDoS. These attacks can damage, steal, or interfere with your data, and cause packet loss or other connection problems. You can use built-in Windows tools, such as Windows Defender, Windows Firewall, or Windows Security, or third-party tools, such as [Avast], [Norton], or [Malwarebytes], to scan, clean, and protect your computer from cyberthreats.
- Use network optimization tools, to improve the performance and stability of your internet connection. These tools can help you reset, configure, or repair your network settings, as well as monitor and manage your bandwidth, latency, or packet loss. You can use built-in Windows tools, such as Network Troubleshooter, Network Reset, or Network Adapter Diagnostics, or third-party tools, such as [Speedify], [Haste], or [WTFast], to optimize your internet connection.
Conclusion
Packet loss is a problem that can interrupt your internet connection, and cause various problems, such as decreased quality of VoIP calls, video buffering, lag in online games, or file transfer errors. To find and fix packet loss in Windows, you can use some built-in Windows tools, such as Command Prompt, PowerShell, or Resource Monitor.
These tools can help you measure packet loss between your computer and the destination server, as well as identify weak points in your network path.