Want to revert the Windows 11 context menu to the classic look? This technical guide explains how to safely do it via registry editing. Designed for professionals and technicians who prioritize efficiency and full control over their operating system.
Security Warning (E-E-A-T): Editing the Registry Editor is high-risk and for advanced users only. Always create a System Restore Point before starting. The author has over 10 years of technical experience in Windows system administration. For official guidance on registry security, visit Microsoft’s official documentation.
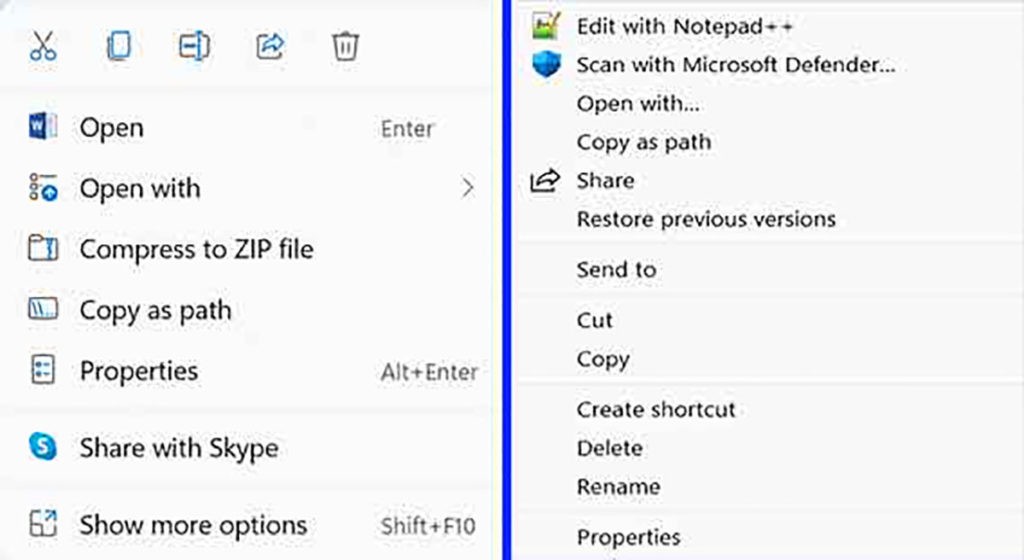
The new Windows 11 context menu features a minimalist design. However, this change often hides advanced options behind extra clicks. For IT professionals, developers, and power users, this can hinder workflow. Therefore, many seek ways to restore the classic, more functional right-click menu.
The solution via registry editing is an effective method. This method has been tested on various Windows 11 builds, including the latest 23H2 version. Note that Microsoft may change this behavior in future updates. Always update your knowledge with trusted sources like Microsoft Docs.
Edit Registry for Windows 11 Classic Context Menu
The following is a step-by-step tutorial. This process will modify specific registry keys. Ensure you have backed up your registry or system first.
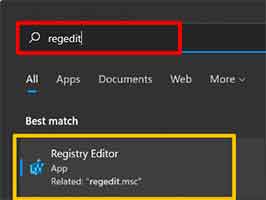
Step 1: Open Registry Editor as Administrator
Press Windows + X, then select “Terminal (Admin)” or “Windows PowerShell (Admin). Type the command regedit and press Enter. This is the safest method to access the registry editor with full privileges.
Step 2: Navigate to the CLSID Key Location
In the Registry Editor window, navigate to the following path. You can copy and paste this path into the address bar for quick navigation:
Computer\HKEY_CURRENT_USER\Software\Classes\CLSID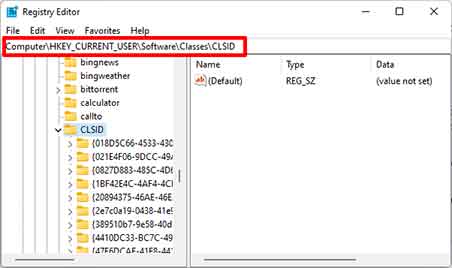
Step 3: Create a New Registry Key with Specific Name
Right-click on the CLSID folder, select New > Key. Name the new key with the following exact string without spaces:
{86ca1aa0-34aa-4e8b-a509-50c905bae2a2}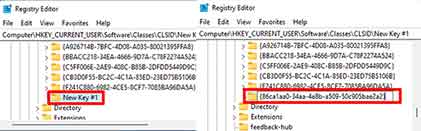
Step 4 & 5: Create Subkey and Empty Default Value
Inside the newly created key, create another subkey named InprocServer32. Then, in the right panel, double-click the (Default) value. Leave the “Value data” field completely empty, then click OK. This process is the core of the registry edit for Windows 11 context menu modification.
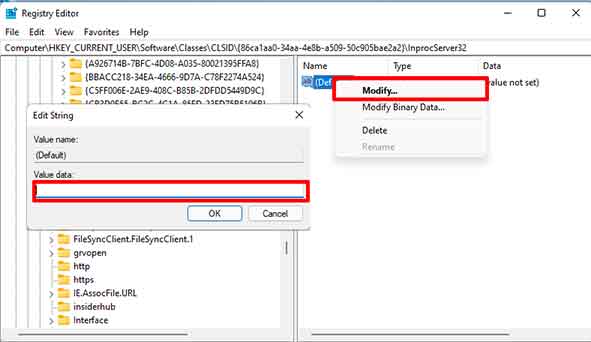
Verification: Ensure the “Data” column for the (Default) value appears blank, not “(value not set)”. This distinction is important for the Windows 11 context menu modification to work.
Step 6: Restart Explorer or PC to Apply Changes
You don’t need a full restart. Open Task Manager (Ctrl+Shift+Esc), find the “Windows Explorer” process, then click “Restart. After that, right-click on the desktop to see the Windows 11 context menu restored to the classic look.
Restore Windows 11 Context Menu to Default
To revert to default, simply delete the {86ca1aa0-34aa-4e8b-a509-50c905bae2a2} key you created. Then restart Explorer as in the previous step. The system will return to using the new Windows 11 context menu design.
By mastering this registry edit for Windows 11 context menu technique, you can tailor your work environment to your preference. Always prioritize security with regular backups.