The Trusted Platform Module (TPM) is a critical hardware-based security standard that serves as the root of trust for computing systems. This article explains its definition, core functions, and provides a technical, step-by-step guide for enabling TPM 2.0 in the BIOS/UEFI firmware of various motherboard brands like HP, Dell, and Lenovo.
The Trusted Platform Module (TPM) is a dedicated cryptographic chip attached to the motherboard. It acts as a secure crypto-processor designed to safeguard cryptographic operations such as encryption key generation, storage, and usage. This technology includes physical security mechanisms, making it resistant to physical tampering. Furthermore, malicious software cannot compromise or manipulate its security functions.
The importance of TPM has grown significantly, especially since Microsoft made TPM 2.0 a minimum requirement for Windows 11 installation. This highlights TPM’s role in building a more resilient security foundation. Therefore, understanding and configuring it correctly is a crucial step for professionals and users alike.
Functions and Benefits of Using TPM
The Trusted Platform Module (TPM) has several core functions that support holistic device security. These functions provide tangible benefits for users and organizations.
- Cryptographic Key Management: TPM can generate, store, and restrict the use of encryption keys like BitLocker keys. These sensitive keys remain inside the protected chip, not in the vulnerable main storage.
- Device Authentication: Each TPM chip has a unique, hardware-bound RSA key pair. This allows the system to reliably identify and authenticate the device, preventing spoofing.
- Platform Integrity Measurement: During the boot process, TPM “measures” or records hashes of critical components like BIOS firmware and the OS loader. This record helps ensure the system only boots with trusted, unmodified code.
How to Enable TPM 2.0 in BIOS/UEFI
Trusted Platform Module (TPM) settings are configured through the computer’s BIOS or UEFI firmware interface. The method to enter the BIOS menu varies by motherboard manufacturer, but typically involves pressing keys like F2, F10, DEL, or ESC immediately after turning on the computer. Always save changes before exiting.
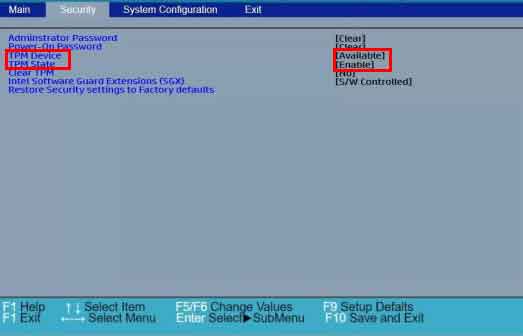
Guide for HP Motherboards
- Restart the computer and press the “F10” key to enter BIOS Setup.
- Open the “Security” tab.
- Locate the “TPM device” option and ensure its status is changed from “Hidden” to “Available”.
- Change the “TPM State” setting to “Enabled”.
- Press “F10” to save and exit.
Guide for Dell Motherboards
- Restart the computer and press “F2” when the Dell logo appears.
- Navigate to the “Security” or “Security Settings” section.
- Select “TPM 2.0 Security” or a similar option.
- Choose “TPM On”.
- Select “Apply” then “Exit”.
Guide for Lenovo Motherboards
- Enter the BIOS by pressing the “F1” or “F2” key during startup.
- Open the “Security” menu.
- For Intel platforms, find and enable the “Intel Platform Trust Technology (PTT)” option.
- For AMD platforms, find and enable the “AMD Platform Security Processor (PSP)” option.
- Save the configuration and restart the computer.
After enabling the Trusted Platform Module (TPM) in the BIOS, operating systems like Windows 11 will automatically detect and utilize it for security features like BitLocker. If you encounter issues, referring directly to the official guide from your motherboard or laptop manufacturer is a prudent step. For example, you can view the technical specifications for TPM from the Trusted Computing Group or security guidance from Microsoft.
In conclusion, enabling TPM 2.0 is a crucial proactive step to enhance your device’s security posture. This technology provides a hardware-based layer of protection that is difficult for software-based attacks to penetrate. By following the guide above, you can ensure the Trusted Platform Module functions optimally to protect your data and system integrity.