Downgrading from Windows 11 back to Windows 10 remains a viable solution for users facing compatibility issues or bugs after an upgrade. This article details two primary methods to revert to the previous operating system, both within the 10-day post-upgrade period and beyond. This guide is tailored for technicians, IT professionals, and advanced users.
Windows 11 offers a new interface and modern features. However, some users may encounter hardware incompatibility, software bugs, or simply prefer the previous interface. Therefore, the option to perform a downgrade from Windows 11 to Windows 10 is crucial. Microsoft provides a relatively straightforward rollback path within a specific timeframe.
It is important to note that the downgrade or rollback process is only available for 10 days after upgrading. Once this window passes, the only method is a clean installation of Windows 10. Always back up critical data before initiating any process.
How to Downgrade from Windows 11 to Windows 10 Within 10 Days
This method utilizes Windows’ built-in recovery feature. The system will restore the PC to its previous state using the saved Windows.old files. Follow these technical steps.
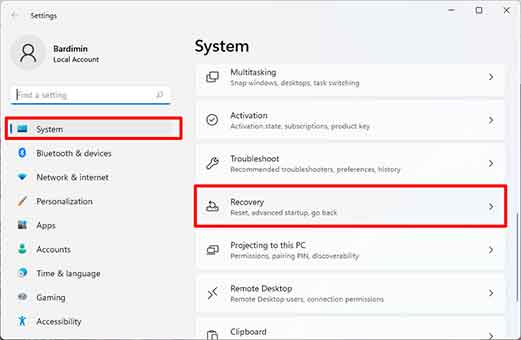
- Open Settings by pressing the Windows + I keys on your keyboard.
- Navigate to System > Recovery.
- Under Recovery options, find and click the Go back button.
- A new window will appear. Select your reason for going back, then click Next.
- You will be prompted to check for updates. Click No, thanks to proceed.
- Read the warning carefully. Ensure you have backed up your data.
- Click the Go back to Windows 10 button to start the process.
The downgrade process will run automatically. The PC will restart several times. Wait for the process to complete fully. The system will then return to the Windows 10 desktop with your personal files intact.
Important Warning: The Go back feature will remove apps and drivers installed after upgrading to Windows 11. Furthermore, all setting changes made in Windows 11 will be reverted.
How to Downgrade from Windows 11 to Windows 10 After 10 Days
If the 10-day period has passed, the Go back option in the Recovery menu will disappear. A downgrade from Windows 11 to Windows 10 can only be achieved via a clean installation. This method requires Windows 10 installation media and will erase all data on the system drive. Therefore, backing up data to external storage is absolutely necessary.
- Download the official Media Creation Tool from Microsoft’s website (dofollow link below).
- Prepare a blank USB flash drive with at least 8 GB of space.
- Run the tool and follow the instructions to create Windows 10 installation media.
- Boot your PC from the USB flash drive.
- Proceed with the standard Windows 10 installation process.
During installation, you will be asked for a product key. The system will usually activate the digital license automatically. However, ensure your previous Windows 10 license is linked to your Microsoft account. For more information, visit the official Microsoft support page about activating Windows.
After installation is complete, you will need to reinstall all necessary applications and drivers. Use the backup you created to restore your personal files.
Conclusion
Performing a downgrade from Windows 11 to Windows 10 is still possible under two scenarios. Within the first 10 days, use the built-in system rollback feature for a quick and easy return. After that period, a clean install of Windows 10 is the only path. Evaluate your needs and the risks before proceeding. This process requires basic technical understanding to ensure a smooth transition.