Learn how to configure the Windows 11 lock screen professionally and in depth. This guide provides complete technical instructions, from changing wallpapers, enabling Windows Spotlight, managing notifications, to advanced configuration via Registry Editor and Group Policy. Tailored for professionals, technicians, and gamers who want to optimize the look and functionality of the Windows 11 lock screen.
The lock screen in Windows 11 is the first interface users interact with before unlocking the system. It not only displays the time and date but can also show notifications from specific apps, system status, and other brief information. For professionals, technicians, and gamers, understanding the intricacies of lock screen settings is crucial for boosting productivity, maintaining privacy, and ensuring optimal device performance. This article dives deep into every technical aspect of Windows 11 lock screen configuration, including lesser-known methods like registry tweaks and group policies, plus troubleshooting tips for common issues.
Understanding Windows 11 Lock Screen Architecture
Technically, the Windows 11 lock screen is managed by the LockApp.exe process running in the background. Configuration files and visual assets are stored in protected system folders. The lock screen differs from the sign-in screen; the lock screen appears first after the computer is locked, wakes from sleep, or is started, whereas the sign-in screen is the subsequent page that asks for credentials. Windows 11 allows lock screen personalization through Settings or via centralized policies in a domain environment. From a security perspective, the lock screen also serves as the first line of defense against unauthorized access.
Mastering lock screen settings not only enhances aesthetics but also improves work efficiency and device security on Windows 11.
Complete Methods to Change the Windows 11 Lock Screen Wallpaper
Windows 11 provides three primary options for displaying images on the lock screen: Windows Spotlight, Picture, and Slideshow. Each has distinct characteristics and technical implications. Here are the detailed steps:
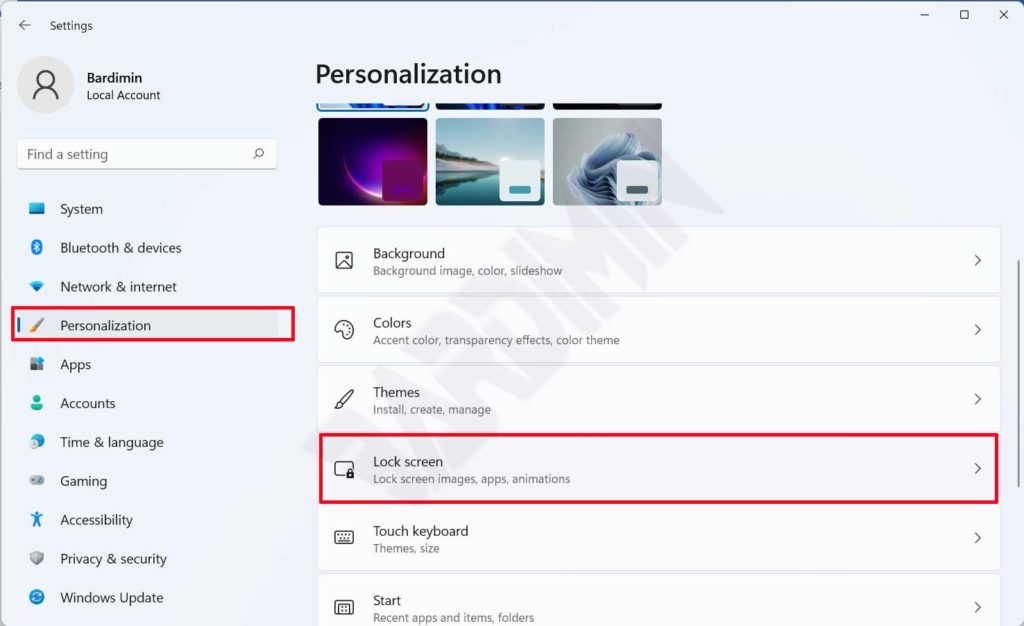
- Open Settings using the keyboard shortcut Win + I.
- Navigate to Personalization » Lock screen.
- Under Personalize your lock screen, click the dropdown to select your desired option.
1. Windows Spotlight: Dynamic and Internet-Connected
Windows Spotlight displays a new image each day downloaded from Microsoft servers. These images are curated and often accompanied by tips or interesting facts. Technically, this feature uses the Content Delivery Manager service that periodically downloads fresh content. Spotlight image cache is stored in %USERPROFILE%/AppData\Local\Packages\Microsoft.Windows.ContentDeliveryManager_cw5n1h2txyewy\LocalState\Assets. To force an update, you can delete all files in that folder (after closing LockApp.exe via Task Manager). Ensure an active internet connection; otherwise, the image won’t change.
2. Picture: Static and Simple
This option lets you choose a single image as the lock screen background. You can pick a default Windows image or select your own by clicking Browse photos. Technically, Windows copies the chosen image to a system folder and references it via the registry. A minimum resolution of 1920×1080 pixels is recommended to avoid pixelation on high-resolution displays.
3. Slideshow: Rotating from a Specific Folder
Slideshow displays a rotating collection of images from folders you specify. Advanced settings (Advanced slideshow settings) allow you to set the duration each image appears (from 1 minute to 1 day), enable shuffle mode, and decide whether the slideshow runs on battery power. For power efficiency, it’s advisable to disable slideshow when on battery, especially on laptops.
Critical Info: If Windows Spotlight fails to update images, you can reset the cache with the following command in PowerShell (run as administrator):Get-AppxPackage *ContentDeliveryManager* | Reset-AppxPackage
After that, restart your computer and re-enable Windows Spotlight.
Managing Notifications on the Windows 11 Lock Screen
Notifications appearing on the lock screen can provide important information like incoming emails, messages, or calendar reminders. However, for professionals and technicians handling sensitive data, notification setings must be managed carefully to avoid leaking personal information. Here are detailed steps to manage notifications:
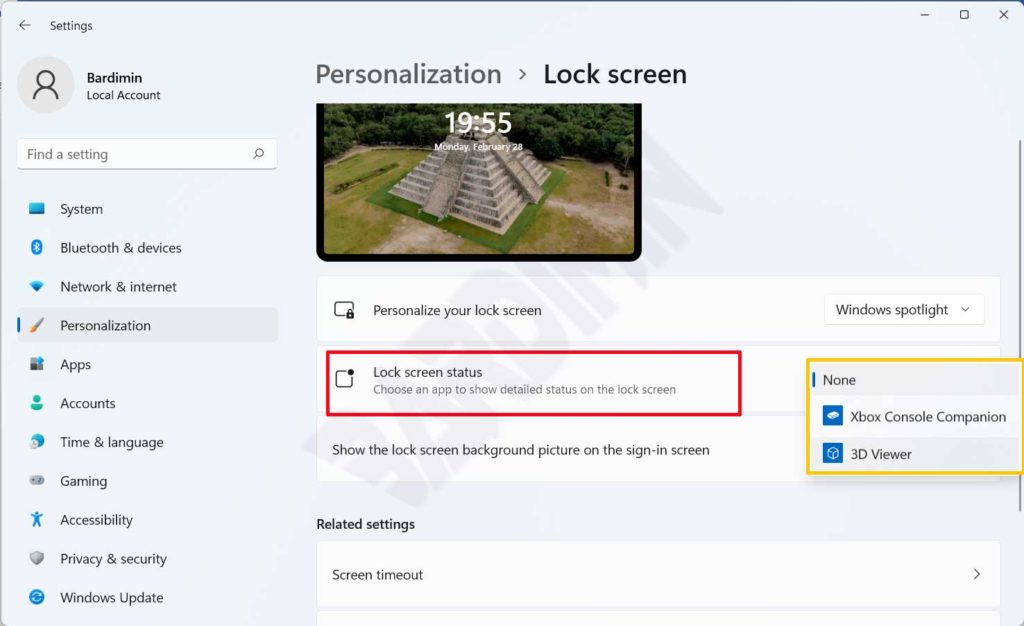
- Go to Settings » Personalization » Lock screen.
- Under Lock screen status, choose an app to show detailed status. Available options depend on apps installed from the Microsoft Store. For instance, if you select Weather, ensure the Weather app is installed and has notification permissions.
- For more granular control, open Settings » System » Notifications. Here you can globally enable or disable lock screen notifications and set priority for each app. Enable Hide notifications when I duplicate my screen to prevent notifications during presentations or screen mirroring.
Hiding Sensitive Content
For added security, you can configure notifications to hide content details when the screen is locked. On the Notifications page, enable Hide notifications when my screen is locked. This way, only the app icon appears, not the message content.
Advanced Lock Screen Configuration
For IT professionals and power users, GUI settings may not suffice. Here are advanced methods using Registry Editor and Group Policy. For official reference, check out Microsoft’s Windows Spotlight FAQ.
Using Registry Editor
Registry Editor allows you to modify lock screen configurations not available in Settings. However, be cautious as mistakes can destabilize the system. Always back up the registry first.
- Disable lock screen entirely: Navigate to
HKEY_LOCAL_MACHINE\SOFTWARE\Policies\Microsoft\Windows\Personalization. If the Personalization key doesn’t exist, create it. Create a new DWORD (32-bit) named NoLockScreen and set its value to 1. Restart your computer. After that, the system will go directly to the sign-in screen without the lock screen. - Force a specific lock screen image in a domain environment: Use the same path, create a DWORD LockScreenImage and set it to the full path of the image file (e.g.,
C:\Windows\Web\Screen\img.jpg). Ensure the file is accessible to all users.
Using Group Policy (Windows 11 Pro/Enterprise)
Group Policy provides centralized control for domain-joined computers. Open gpedit.msc and navigate to Computer Configuration » Administrative Templates » Control Panel » Personalization. Relevant policies include:
- Force a specific default lock screen image: Enable and specify the image path.
- Turn off lock screen camera: Disable camera access from the lock screen.
- Turn off lock screen notifications: Disable all lock screen notifications.
For gaming environments, disable slideshow and lock screen notifications to reduce system load when the computer is idle. This can slightly improve performance when returning to a game.
In-Depth Lock Screen Troubleshooting
Here are common issues users encounter along with technical solutions:
- Lock screen doesn’t change even after setting slideshow: Ensure the selected folder contains image files in supported formats (jpg, png, bmp, gif). Also check if the folder is offline or syncing with OneDrive, which might cause slow access. Try removing and re-adding the folder.
- Windows Spotlight doesn’t update images: Besides the cache reset method mentioned, ensure the Content Delivery Manager service isn’t disabled. Open Services.msc, find Content Delivery Manager, and verify its status is Running and startup type is Automatic.
- Lock screen clock is out of sync or wrong time zone: Go to Settings » Time & Language » Date & time. Enable Set time automatically and Set time zone automatically. If still incorrect, manually synchronize with time.windows.com via Control Panel » Date and Time » Internet Time.
- Notifications don’t appear on lock screen: Check notification permissions for the relevant app in Settings » System » Notifications. Also ensure the app supports lock screen notifications. Some third-party apps may require additional in-app settings.
- Lock screen appears even after disabling via registry: Verify the DWORD NoLockScreen is in the correct path. Some Windows 11 versions may require a full restart (not just shutdown) for changes to take effect. Try running
shutdown /r /t 0in Command Prompt (admin).
Optimizing Lock Screen for Specific Needs
For Gamers
Gamers want a responsive system free from background interruptions. Here are lock screen recommendations for gaming:
- Disable slideshow because it can trigger periodic disk and GPU activity.
- Turn off lock screen notifications to avoid distractions while streaming or playing games.
- Set the power plan to High Performance and disable Fast Startup to prevent slow wake-from-sleep issues.
For IT Professionals and Technicians
Technicians often need quick access to system information. Use the lock screen status feature to select apps that display system metrics, such as Task Manager (if available) or third-party monitoring apps that support lock screen display. Additionally, enable notifications for server monitoring apps to be alerted immediately of anomalies.
Conclusion
Configuring the Windows 11 lock screen optimally requires understanding the various options available, from simple Settings tweaks to complex Registry and Group Policy adjustments. With this guide, professionals, technicians, and gamers can tailor the lock screen to their specific needs, enhancing productivity, maintaining privacy, and ensuring peak device performance. Feel free to explore each setting and adjust periodically as your requirements evolve.