Advertisement
Pre-Reset Steps:
1. Extract Program Files
- Right-click on the Epson L8160 Adjustment Program.rar file
- Select “Extract Here”
- Enter your password: bardimincom
- Wait for the extraction process to complete
2. Temporarily Disable Antivirus
- Open Windows Security → Virus & threat protection
- Click “Manage settings”
- Temporarily turn off “Real-time protection”
A Step-by-Step Reset Guide with Conceptual Visuals
Step 1: Turn Off the Printer Completely
- Press and hold the power button until all lights are completely off
- Make sure that no indicator light is still on
- Wait 10 seconds after the printer is completely shut down
Step 2: Run the Program as an Administrator
- Open the extraction results folder
- Find the AdjProg.exe file
- Right-click → select “Run as administrator”
- If a UAC warning appears, click “Yes”
Step 3: Select the Printer Model
- On the program’s main screen, select “L8160”
- Click the button “Particular adjustment mode”
- Programs ready for specific operations
Step 4: Select the Waste Ink Counter Mode
- From the menu list, select “Waste ink pad counter”
- Click “OK” to continue
- The counter reset window will open
Step 5: Connect and Power on the Printer
- Make sure the USB cable is connected to the computer and printer
- Power on the printer in a USB-connected state
- The program will automatically detect the printer
- Wait for the “Connected” status to appear
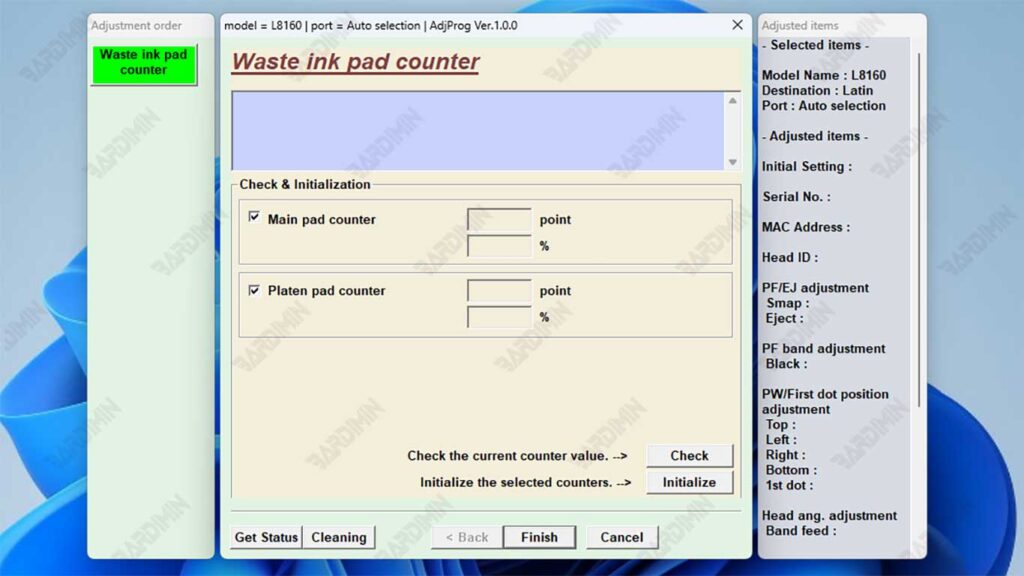
Step 6: Counter Reset Process
- Check both options:
– ☑ “Main Pad Counter”
– ☑ “Platen Pad Counter” - Click the “Check” button for verification
- If there is no error, the “Initialization” button will be activated
- Click “Initialization” to start the reset
Step 7: Confirm and Restart
- Wait for the message “Success” or “Completed” to appear
- Turn off the printer completely
- Unplug the power cord from the power outlet
- Wait 1-2 minutes (important for capacitor discharge)
- Turn the printer back on
Critical Step Troubleshooting
If the printer is not detected:
Advertisement
- Check the USB cable connection
- Replace the USB port (use the motherboard’s back port)
- Install the Epson USB driver first
- Restart the computer and repeat from the beginning
If the initialization button is not active:
- Make sure the printer is on and detected
- Check the USB cable (use the original cable)
- Make sure to choose the right “L8160 Series” model
- Repeat the steps from number 1
If an error message appears:
Advertisement
- “Communication error” → Check the cable and connection
- “Printer not found” → Make sure the driver is installed
- “Counter already zero” → Reset has been done
Verify Reset Success
Once the process is complete, perform the test:
- Print test page via printer maintenance menu
- Check the status of the lights – they shouldn’t blink anymore
- Monitor Printer Status – no waste ink error message
- Perform a nozzle check to make sure the printhead is working
This reset process only solves the software counter problem. If the physical waste ink pad is already saturated, it is recommended to replace it in the near future to prevent ink overflow.