Article Summary: This comprehensive guide explores Virtual Machines (VMs) in detail, covering definitions, popular applications (like VMware and VirtualBox), and performance comparisons. You’ll also get a step-by-step tutorial for creating a Virtual Machine using Hyper-V on Windows 10/11, useful for development, testing, or running alternative operating systems.
Complete Virtual Machine Guide & How to Create on Windows
A Virtual Machine (VM) is a software emulation of a physical computer system. This concept allows multiple operating systems to run independently on the same physical hardware. The host system runs software called a hypervisor, which manages and allocates resources (such as CPU, RAM, and storage) to each VM (guest).
This technology is highly flexible. A single host computer can run multiple guests simultaneously. Each guest can use different operating systems and applications. Therefore, VMs are an ideal solution for server consolidation, software development, testing, or running legacy applications.
Applications for Creating Virtual Machines
Various virtual machine applications are available, each with its strengths. Popular choices for home and professional users include VMware Workstation Player (free for non-commercial use) and Oracle VM VirtualBox, which is open-source and cross-platform. In the Apple macOS ecosystem, Parallels Desktop is often the preferred choice due to its optimization. Additionally, Microsoft includes the Hyper-V feature natively in Windows 10 Pro, Enterprise, and Education editions, as well as Windows 11 Pro and above.
The Hyper-V feature on Windows delivers high performance because it runs at the kernel level. Requirements to enable it are:
- Windows 10/11 Pro, Enterprise, or Education (64-bit).
- A 64-bit processor with SLAT support (Second Level Address Translation).
- Virtualization support enabled in BIOS/UEFI (Intel VT-x or AMD-V).
- Minimum 4 GB RAM (more is recommended).
VirtualBox, VMware, Parallels, and Hyper-V Comparison
Core Feature Analysis
Choosing a virtual machine application depends on specific needs. The following table summarizes feature comparisons of major platforms based on the latest information:
| Feature | VMware Workstation | VirtualBox | Parallels Desktop | Hyper-V |
|---|---|---|---|---|
| Snapshot/Backup | Yes | Yes | Yes | Yes |
| Drag & Drop | Yes | Yes | Yes | Limited |
| Dynamic RAM Allocation | Yes | Yes | Yes | No |
| Guest Additions/Tools | Excellent (VMware Tools) | Good (Guest Additions) | Excellent (Parallels Tools) | Good (Integration Services) |
| 3D Acceleration Support | Excellent | Moderate | Excellent (for macOS) | Limited |
| Host OS | Windows, Linux | Windows, Linux, macOS, Solaris | macOS | Windows |
Performance and Usability Review
Beyond features, key considerations are performance and ease of use. Hyper-V generally excels in efficiency and speed for Windows workloads due to its direct kernel integration. However, VirtualBox is easier to use and supports more host OS options. VMware Workstation offers a balance of advanced features, stability, and good graphics performance, making it suitable for gamers wanting to test games on different OS or developers requiring a solid testing environment.
Selection Tip: For Windows users needing maximum performance and Azure integration, choose Hyper-V. If you require cross-platform flexibility and a free solution, VirtualBox is the right choice. Meanwhile, VMware Workstation is ideal for professionals needing enterprise features in a desktop environment.
How to Create a Virtual Machine with Hyper-V on Windows
Hyper-V offers a powerful, free virtualization solution built into Windows. Its advantages include high performance, good integration with other Microsoft products, and direct migration capability to Azure cloud.
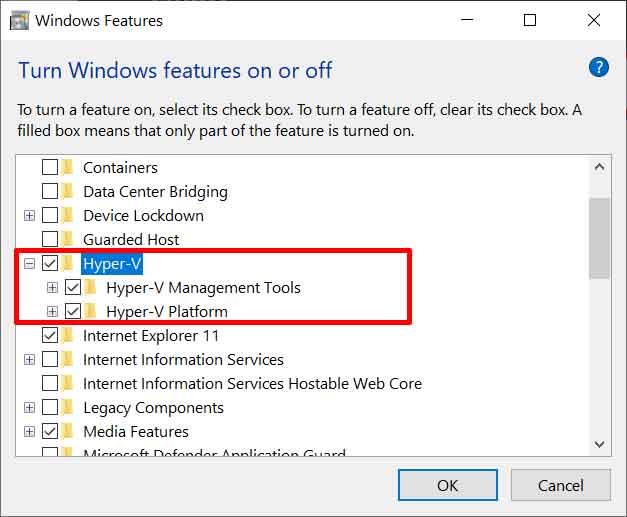
Step 1: Enable the Hyper-V Feature
- Open “Turn Windows features on or off” via Start Menu or Control Panel.
- In the window that appears, find and check all options under “Hyper-V“, including “Hyper-V Management Tools” and “Hyper-V Platform“.
- Click OK and restart your computer.
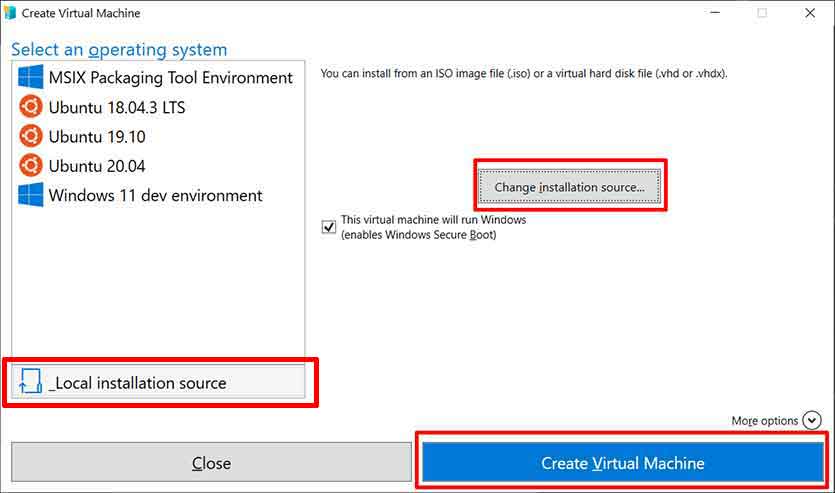
Step 2: Create a New Virtual Machine
- Open the “Hyper-V Manager application from the Start Menu.
- In the right panel, click “New” > “Virtual Machine…“.
- Follow the wizard guide. Specify the VM name, generation (choose Generation 2 for modern OS), and memory allocation.
- At the “Connection” step, select “Default Switch” to give the VM internet access.
- Create a new virtual hard disk or use an existing one. Then, choose the “Install an operating system from a bootable image file” option and browse to your desired operating system ISO file.
- Complete the wizard and click “Finish“.
Once the VM is created, right-click it in Hyper-V Manager and select “Connect” to power it on and begin the guest operating system installation process. Thus, you have successfully created an isolated virtual environment. Virtual machine technology continues to evolve and serves as the backbone for IT modernization, cloud computing, and secure, efficient software development.
For more information on specifications and official guides, you can refer to the Microsoft Hyper-V and Oracle VirtualBox documentation.