Storage Spaces Direct (S2D) is a software-based storage solution from Microsoft designed specifically for hyper-converged infrastructure (HCI) environments. By leveraging local drives across multiple servers, S2D enables businesses to build distributed, scalable, and cost-effective storage systems.
One of S2D’s main advantages is its ability to improve storage efficiency and server performance. With features such as SSD caching, S2D uses SSDs as a cache to speed up data access, so applications that require high speeds, such as databases and virtualization, can run more optimally.
In addition, S2D provides resiliency options such as mirroring (two or three copies of data) and parity (similar to RAID 5/6) that ensure data remains safe even in the event of a hardware failure. S2D integration with Windows Server technologies such as Cluster Shared Volumes (CSV) and ReFS also makes data management easier, while support for Remote Direct Memory Access (RDMA) ensures low latency in high-speed networks.
S2D has advantages over RAID, making it more suitable for today’s business needs. RAID is limited in flexibility and expandability. S2D allows the use of local drives across multiple servers, flexible addition of servers and drives, and offers more secure three-way mirroring than RAID 1 or RAID 5.
S2D also integrates with Windows Server, making it easy to manage through PowerShell or Windows Admin Center, and reducing the need for investment in dedicated storage systems such as SAN/NAS. With all these advantages, S2D is a modern and cost-effective option for a reliable storage solution.
What is Storage Spaces Direct (S2D)?
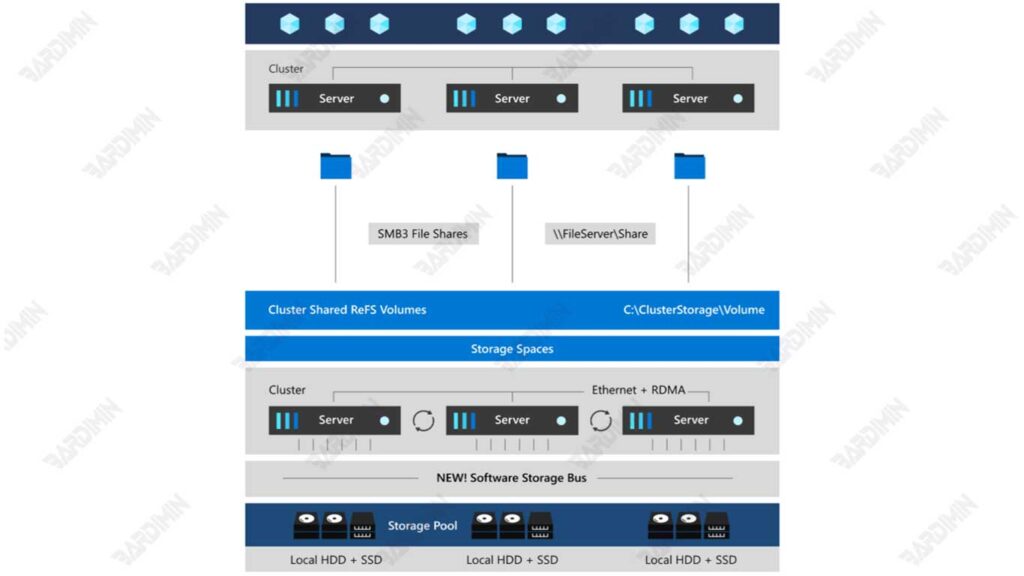
Storage Spaces Direct (S2D) is a software-defined storage technology (SDS) introduced by Microsoft in Windows Server. The technology is designed to manage cluster-based storage by combining multiple local storage devices from multiple servers into a single distributed storage pool. With S2D, organizations can build storage infrastructure that is extensible, highly available, and cost-efficient without the need to use external storage devices such as SAN (Storage Area Network) or NAS (Network Attached Storage).
S2D works by automating storage management through disk-tiering, caching, and mirroring/parity technologies to improve access speed and capacity efficiency. By utilizing various types of storage media such as NVMe, SSD, and HDD, S2D can deliver high performance while maintaining data redundancy to prevent system failure.
History and Development of S2D Technology in Windows Server
The Storage Spaces technology was first launched in Windows Server 2012 as a feature to manage storage pools more flexibly. However, at that time, this feature still requires JBOD (Just a Bunch of Disks) and can’t support distributed storage in clusters.
In Windows Server 2016, Microsoft introduced Storage Spaces Direct (S2D) as a more advanced storage solution, supporting (HCI) hyper-converged infrastructure. This technology allows the consolidation of internal storage from multiple servers into a single storage cluster without the need for a SAN or NAS.
Furthermore, in Windows Server 2019, S2D has been enhanced with performance improvements and features, such as:
- Cluster Performance History – Monitor storage performance in real-time.
- Mirror-Accelerated Parity – A combination of mirror and parity modes to achieve a balance between performance and capacity.
- Scalability up to 16 nodes – Allows for greater expansion than previous versions.
Until the latest version of Windows Server 2022, S2D has been further optimized with support for higher performance, better storage efficiency, and stronger data security.
The advantages of Storage Spaces Direct over other storage solutions
Compared to traditional storage solutions such as RAID, SAN, and NAS, Storage Spaces Direct offers several advantages that make it the top choice for many modern organizations and data centers.
| Feature | Storage Spaces Direct (S2D) | RAID (Hardware-Based) | SAN/NAS |
| Implementation Type | Software-defined (works on Windows Server) | Requires a dedicated RAID controller | Requires a separate storage device |
| Scalability | Expandable by adding new servers or storage pools | Limited to RAID controller capacity | High scalability but expensive |
| Redundancy & High Availability | Supports cluster failover, no single point of failure | If the RAID controller is damaged, the entire array can fail | Depends on SAN/NAS configuration |
| Performance | Using NVMe, SSD, and HDD with auto-caching | Depends on the RAID configuration used | Has additional latency due to network access |
| Cost Efficiency | No need for additional storage devices such as SAN | Requires expensive RAID controllers | High prices due to dependence on external devices |
| Management & Monitoring | Integrates with Windows Admin Center & PowerShell | Manual configuration via BIOS/RAID controller | Requires additional software |
Storage Spaces Direct Requirements and Components
For Storage Spaces Direct (S2D) to work properly, there are several software and hardware requirements that need to be met. From Windows Server editions, and hardware specifications, to network configurations, everything must be up to standard to achieve optimal performance and high availability.
S2D-Supported Windows Server Editions
Storage Spaces Direct (S2D) can only be used on Windows Server Datacenter Edition, as this feature is not available in Windows Server Standard Edition or other editions. Here is a list of Windows Server editions that support S2D:
- Windows Server 2016 Datacenter Edition – The first version to support S2D with basic features.
- Windows Server 2019 Datacenter Edition – Improves performance, storage efficiency, and monitoring features.
- Windows Server 2022 Datacenter Edition – The latest version with improved security, faster performance, and better storage management.
Hardware Required for Storage Spaces Direct
1. Minimum of 2 Nodes (3-16 Nodes Recommended) for High Availability
S2D operates in a cluster server, which requires at least 2 nodes to function. However, to achieve high availability, it is recommended to use between 3 to 16 nodes.
| Number of Nodes | Advantage |
| 2 Nodes | It can be used, but without automatic failover (requires manual intervention). |
| 3 Node | Supports automatic failover, safer against server failure. |
| 4-16 Nodes | High scalability, maximum performance, and better fault tolerance. |
2. Supported Drive Types
S2D supports a wide variety of Direct-Attached Storage (DAS) types, which means storage must be connected directly to the server without the need for a RAID Controller. Types of storage that can be used include:
- NVMe (Non-Volatile Memory Express) – Has the highest speed, it is perfect for caching layer.
- SSD (Solid State Drive) – Offers high performance with low latency, recommended for clusters that require high I/O.
- HDD (Hard Disk Drive) – Provides large capacity at a lower cost, ideal for cold storage or infrequently accessed data.
3. Network Requirements: RDMA via iWARP or RoCE for Best Performance
S2D requires a fast network with low latency to keep communication between nodes in the cluster efficient. Microsoft recommends using Remote Direct Memory Access (RDMA) technology, which can increase throughput and reduce the load on the CPU.
RDMA technologies available:
- RDMA over iWARP – Using TCP/IP-based protocols, it is easier to configure and more stable in an enterprise network environment.
- RDMA over RoCE (RDMA over Converged Ethernet) – Offers lower latency, but requires DCB (Data Center Bridging) to prevent packet loss.
4. Drivers & Firmware to Update
To avoid system errors and compatibility issues, all drivers and firmware used should be kept up to date. Components that must be checked include:
- Driver Network Adapter (RDMA Support) – Make sure it supports iWARP or RoCE.
- Firmware NVMe/SSD/HDD – Firmware updates for optimal data access stability and speed.
- BIOS & Firmware Server – Make sure to use the latest version to improve system compatibility and security.
- Windows Server Update – Always patch and update Windows Server to get the latest bug fixes and features.
Example Hardware Configuration for S2D
Here’s an example of a hardware configuration for an S2D environment with 3 nodes:
Servers: 3 server units with Intel Xeon or AMD EPYC processors.
Drive per Node:
- 2 x NVMe (1.6 TB) for caching.
- 4 x SSD (3.84 TB) for tiering.
- 8 x HDD (10 TB) for storage capacity.
Networking: 2 x 10 GbE NIC with RDMA (RoCE or iWARP) support.
Switch: A 10 GbE switch that supports RDMA.
How to Enable and Configure Storage Spaces Direct (S2D)
Once you have qualified the hardware and software, the next step is to enable and configure Storage Spaces Direct (S2D) in Windows Server Datacenter Edition. This process includes enabling the Failover Clustering feature, cluster validation, creating a storage pool, and creating a virtual disk (storage space).
Step 1: Enable Failover Clustering & Storage Spaces Direct Feature
Before enabling S2D, make sure that the Failover Clustering and File Server features are installed on each node in the cluster. Use the following PowerShell command:
Install-WindowsFeature -Name FS-FileServer, Failover-Clustering -IncludeManagementToolsExplanation:
- FS-FileServer = Enables File Server features required for cluster-based storage management.
- Failover-Clustering = Enables clustering feature that allows multiple servers to operate as a single unit.
- IncludeManagementTools = Ensure management tools such as Failover Cluster Manager are also installed.
Step 2: Validate and Create a Cluster
Once the feature is enabled, you need to validate the cluster and then create a new cluster.
Before creating a cluster, make sure all nodes are working properly and compatible by using the following command:
Test-Cluster -Node Server1, Server2Test-Cluster will conduct a series of validation tests on hardware, networking, storage, and system configurations. Make sure there are no critical errors, if there are warnings, check that they are still within safe limits.
If validation is successful, create a new cluster with the desired name, for example, “MyCluster”, and a specific static IP address:
New-Cluster -Name MyCluster -Node Server1, Server2 -StaticAddress <IP_Address>Once the cluster is created, check its status in Failover Cluster Manager or with PowerShell:
Get-ClusterIf the cluster is successfully created, move on to the next step.
Step 3: Enable Storage Spaces Direct (S2D)
Once the cluster is formed, activate the Storage Spaces Direct with the following command:
Enable-ClusterS2DThis command activates Storage Spaces Direct inside the cluster that has been created. Windows will automatically recognize available drives, configure storage pools, and enable cache if NVMe or SSD disks are present.
Verify the results of S2D activation with the command:
Get-StoragePoolIf the output shows a new storage pool named “S2D on MyCluster”, it means that S2D has been successfully activated.
Step 4: Create a Virtual Disk (Storage Space)
Once S2D is enabled, the next step is to create a storage volume that can be used like a regular drive.
Use the following command to create 1TB of storage space in NTFS format:
New-Volume -StoragePoolFriendlyName “S2D on MyCluster” -FriendlyName “Volume1” -FileSystem NTFS -Size 1TBExplanation:
- StoragePoolFriendlyName “S2D on MyCluster” = Utilizing the storage pool that has been automatically created by S2D.
- FriendlyName “Volume1” = Assigns a name to the newly created volume.
- FileSystem NTFS = Use NTFS format (or can choose ReFS for better performance).
- Size 1TB = The size of the volume to be made, can be adjusted as needed.
Once the volume has been successfully created, you can check it with the command:
Get-VolumeIf the volume appears in the list, the configuration has been successful. This volume can now be used like a regular drive.
Storage Spaces Direct Architecture: Mirror vs. Parity
Storage Spaces Direct (S2D) provides two main options for setting redundancy and storage efficiency: Mirror and Parity. In addition, S2D also has Hybrid Mode, which combines the advantages of both options. Here’s a detailed explanation of each option, along with examples of how to use it in different workload scenarios.
1. Mirror: High Redundancy, Maximum Performance
Mirroring is a storage technique in which data is copied to multiple drives simultaneously. It is similar to RAID 1 (mirroring two drives) or RAID 10 (mirroring with striping).
Mirroring Characteristics:
- High Redundancy: Data is copied to two or three drives, depending on the configuration.
- Two-way mirror: Requires a minimum of 2 drives, data is copied to 2 drives.
- Three-way mirror: Requires a minimum of 3 drives, data is copied to 3 drives.
- Maximum Performance: Because data can be accessed from multiple drives simultaneously, mirroring provides excellent read performance.
- Low Storage Efficiency: Because data is copied, only 50% (two-way mirror) or 33% (three-way mirror) of the total drive capacity can be utilized.
Usage Example:
- OLTP (SQL Server) databases: Mirroring is perfect for workloads that require low latency and high reliability, such as database transactions.
- Critical Applications: Workloads that require high availability and tolerance for drive failure.
2. Parity: More Efficient Storage
Parity is a storage method that utilizes mathematical calculations to protect data, similar to RAID 5 or RAID 6.
Parity Characteristics:
- More Efficient Storage: Parity requires less space for redundancy compared to mirroring. For example, in RAID 5, only one drive is used for parity, so storage efficiency is increased.
- Good Read Performance: Parity offers good read performance, but its write speed is slower due to having to compute and store parity data.
- Adequate Redundancy: Parity can handle the failure of one or two drives, depending on the configuration used.
Usage Example:
- File Sharing & Backup: Parity is perfect for workloads that require large capacity but don’t require high write speeds, such as file storage or backups.
- Data Archive: A workload that prioritizes storage efficiency over performance.
3. Hybrid Mode: A Combination of Mirroring and Parity
Hybrid mode combines mirroring and parity advantages to achieve a balance between performance and storage efficiency. In this mode, frequently accessed data is stored by mirroring, while infrequently accessed data is stored with parity.
Characteristics of Hybrid Mode:
- Performance and Efficiency Balance: Data that requires high performance is stored on SSDs with mirroring, while data that requires large capacities is stored on HDDs with parity.
- Flexibility: Allows customization according to workload needs.
Usage Example:
- Virtual Machine Storage: Hybrid mode is ideal for virtualization environments where some VMs require high performance (stored on SSDs with mirroring), while others require large capacities (stored on HDDs with parity).
- Mixed Workloads: Workloads that have a combo
Workload-Based Usage Examples
| Workload Type | Recommended Configurations |
| Database OLTP (SQL Server) | Mirror for low latency and high performance. |
| File Sharing & Backup | Parity for long-term capacity and storage efficiency. |
| Virtual Machine Storage | Hybrid Mode for a balance between performance and capacity. |
Conclusion
Storage Spaces Direct (S2D) is a Software-Defined Storage (SDS) solution from Windows Server that is more flexible, scalable, and efficient than RAID. S2D supports three main configurations: Mirror for high performance and maximum redundancy, Parity for capacity efficiency, and Hybrid Mode that combines the two.
With NVMe, SSD, and RDMA networking support, S2D offers high speed and ease of management without the need for additional devices such as SAN/NAS, making it more cost-effective. If you’re looking for a reliable, flexible, and easy-to-manage storage solution, S2D is the best choice for your Windows Server infrastructure!