Have you ever encountered the C drive that keeps filling automatically issue in Windows? If so, you may feel frustrated and confused as to why this is happening. Is there a virus infecting your computer? Are there any programs running in the background that eat up your disk space? Are there any junk files piling up on your C drive?
Don’t worry, you’re not alone. Many Windows users face the same problem. Several reasons might cause your C drive to keep full automatically, such as:
- System Restore. This feature allows you to restore your system to its previous state in case of problems. However, this feature also takes up considerable disk space, as it creates restore points at regular intervals that store copies of your system files.
- Hibernation. This feature allows you to shut down your computer without losing the data you are working on. However, this feature also takes up considerable disk space, as it creates a hiberfil file .sys which stores a copy of your memory.
- Temporary Files. These files are created by the system or the program you run to store data temporarily. Usually, these files will be deleted automatically after you close the program or restart the computer. However, sometimes these files can be left behind and accumulate on your C drive.
- Windows Update. This feature allows you to get the latest updates for your system and programs. However, this feature also takes up considerable disk space, as it creates a backup file that stores a copy of the updated file.
- Recycle Bin. This place allows you to restore files you’ve deleted if you change your mind. However, this place also takes up considerable disk space, as it stores the files you have deleted until you empty them.
To solve the C drive keeps filling automatically issue, you need to do as following steps:
Step 1: Clean Up Junk Files
The first step you have to do is clean up the junk files that accumulate on your C drive. These junk files can be temporary files, log files, cache files, error files, backup files, and others. You can use the Disk Cleanup feature provided by Windows to perform this task. Here’s how:
- Go to File Explorer and right-click on C drive. Select Properties.
- In the General tab, click the Disk Cleanup button.
- Wait until Windows scans for junk files that can be deleted. You can see the size of junk files you can save at the bottom of the window.
- Check the junk files you want to delete. You can click the Clean up system files button to select system junk files that can be deleted, such as update files, restore files, and hibernation files.
- Click the OK button and confirm the deletion of junk files.
Step 2: Reset System Restore Size
The second step you have to do is reset the size of the System Restore set by Windows. By default, Windows will allocate about 10% of C drive disk space for this feature. If you feel that this size is too big, you can reduce it according to your needs. Here’s how:
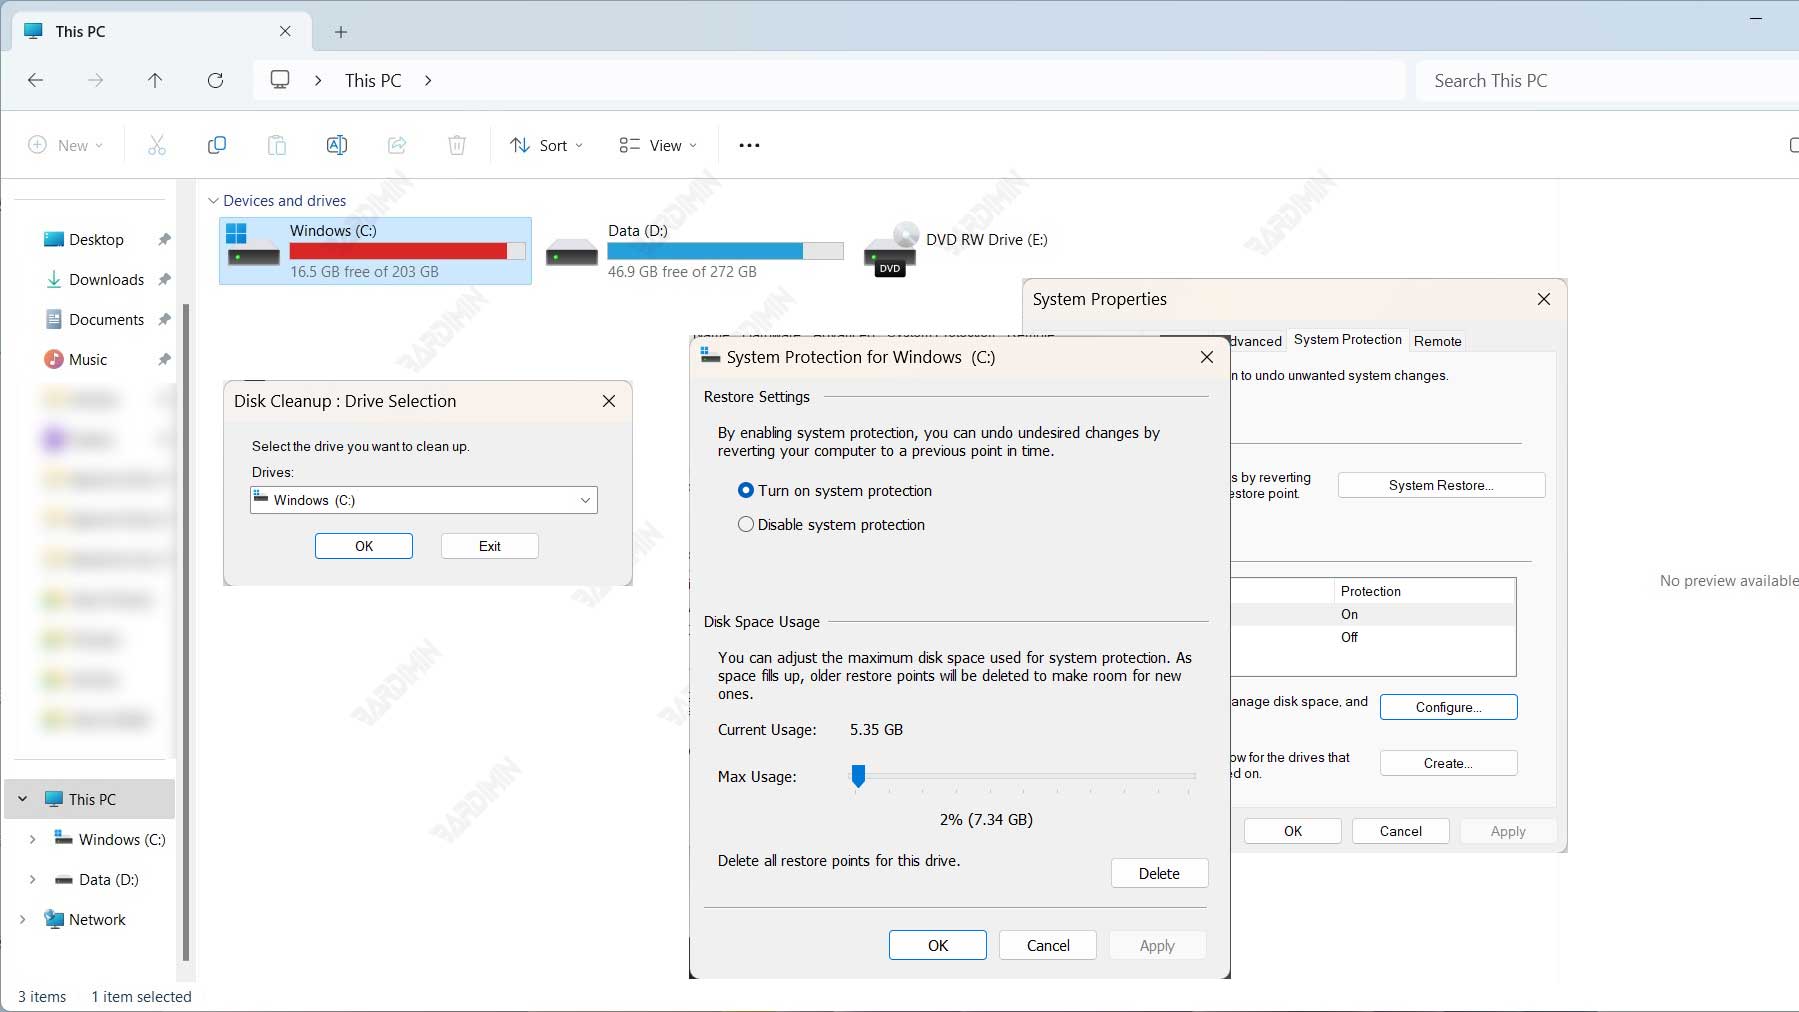
- Go to Control Panel and select System.
- On the left side, click System protection.
- Under the System Protection tab, select C drive and click the Configure button.
- Under the Disk Space Usage section, slide the slider to set the maximum size you want to allocate for System Restore. You can see the current size and available sizes below the slider.
- Click the OK button and confirm the resizing.
Step 3: Disable Hibernation
The third step you have to do is disable the Hibernation feature if you don’t need it. This feature can take up considerable disk space, depending on the size of your memory. If you disable this feature, you can save disk space by the size of the hiberfil.sys file that is on your C drive. Here’s how:
- Open Command Prompt as administrator. You can type cmd in the Windows search box and right-click on the result. Select Run as administrator.
- Type the following command and press Enter:
powercfg -h off
- Wait until the command finishes executing. You can check if the hiberfil.sys file is missing from your C drive.
Step 4: Delete Unnecessary Update Files
The fourth step you have to do is delete the unnecessary update files that are on your C drive. This update file can be a backup file created by Windows when performing a system or program update. If you don’t think you need to keep these backup files, you can delete them to save disk space. Here’s how:
- Open File Explorer and go to the following folder:
C:\Windows\SoftwareDistribution\Download
- Delete all files and folders that are inside this folder. You may need to grant administrator permission to do this.
- Go to the following folder:
C:\Windows\winsxs
- Look for files and folders that have names that end with .bak, .old, or .tmp. Delete these files and folders. You may need to grant administrator permission to do this.
Step 5: Empty the Recycle Bin
The fifth and final step you have to do is empty the Recycle Bin that is on your desktop. This recycle bin can take up considerable disk space, depending on the size of the files you have deleted. If you are sure that there is no need to restore files that you have deleted, you can empty this Recycle Bin to save disk space. Here’s how:
- Right-click on the Recycle Bin icon on your desktop. Select Empty Recycle Bin.
- Confirm deletion of existing files in the Recycle Bin.
By doing the steps above, you can solve the C drive keeps filling issue automatically in Windows. You can also improve the performance and speed of your computer this way. Hope this article will be useful for you. Thanks for reading.