If you can’t get any music out of your Windows machine, one solution is to reset your audio.
When you experience audio issues or interruptions, you can restore the sound settings to fix the issue.
If your audio or voice options are incorrect, it might cause the audio to not work normally. Third-party applications you install can change the audio settings of your Windows 11 computer, resulting in sound-related problems and, sometimes, no sound at all.
Some Windows users tinker with sound settings and don’t know what to change to get everything back to normal. You need to restore the sound settings to the defaults. There are several ways to restore sound options in Windows 11.
Restoring sound settings is especially useful if you make a misconfiguration or the sound coming out of your speakers is not appropriate.
How to Reset Audio Settings in Windows 11
Before you reset your computer’s audio settings, see if there is a simpler solution to your audio problem. For example, if you’re having trouble with headphones, make sure they’re properly plugged in, or try a different device.
If your speakers aren’t working properly, try adjusting the volume or switching to another pair. If you’re still having audio issues after trying these simple steps, resetting your computer might be the best option.
Some ways to reset sound settings in Windows 11 are:
- Reset devise sound and volume settings for all apps
- Reset audio driver
- Audio service reset
- Reset speakers
Reset devise sound and volume settings for all apps in Windows 11
If the audio settings in Windows have problems, one solution that can be tried is to reset the settings. Here are the steps on how to reset audio settings in Windows:
- Open Windows 11 Settings with the keyboard keys (WIN + I).
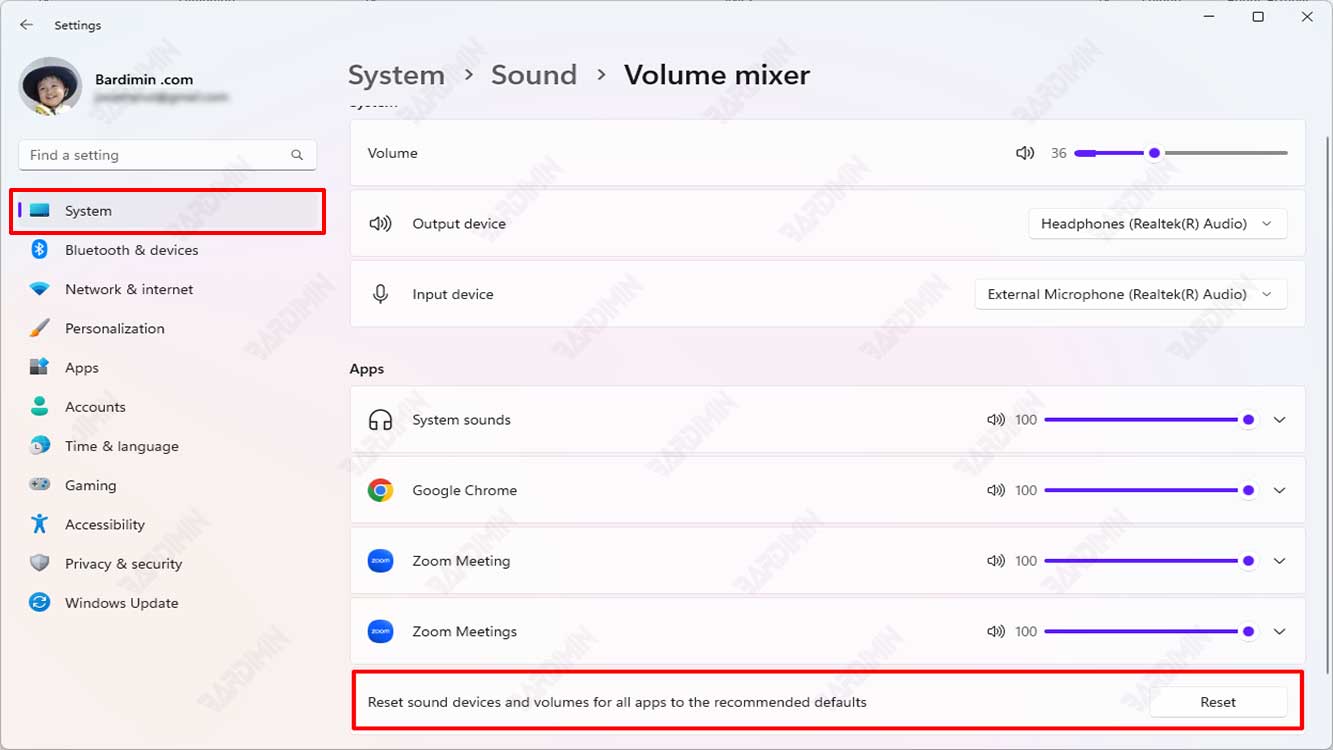
- Then navigate to “System > Sound > Volume mixer”.
- In the right-hand pane, swipe down and find “Reset sound devices and volumes for all apps to the recommended defaults”.
- Click the “Reset” button to restore the settings to default.

The audio settings in Windows will be reset to the initial settings and may fix the existing issue. However, keep in mind that this reset process will remove all previously saved audio preferences.
Reset the audio driver in Windows 11
Here are the steps on how to reset the audio driver in Windows:
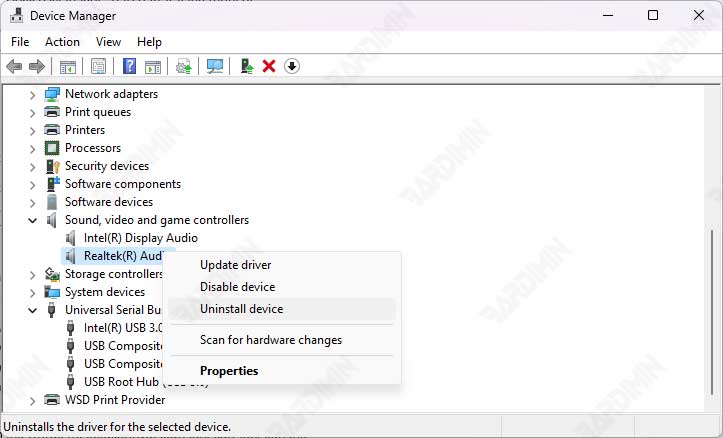
- Open the “Device Manager” by pressing the keys (WIN + X) on the keyboard, then select “Device Manager” from the list that appears.
- Find the audio device you want to reset under the “Sound, video, and game controllers” category. This device is usually named “Realtek High Definition Audio” or the like.
- Right-click on the audio device, then select the “Uninstall device” option.
- Select the “Delete the driver software for this device” checkbox if available, then click “Uninstall”.
- After the uninstallation process is complete, restart your computer.
- Once the computer is restarted, Windows will automatically install a new audio driver. If not, open the “Device Manager” again and click “Action”, then select the “Scan for hardware changes” option. This will prompt Windows to look for a new driver for your audio device.

Be sure to download the latest audio drivers from the hardware manufacturer’s website or the official Windows website.
Reset Windows Audio Servicing in Windows 11
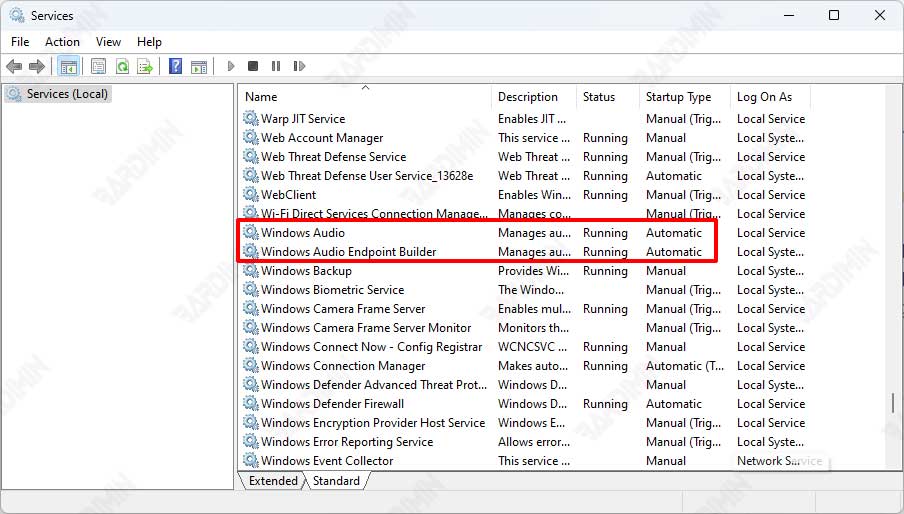
Windows uses several services to manage sound. “Windows Audio” and “Windows Audio Endpoint Builder” are two Windows 11 services that work with sound on your PC.
If you have problems with the clarity of your computer’s voice, you can restart the program. To do so, follow these steps.
Here are the steps on how to reset Windows Audio Service on Windows:
- Open “Services” by pressing the Windows key + R on the keyboard, then type “services.msc” and press Enter.
- Look for “Windows Audio” on the list of services. Make sure that this service is running, and the status is “Started”.
- If the service is not running, double-click on “Windows Audio” to open the “Properties” window.
- Select the “Automatic” option from the dropdown menu under “Startup type”, and then click the “Start” button to start the service.
- If the service is already running, right-click on “Windows Audio” and select the “Restart” option.
- Repeat the steps for the “Windows Audio Endpoint Builder” service.

If the audio problem persists, be sure to check the sound settings on the computer and make sure that the operating system has correctly detected the installed audio device. Otherwise, you may need to install the audio driver or check the audio device for issues.
Reset speakers in Windows 11
- Open the Windows “Control Panel“.
- Click “Sound“.
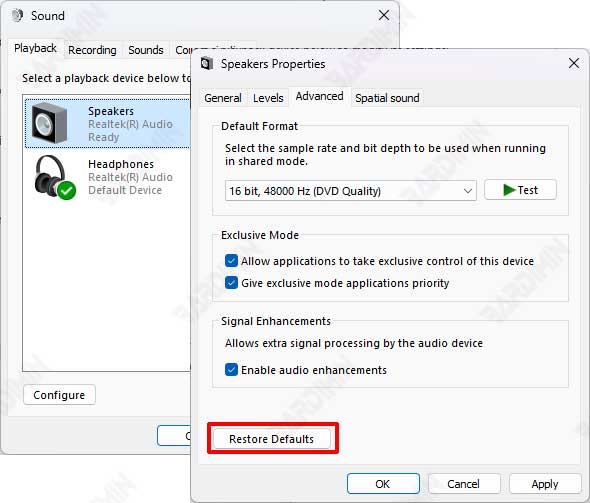
- Then right-click on the Speaker you want to reset and select “Properties“.
- Select the “Advanced” tab of the dialog box.
- Click the “Restore Defaults” button.

Be sure to check the speaker cable and make sure that the operating system has correctly detected the attached audio device.

