Do you want to try Windows 11, the latest operating system from Microsoft, but your PC does not meet the minimum requirements? Don’t worry, you can still install Windows 11 on an unsupported PC with a few tricks.
Windows 11 is the latest operating system from Microsoft that offers many new features and improvements, such as a more modern user interface, Microsoft Teams integration, Android app support, and more. However, Windows 11 also has higher hardware requirements than Windows 10, such as 8th generation processors or later, TPM 2.0, and Secure Boot. If your PC doesn’t meet these requirements, you may not be able to officially install Windows 11.
Don’t worry, though, because there are still ways to install Windows 11 on an unsupported PC, with a little trick and modification. In this article, we’ll show you the steps you need to take to install Windows 11 on an unsupported PC, either through upgrade or clean install methods. We will also tell you the risks and consequences you may face if you choose to do so.
What Are the Minimum Requirements for Windows 11?
Before we begin, let’s see what are the minimum requirements for Windows 11. According to Microsoft, your PC must have the following specifications to run Windows 11:
- Processor: 1 gigahertz (GHz) or faster with 2 or more cores on a 64-bit compatible processor or System on a Chip (SoC)
- RAM: 4 gigabytes (GB) or more
- Storage: 64 GB or greater storage device
- System firmware: UEFI, compatible with Secure Boot
- TPM: Trusted Platform Module (TPM) version 2.0
- Graphics card: DirectX 12 or later compatible with WDDM 2.0 drivers
- Display: High-resolution (720p) monitor larger than 9 inches diagonally, 8 bits per color channel
- Internet connection and Microsoft account: For Windows 11 Home settings, changing the operating system, and some features
You can check if your PC meets these requirements by using Microsoft’s PC Health Check tool. If your PC doesn’t pass the check, you’ll see a message like this:
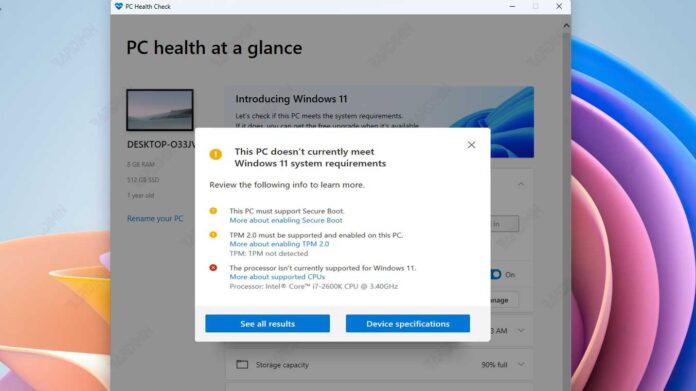
However, there are ways to get around this limitation and install Windows 11 on an unsupported PC. Let’s discuss some methods you can try.
Warning Before Installing Windows 11 on an Unsupported PC
Before we get started, there are a few things you need to know and consider before installing Windows 11 on an unsupported PC.
- Installing Windows 11 on an unsupported PC is not a process recommended or supported by Microsoft. You may experience compatibility, performance, stability, or security issues that you can’t predict or resolve.
- You may not be able to receive future Windows 11 features or security updates, which could leave your PC vulnerable to threats or bugs. Microsoft can also change its policy at any time and prevent unsupported PCs from running Windows 11 at all.
- You should back up your important data before installing Windows 11 on an unsupported PC, as there is a chance that you may lose data or damage your system during the installation process. You’ll also need to create Windows 10 installation media that can be used to restore your PC to a previous operating system in case of problems.
- You must follow the steps we provide carefully and thoroughly, as errors or omissions may lead to installation failure or system damage. We are not responsible for any loss or damage you may suffer as a result of installing Windows 11 on an unsupported PC.
If you understand and accept the risks and consequences involved, you can proceed to the following steps to install Windows 11 on an unsupported PC.
How to Install Windows 11 on an Unsupported PC Through Upgrade Method
The upgrade method is the easiest and fastest way to install Windows 11 on an unsupported PC, as you don’t need to delete or format any partitions. You just need to download the Windows 11 ISO file and run it from within Windows 10. Here are the steps you need to take:
- Download the Windows 11 ISO file from this link.
- Make sure you select the version of Windows 11 that matches your version of Windows 10, such as Home, Pro, or Enterprise. You should also choose an architecture that suits your PC, for example, 32-bit or 64-bit.
- Once the Windows 11 ISO file has finished downloading, open File Explorer and right-click on it. Select Mount from the context menu. This will create a new virtual drive on your PC containing the Windows 11 installation files.
- Open the virtual drive and look for a file named setup.exe. Right-click on the file and select Run as administrator. This will start the Windows 11 upgrade process.
- Follow the on-screen instructions to accept the license terms and choose the settings you want.
- Click on the Next button and wait for the upgrade process to complete. Your PC will restart several times during this process. Once done, you will see the Windows 11 welcome screen and can start enjoying your new operating system.
How to Install Windows 11 on an Unsupported PC Through the Clean Install Method
The clean install method is a more complicated and time-consuming way to install Windows 11 on an unsupported PC, as you will have to create bootable installation media, delete or format existing partitions, and install Windows 11 from scratch. However, this method also allows you to start with a clean and fresh system, without a trace of Windows 10 or other programs. Here are the steps you need to take:
- Download the Windows 11 ISO file from the same URL as mentioned above.
- Download and install a program that can be used to create bootable installation media, such as Rufus, BalenaEtcher, or WinToUSB. You will also need a blank USB flash drive with a capacity of at least 8 GB.
- Run the program you downloaded and select the Windows 11 ISO file as the source. Select the USB flash drive as the destination. Make sure you choose a partition scheme that suits your PC, for example, GPT or MBR. Click on the Start or Create button to start creating Windows 11 bootable installation media.
- Once the Windows 11 bootable installation media has been created, unplug the USB flash drive from your PC and insert it into the PC you want to install Windows 11 on. Restart your PC and press the appropriate key to open the boot menu, for example, F12, F10, or Esc. Select the USB flash drive as the first boot device and press Enter.
- You will see the initial setup screen of Windows 11. Select your desired language, time, and keyboard, and click on the Next button. Click on the Install now button to start the Windows 11 installation process.
- Enter your Windows 11 product key if you have one, or click on the I don’t have a product key link if you don’t have one. You can activate Windows 11 later with a valid Windows 10 product key. Select the edition of Windows 11 you want and click on the Next button.
- Agree to the license terms and click on the Next button. Select the type of installation you want, which is Custom: Install Windows only (advanced). This will take you to a screen where you can manage the partition where you want to install Windows 11. You can delete or format an existing partition, or create a new partition if you have free space. Make sure you choose a partition that has enough size for Windows 11, which is at least 64 GB. Click on the Next button once you have selected the partition you want.
- Wait until the Windows 11 installation process is complete. Your PC will restart several times during this process. Once done, you will see the Windows 11 welcome screen and can start enjoying your new operating system.
Conclusion
That’s how to install Windows 11 on an unsupported PC, either through upgrade or clean installation methods. We hope this article has helped those of you who want to try Windows 11 on your PC, even if your PC does not meet the hardware requirements set by Microsoft. However, we also remind you to exercise caution and take responsibility for the risks and consequences you may face if you choose to do so. Good luck and good luck!