Are you trying to update Windows 11, but Safeguard Hold is getting in your way? Don’t worry, in this article, I will tell you how to disable Safeguard Hold and update your Windows 11 operating system.
When you attempt to update your Windows 11 operating system, you may encounter issues with Safeguard Hold that hinder the update process. Safeguard Hold is a very important feature in Windows 11 as it ensures that users have a safe and positive experience when upgrading their operating system.
However, sometimes Safeguard Hold can get in the way of an update, even when your device doesn’t have compatibility or performance issues. Don’t worry, in this article, Bardimin will discuss the steps you need to take to disable Safeguard Hold and proceed with your Windows 11 update successfully.
What is Safeguard Hold?
Safeguard Hold is a very important feature in Windows 11 as it ensures that users have a safe and positive experience when upgrading their operating system. This feature checks if your device meets the minimum system requirements before allowing an upgrade.
This feature can help prevent hacking, misuse of information, and financial loss. When the Safeguard Hold feature is enabled, access to certain data will be restricted and require additional verification steps before you can access it.
This feature is also designed to prevent inexperienced or ignorant users from damaging the operating system or losing important data. However, sometimes Safeguard Hold can be a hindrance to users who know exactly what they are doing.
Safeguard Hold can be enforced by Microsoft, or by IT administrators. If Safeguard Hold is implemented by Microsoft, devices will not be able to install feature updates until Safeguard Hold is revoked by Microsoft. If a Safeguard Hold is enforced by an IT administrator, the IT administrator can revoke the Safeguard Hold at any time.
Why You May Need to Disable Safeguard Hold?
Safeguard Hold is an important feature that helps protect devices from problematic updates. Although Safeguard Hold provides a strong layer of protection, there are times when you may need to disable it.
Here are some reasons why you might want to disable Safeguard Hold:
- Recurring Access: If you feel that additional verification measures are an obstacle to your regular access to data, you may want to disable Safeguard Hold temporarily.
- System Maintenance: When you need to perform maintenance on your device or system, disabling Safeguard Hold can make the process easier.
- Device Switching: When you switch to a new device and want to transfer data, disabling Safeguard Hold can facilitate a smoother data transfer.
Steps to Disable Safeguard Hold via Windows Registry

Step 1: Open Registry Editor
The first step to disabling Safeguard Hold is to open the Registry Editor. You can do this by typing “regedit” in the Start menu or the Windows search box.
Once Registry Editor opens, navigate to the following directory: “ComputerHKEY_LOCAL_MACHINESOFTWAREMicrosoftWindows”
Step 2: Add a New Key
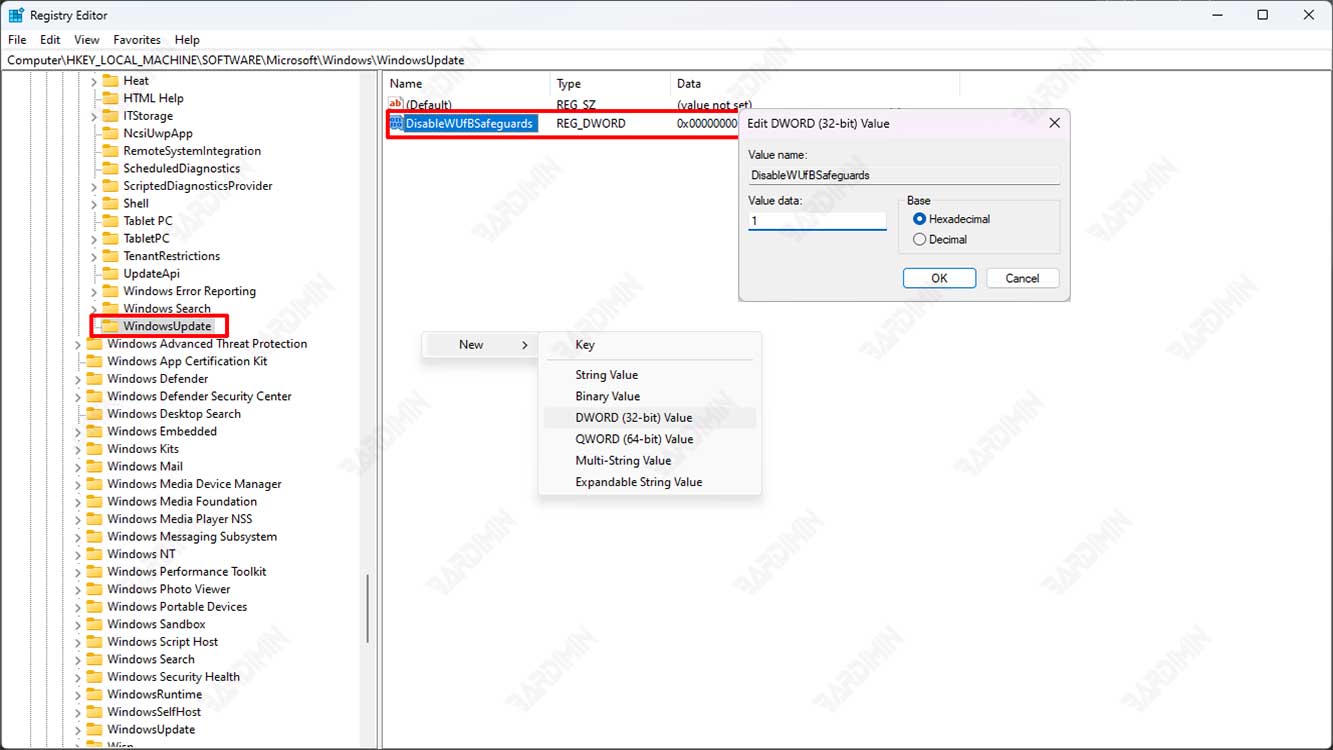
Once you have selected the Windows directory, add a new key by right-clicking in an empty area on the right panel and selecting “New > Key”.
Name the new key “WindowsUpdate” (without quotation marks).
Step 3: Add DWORD Key
Select the new key you created earlier, then add a new DWORD key by right-clicking in an empty area on the right panel and selecting “New > DWORD (32-bit) Value”.
Name the DWORD key “DisableWUfBSafeguards” (without quotes).
Once the DWORD key is created, right-click on it and select “Modify”. Then, change the DWORD value to “1” (without quotes).
Step 4: Restart Your Computer
After changing the DWORD value, restart your computer for the change to take effect.
Once your computer turns back on, you should be able to update Windows 11 without any Safeguard Hold issues.
Steps to Disable Safeguard Hold via Windows Group Policy
Here are the steps to disable Safeguard Hold via Group Policy in Windows:

Step 1: Open the Group Policy Editor
Open the Group Policy Editor by typing “gpedit.msc” in the search box or the Run menu (press Windows key + R).
Step 2: Navigate to the Relevant Settings
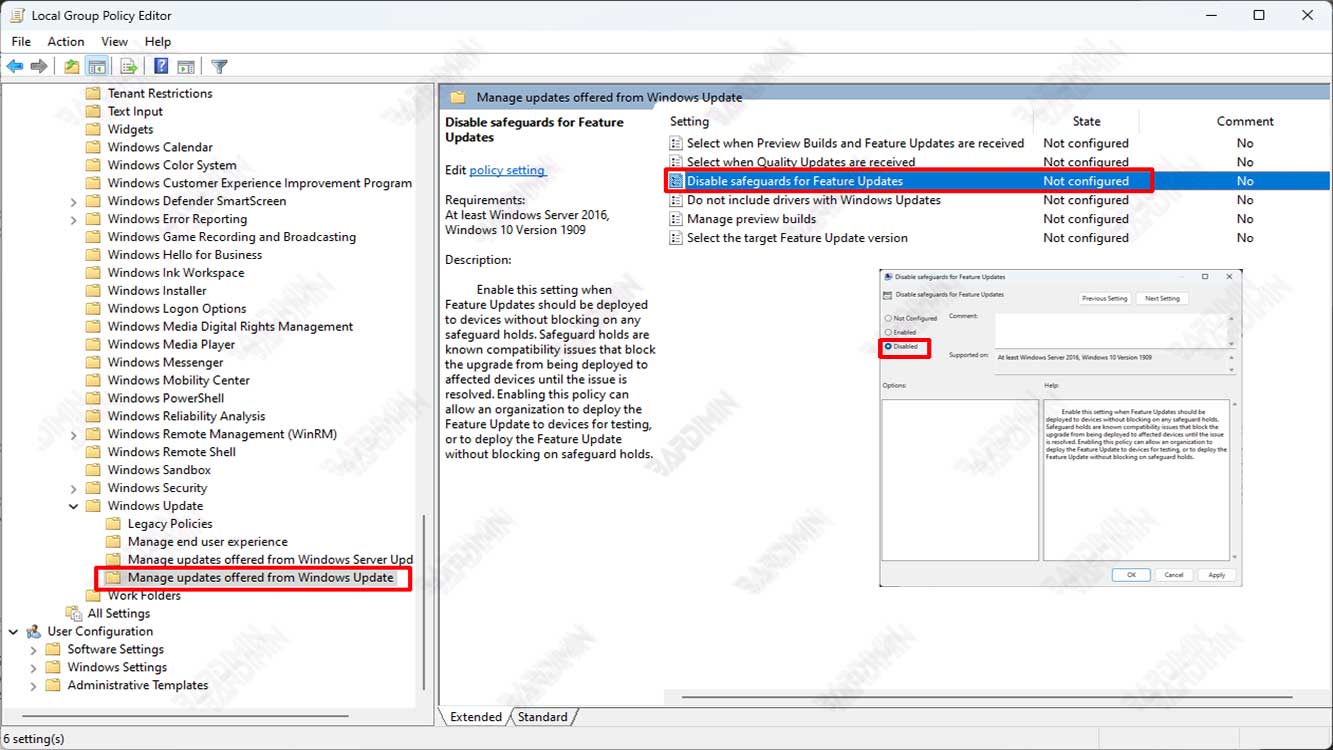
Once the Group Policy Editor opens, navigate to “Local Computer Policy >> Administrative Templates >> Windows Components >> Windows Update >> Manage updates offered from Windows Update”.
Step 3: Disable Safeguard Hold
Find the option “Disable safeguards for Feature Updates” in the right pane and open its settings by double-clicking.
In the window that appears, select the “Disabled” option to disable Safeguard Hold. Click “Apply” and “OK” to save changes.
Step 4: Restart Your Computer
After changing the Group Policy settings, you need to restart your computer for the changes to take effect effectively.
Conclusion
Safeguard Hold is an important feature in Windows 11 that ensures users have a safe and positive experience when upgrading their operating system. However, sometimes Safeguard Hold can get in the way of an update, even when your device doesn’t have compatibility or performance issues.
If Safeguard Hold gets in your way when trying to update Windows 11, follow the steps above to disable it and easily update your operating system.


