On Windows operating systems, IPv6 (Internet Protocol version 6) is a newer version of the network protocol used to connect devices to the internet.
IPv6 stands for “Internet Protocol version 6.” It is the latest version of the Internet Protocol (IP) that provides an identification and location system for computers on the network as well as routing traffic on the Internet. IPv6 was developed by the Internet Engineering Task Force (IETF) as the successor to IPv4.
As the successor to IPv4, IPv6 has some important differences. One of them is a larger IP address size. IPv4 uses a 32-bit address format, while IPv6 uses a 128-bit address format.

This allows IPv6 to provide more IP addresses than IPv4, overcoming the IP address depletion problem that occurs with IPv4 as more devices connect to the Internet.
The use of IPv6 also helps in improving security, automatic configuration, and network flexibility. In addition, the implementation of IPv6 is important to maintain the rapid growth and development of the internet by providing more IP addresses that can be assigned to connected devices.
While IPv6 offers some advantages, there are some situations where you may need to disable it, especially if you’re having network connection or security issues. This article will discuss the steps to disable IPv6 in Windows.
Step 1: Open Network Settings
The first step is to open Network Settings on your Windows system. To do this, follow these steps:
- Press the keys on the keyboard “WIN + R” on the keyboard to open the “Run” dialog box.
- Type “control” in the search box, then click “OK”.
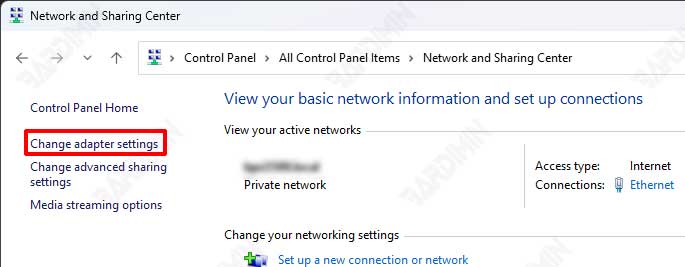
- In the “Control Panel” window, select “Network and Sharing Center”.
- Then select “Change adapter settings”.

Step 2: Open Network Card Settings
Once you have opened Network Settings, the next step is to open the settings for the network card for which you want to disable IPv6. Here are the steps:
- In the “Network Connections” window, select one of the network cards you are currently using.
- Then, right-click and select the “Properties” option.
Step 3: Disable IPv6
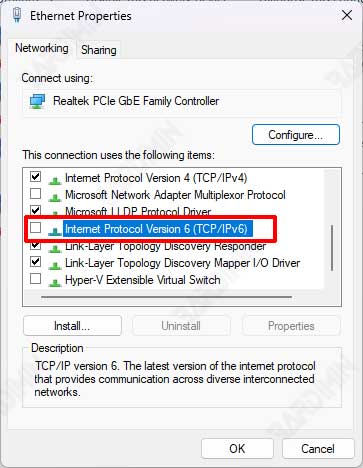
Once the Properties window appears, the final step is to disable the IPv6 protocol. Here’s what to do next:
- Look for “Internet Protocol Version 6 (TCP/IPv6)” in the list of items.
- Uncheck the box in front of it to disable the IPv6 protocol.
- Click “OK” to save changes.

Conclusion
By completing the above steps, you have successfully disabled IPv6 on your Windows network card. This can help fix connection problems or improve the security of your system.
However, keep in mind that IPv6 has its benefits, and disabling it should be considered wisely.
By following these steps, you can easily manage network protocols on your operating system. Hope this information is useful and helps you in optimizing your computer network settings.


