How to Fix Windows Sandbox Fails to Start Error in Windows 11
Regardless of which Sandbox error code you receive, the following guide will show you that can help troubleshoot the Windows Sandbox won’t start issue.
- Disable and Re-enable Windows Sandbox.
- Run the Windows services required by Sandbox.
- Restart Hyper-V and other applications listed on the “Windows Features” screen.
- Use the Windows Troubleshooting Tool.
- Repair Windows system files.
- Restore Windows to a Previous State.
- Update your device.
1] Disable and Re-enable Windows Sandbox.
- Open Windows Features. You can open it by pressing the keyboard key (WIN + R) to access the “Run” dialog box. Type “optionalfeatures” and press Enter to open the Windows Features program.
- Then swipe down on the Windows Features window. Find “Windows Sandbox” and uncheck it to disable it.
- Click the OK button.
- Restart your computer.
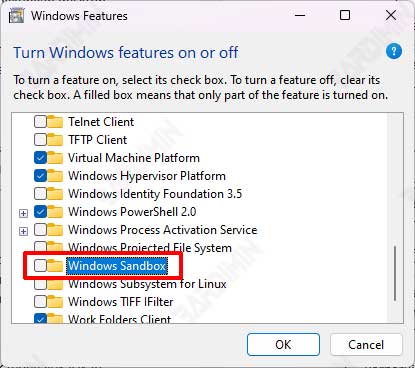
After Windows restarts, repeat it and activate Windows Sandbox by checking it.
2] Run the Windows services required by the Sandbox.
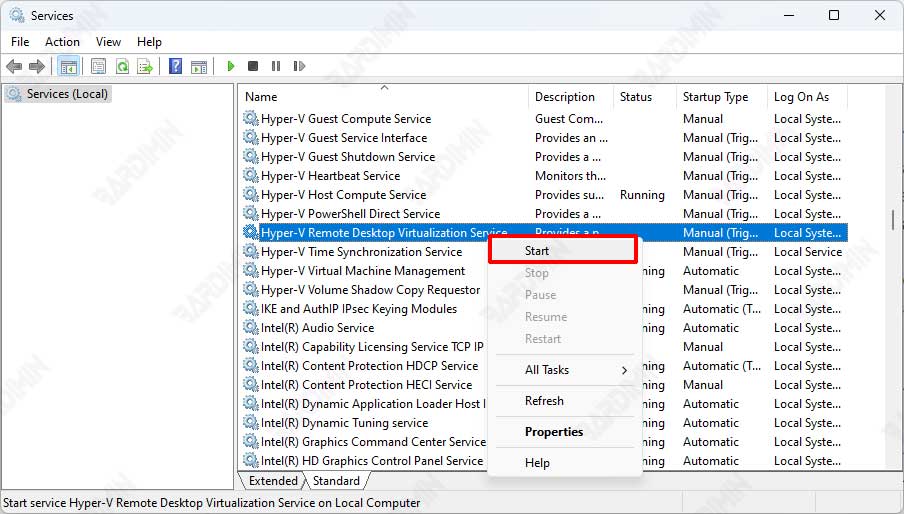
When certain Windows services are disabled, Sandbox errors usually appear. To run correctly, Windows Sandbox requires the Windows service “Hyper-V Remote Desktop Virtualization Service” to be running.
- Open Windows Services. Press the keyboard keys (WIN + R) to access the “Run” dialog box. Type “services.msc” and press Enter to open Windows services.
- Then in the Windows Services window, search for and find the “Hyper-V Remote Desktop Virtualization Service” service.
- Right-click the service and select the “Start” option.
If Windows Sandbox still fails to start, also make sure the following services are also running. Use the above to run:
- Hyper-V Host Service
- Hyper-V Time Synchronization Service
- Virtual Disk
3] Restart Hyper-V and other applications listed on the “Windows Features” screen.
Restarting some programs on the Windows Features screen can help. However, this method will only be effective if you restart the features on which the Sandbox tool depends.
In this case, restarting the “Hyper-V”, “Hyper-V Management Tools”, and “Hyper-V Platform” features might help resolve the issue.
- Open Windows Features. You can open it by pressing the keyboard key (WIN + R) to access the “Run” dialog box. Type “optionalfeatures” and press Enter to open the Windows Features program.
- Then swipe down on the Windows Features window. Find “Hyper-V” and uncheck it to disable it. Also, make sure to uncheck “Hyper-V Management Tools” and “Hyper-V Platform“.
- Click the OK button and restart the computer.
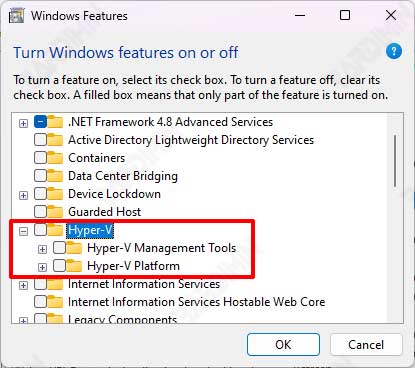
After the computer turns back on, repeat the steps to re-enable “Hyper-V”, “Hyper-V Management Tools”, and “Hyper-V Platform” by checking them.
4] Use the Windows Troubleshooting Tool.
- Open Windows “Settings” by pressing the keyboard keys (WIN + I).
- Then navigate to “System > Troubleshoot“.
- Select “Other troubleshooters” on the right panel.
- Select the hardware or device and press the Run button.
- Restart the computer by following the instructions on the screen.
5] Repair Windows system files.
- Open “Command Prompt (CMD)” and run it as administrator.
- To repair system files, use the following command:
sfc /scannow
- Then, run the following commands one by one:
DISM /Online /Cleanup-Image /CheckHealth
DISM /Online /Cleanup-Image /ScanHealth
DISM /Online /Cleanup-Image /restorehealth
- Restart the computer when all processes are complete.
6] Restore Windows to its Previous State.
In Windows 11, you can restore from the restore system by:
- Open the “Control Panel“.
- Click “Recovery“.
- In the “Recovery” window that opens, select “Open System Restore” on the right panel.
- Next will open the “System Restore” dialog box. Click the “Next” button.
- Then select the restore point on the date the computer is still working properly and normally. Click the “Next” button to continue.
- Click the “Finish” button to start the restore process.
- Wait until the restore process is complete. Your PC will restart when finished.
