Windows 11 default fonts feel too ordinary? If you’re tired of the Segoe UI looking the same, you’re not alone! Many Windows 11 users want to change the default system font to make their desktop look more personalized and visually appealing. However, Microsoft does not provide an official option to override it through Settings.
In addition to aesthetics, the right font can improve reading comfort, especially for users who work for a long time in front of the screen. This article will guide you step-by-step on changing the default font of Windows 11 without the risk of error, including the best font recommendations and solutions in case of problems.
System font modifications affect the overall Windows interface. Ensure you follow these guidelines carefully and create a backup registry before proceeding. Let’s get started!
Important Preparations Before Changing Windows 11 System Fonts
Changing the default system font in Windows 11 can indeed make the look more personalized, but there are a few crucial things to prepare for first. Minor errors can cause problems with the Windows interface, so follow this setup guide carefully!
1. Windows Registry Backup (MANDATORY!)
Font modifications are made through Registry Editor, and editing errors can make the system unstable.
How to backup:
- Open Registry Editor (press Win + R, type regedit, then Enter).
- Click File > Export, save it with a name like Backup_Registry_Sebelum_Ganti_Font.reg.
- Store the backup file in a secure location (flash drive/cloud).
2. Choose a Compatible Font
Not all fonts can work well as a font system. Some safe recommendations:
- Arial
- Calibri
- Segoe UI (other variants)
- Tahoma
Avoid custom fonts that don’t support full characters (which can cause text errors in some apps).
3. Make Sure You Have Administrator Access
To be able to make modifications to the registry and system settings, you must use an account with Administrator access rights.
How to verify an administrator account:
- Click the Start button, type cmd.
- Right-click on Command Prompt, select Run as administrator.
- If you see a UAC (User Account Control) notification, it means that you have admin access.
If you don’t have administrator access, you won’t be able to run the registry file or change the system font settings.
Steps to Change the Default System Font in Windows 11
Changing the font system in Windows 11 can give it a personal touch and improve visual comfort. However, since system fonts are directly related to the user interface (UI), this process must be done carefully.
1. Manual Method: Using the Registry Editor
This method is suitable for intermediate to advanced users who understand the risks and importance of registry modifications.
1. Open the Registry Editor
- Press Win + R, type regedit, and then press Enter.
- If UAC appears, click Yes to grant admin permissions.
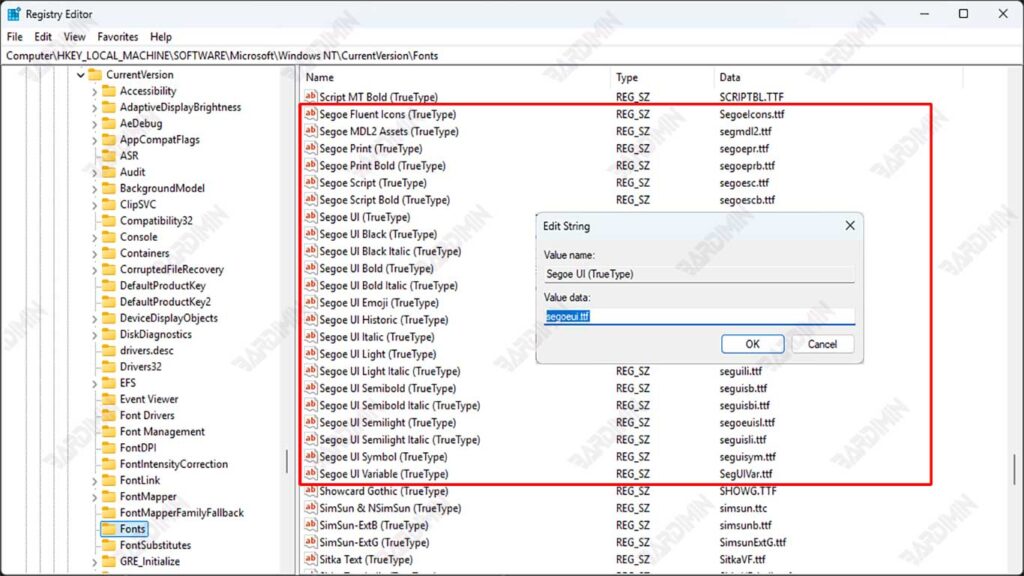
2. Navigate to System Font Location
Enter the following path:
HKEY_LOCAL_MACHINE\SOFTWARE\Microsoft\Windows NT\CurrentVersion\Fonts3. Change the Default Font
- Look for the following entries (depending on the type of font you want to replace):
- Segoe UI (TrueType) → Fonts for plain text
- Segoe UI Bold (TrueType) → Fonts for bold text
- Segoe UI Light (TrueType) → Fonts for light text
- Right-click on the entry, select Modify.
- Replace the value with a new font file name (example: Arial.ttf).
- Make sure the selected font is installed on the system.
4. Save & Close Registry Editor
Once you’ve made the changes, perform a system restart to apply the new font.
