Are you worried about important data being stolen via USB? Or afraid of someone else’s flash drive bringing malware to your PC? Calm! In Windows 11, you can block access to USB flash drives and external hard drives in two powerful ways: Group Policy and Registry Editor.
In today’s digital era, data security is crucial. Did you know that portable storage devices such as flash drives and external hard drives can be a serious threat? Not only can they potentially steal important data in seconds, but they can also carry malicious malware that can damage your computer system.
According to a recent report from Cybersecurity Ventures, malware attacks via USB devices increased by 37% in 2023. What’s even more worrying is that many users don’t realize that their data can be stolen just by plugging a flash drive into a computer. Even in the work environment, this risk is often ignored until a detrimental data leak occurs.
But don’t worry! Windows 11 provides a powerful solution to address this issue. In this comprehensive guide, you’ll learn how to block USB storage access easily, either through Group Policy Editor or Registry Editor. We’ll also discuss the different methods for Windows 11 Home and Pro, as well as additional tips to improve your system’s security.
Method 1: Block USB via Group Policy Editor (Instant Solution for Windows 11 Pro/Enterprise!)
For you, Windows 11 Pro or Enterprise, the Group Policy Editor is a powerful weapon to secure your computer from USB threats. No need to install additional software – just 5 clicks and your USB storage port will be locked tightly!
Practical Steps to Block USB via Group Policy Editor
1. Open Group Policy Editor
- Press Win + R (Windows key + R together)
- Type gpedit.msc
- Press Enter or click OK
(If you see an error message, your version of Windows doesn’t support it – go straight to Method 2!)
2. Navigate to Blocking Policy
Navigate to the following directory:
Computer Configuration > Administrative Templates > System > Device Installation > Device Installation Restrictions3. Turn on “Prevention”
- Look for the option “Prevent installation of removable devices.”
- Double click, this is the “main switch” of USB blocking
- Select Enabled (Activate)
- Click OK to save

Important Facts:
– Immediate effect! Once activated, Windows will reject all USB storage devices (flash disks, external HDDs, etc.).
-But… The USB mouse/keyboard remains functioning normally – the system only blocks the storage device.
– Can be reversed at any time by changing the setting to Disabled.
Tips for IT Admins: Elevate Security to the Enterprise Level!
For IT professionals who want to implement more granular and secure USB restrictions, the Group Policy Editor provides powerful advanced options. Here’s an in-depth explanation of how to optimize USB security policies on corporate networks:
1. “Allow Installation of Devices with Specific IDs”
(USB Device Control Specifically)
What are the benefits?
- You can whitelist the USB devices that are allowed
- Only flash drives/hard drives with specific device IDs can be used
- Suitable for enterprise environments that need to allow only authorized devices
How to Apply:
- In the Device Installation Restrictions folder, look for the option: “Allow installation of devices that match any of these device IDs.”
- Enabled
- Click Show in the Device IDs section, then enter:
- Example format: USB\VID_0781&PID_5583 (SanDisk Cruzer ID)
- Get the device ID via Device Manager (see Properties > Details > Hardware IDs)
2. “Prevent Installation of Unauthorized Devices”
(Total Lock All Devices Not Registered)
Why is this important?
- Serves as a second layer of security
- Ensure only devices with registered IDs can be installed
- Prevent bypass attempts with new devices
Optimal Implementation:
- Enable the option: “Prevent installation of devices not described by other policy settings.”
- Combine it with the whitelist ID in point 1
- Result:
- Devices on the whitelist → Allowed to use
- Unknown device → Auto blocked
Method 2: Block USB via Registry Editor – The Ultimate Solution for Windows 11 Home!
For Windows 11 Home users, the Group Policy Editor feature is not available. But don’t worry, you can still block the USB port by modifying the Windows Registry. This method is quite effective, but it needs to be done carefully to keep the system stable.
Important Warning!
“Edit Registry is like heart surgery – one step can be fatal! But don’t worry, follow these guidelines carefully and you’ll be safe.”
Why Choose This Method?
- The only solution for Windows 11 Home (which doesn’t have a Group Policy)
- 100% effectively blocks all USB storage
- No additional software – purely Windows features
Step by Step Block USB via Registry Editor
1. Open the Windows Registry Editor
- Press Win + R → type “regedit” → Enter
- Click Yes on the UAC alert
2. Navigate to the USB Policy directory
Navigate to the following locations:
Computer\HKEY_LOCAL_MACHINE\SOFTWARE\Policies\Microsoft\Windows3. Create a DeviceInstall folder
- Right-click Windows > New > Key → name: “DeviceInstall”
- Enter a new folder, create another key named: “Restrictions”
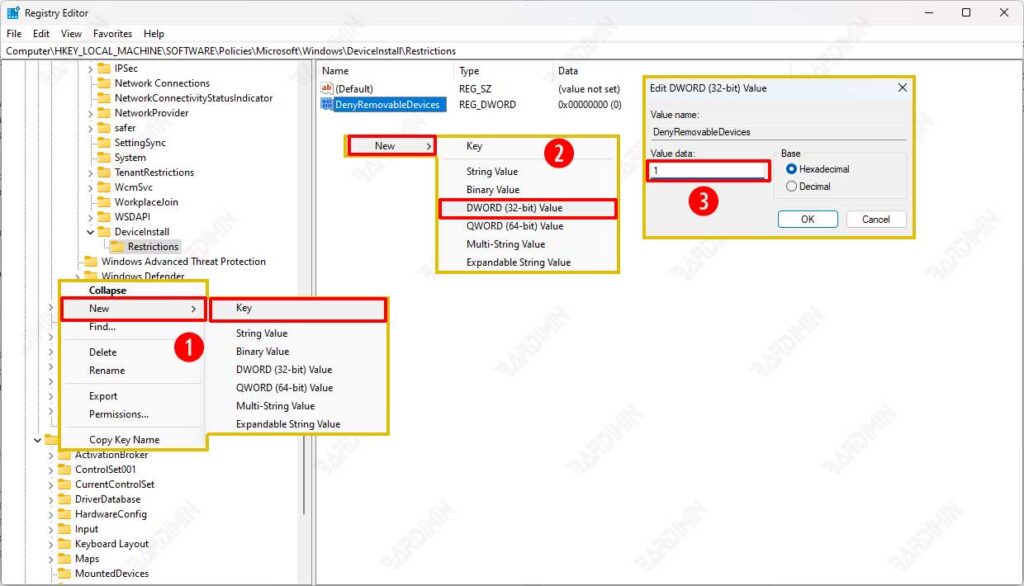
4. Create a DenyRemovableDevices key
- Inside the Restrictions, right-click the empty area
- Select New > DWORD (32-bit) Value
- Name: “DenyRemovableDevices”
- Double-click, set value:
- 1 = Total block
- 0 = Allow access
5. Restart
Press Win + R → type “shutdown /r /t 0” → Enter to restart super fast
Interesting Facts:
– This change modifies the Windows kernel-level policy
– Still allow USB mouse/keyboard (only block storage)
– The effect is stronger than Group Policy!
Did you know that all the manual steps can be shortened to just 1 click? Here are the secrets that are rarely revealed!
How This Magic Script Works:
A REG file works like a “registry action shortcut” – when executed, it will:
- Automatically create all necessary folders and keys
- Set the DenyRemovableDevices value to 1
- Without the need to open the manual Registry Editor
How to Create a Magic File:
- Open Notepad
- Copy-paste this script:
Windows Registry Editor Version 5.00
[HKEY_LOCAL_MACHINE\SOFTWARE\Policies\Microsoft\Windows\DeviceInstall\Restrictions]
“DenyRemovableDevices”=dword:00000001- Save As → select All Files → name disable_usb.reg
How to Use:
- Double-click the disable_usb.reg file
- Click Yes on the security alert
- Boom! USB is blocked immediately after restarting
USB Enable Version:
Create an enable_usb.reg file with a value of 0 to reverse:
Windows Registry Editor Version 5.00
[HKEY_LOCAL_MACHINE\SOFTWARE\Policies\Microsoft\Windows\DeviceInstall\Restrictions]
“DenyRemovableDevices”=dword:00000000
Pro Tip:
Combine with a Batch Script for complete automation:
echo off
regedit /s disable_usb.reg
shutdown /r /t 0
Commemoration:
– REG files from unknown sources can be harmful
– Always check the content of the script before running it
– Keep a backup of REG files in a safe location