How to Disable Removable Storage in Windows 11
Disabling removable storage in Windows 11 is an important step to improve system security and prevent the spread of malware. One of the most effective ways to do this is to use Group Policy Editor (GPO), a built-in Windows tool that allows administrators to control various aspects of the system. Here is the full guide.
1. Using the Group Policy Editor (GPO)
Group Policy Editor is a very powerful tool for setting system policies in Windows 11. With this tool, you can disable access to removable storage such as USB Flash Drives, External Hard Drives, and SD Cards. Here are the steps:
Step 1: Open Group Policy Editor
1. Press the Windows + R keys on the keyboard to open the Run window.
2. Type gpedit.msc in the field provided, then press Enter.
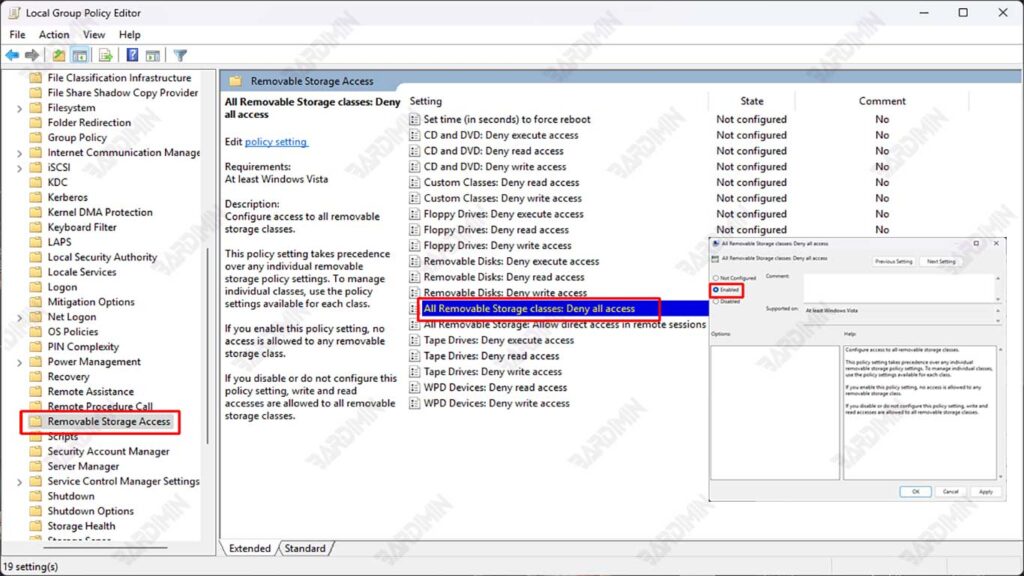
Step 2: Navigate to Removable Storage Access
- Once Group Policy Editor opens, navigate to the following path:
Computer Configuration > Administrative Templates > System > Removable Storage Access- In the Removable Storage Access folder, you’ll see various policy options related to external storage devices.
Step 3: Disable Access to All Removable Storage
- Look for an option named “All Removable Storage Classes: Deny All Access”.
- Double-click on the option to open the settings window.
- In the window that appears, select the Enabled option to disable access to all types of removable storage.
- Click Apply and OK to save the changes.
Step 4: Restart the Computer
- After you enable this policy, restart your computer to apply the changes.
- After the restart, all access to the removable storage will be disabled, including USB Flash Drives, External Hard Drives, and SD Cards.
Group Policy Editor is only available on Windows 11 Pro, Enterprise, and Education. If you’re using Windows 11 Home, you’ll need to use Registry Editor or a third-party tool.
This policy will block all types of removable storage. If you only want to block certain types (for example, only USB Flash Drives), you can set more specific policies in the Removable Storage Access folder.
2. Using the Registry Editor
Registry Editor is a tool that allows you to make in-depth changes to your Windows 11 system. By editing the registry, you can block access to removable storage such as USB Flash Drives, External Hard Drives, and SD Cards. Here are the steps:
Step 1: Open Registry Editor
- Press the Windows + R keys on your keyboard to open the Run window.
- Type regedit in the field provided, then press Enter.
- If you see a User Account Control (UAC) alert, click Yes to continue.
Step 2: Navigate to the Right Key
- Once Registry Editor opens, navigate to the following path:
HKEY_LOCAL_MACHINE\SOFTWARE\Policies\Microsoft\Windows\RemovableStorageDevices- If the RemovableStorageDevices folder doesn’t exist, you can create it manually. Right-click on the Windows folder, select New > Key and give it a RemovableStorageDevices name.
Step 3: Create a New DWORD to Block Removable Storage
- In the RemovableStorageDevices folder, right-click on an empty area and select New > DWORD (32-bit) Value.
- Name the new DWORD Deny_All.
- Double-click on the Deny_All, then change the Value data to 1.
- Click OK to save the changes.
Step 4: Restart the Computer
- After making changes, restart your computer for the new settings to take effect.
- After restarting, access to all removable storage will be blocked.
