How to Switch from Local Profile to Roaming Profile in Windows 11
To switch from Local Profile to Roaming Profile in Windows 11, you need to follow some technical steps, especially if you’re on a network that uses Active Directory (AD). Here is a step-by-step guide to making this change:
Step 1: Ensure Access to Active Directory (AD) and Group Policy Management
Make sure you have administrative access rights to Active Directory and Group Policy Management Console (GPMC). This is required to configure the Roaming Profile at the network level.
Step 2: Log in to Control Panel > System > Advanced System Settings
- Open Control Panel.
- Select System and Security > System.
- In the left panel, click Advanced system settings.
- In the window that appears, select the Advanced tab.
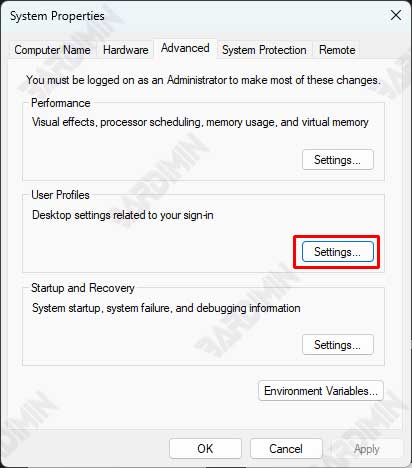
Step 3: Select Tab User Profiles and Change Profile Type
- Under the User Profiles section, click the Settings button.
- In the User Profiles window, select the user profile you want to change from Local to Roaming.
- Click Change Type.
- Select the Roaming Profile option and click OK.

Step 4: Configure Roaming Profile Path in Group Policy Editor
- Open Group Policy Management Console (GPMC) by typing gpmc.msc in the Start menu and pressing Enter.
- Navigate to Group Policy Object (GPO) associated with your user or computer.
- Right-click on the GPO and select Edit.
- In Group Policy Management Editor, navigate to:
Computer Configuration > Policies > Administrative Templates > System > User Profiles- Find and enable the Set roaming profile path for all users logging onto this computer policy.
- Enter the path of the server where the roaming profile will be stored, for example:
\\ServerName\Profiles\%Username%- Save the changes and close Group Policy Management Editor.
Step 5: Restart the Computer and Test Sync
- Restart your computer to apply the changes.
- After restarting, log in to the user account that has been changed to Roaming Profile.
- Test syncing by making changes to settings or files, then signing in from another device to make sure those changes are synced.
Choosing between Local Profile and Roaming Profile in Windows 11 is a decision that needs to be tailored to your needs and work environment. Local Profiles are suitable for individual use that relies on only one device, such as designers or authors, because they offer high access speeds and local data security.
On the other hand, Roaming Profile is ideal for business environments or users who switch devices frequently, as it allows data access from various locations and devices with maintained consistency. The selection of these profiles depends on three main factors: accessibility, security, and speed.
If you need flexibility and data synchronization between devices, Roaming Profile is the best option. However, if you prioritize the speed and security of locally stored data, Local Profiles are a better fit. By understanding the differences and benefits of each, you can optimize the use of Windows 11 according to your personal or professional needs.
