In today’s digital era, we often store various types of files on our computers, ranging from important documents, and photos of memories, to work videos. However, with more and more files being stored, many times we face the problem of losing the files needed just when we need them.
The ability to find missing files within Windows folders is an essential skill that every computer user must have. Knowing how to take advantage of the search and sort features provided by Windows can save time and reduce frustration when searching for lost files.
Using the Search Box in Folders
When you search for missing files inside a desktop folder, the Search boxes in the Start menu can be overwhelming. To solve the problem of a “sea of files in folders,” Windows provides a Search box in the upper-right corner of each folder.
This Search box allows users to quickly search for files without the need to open folders one by one. This feature is especially useful when you have a lot of files in a folder and don’t want to spend time searching for them manually. This search box limits the search to only the files that are within the folder, making the search more specific and focused.
Steps to find files:
- Starting a Search by Typing a Keyword from the Searched File:
To start the search, simply click on the Search box and type in a keyword or phrase that you remember related to the missing file. These keywords can be part of the file name, file type, or words in the document. Windows will automatically start processing your input and display the corresponding results. - How Windows Filters Irrelevant Files While You Type:
When you type a keyword, Windows dynamically filters out files that don’t match your search criteria. Each letter you enter narrows down the search results, leaving only the most relevant files with the keyword that has been typed. This process makes it easy for you to quickly find the file you’re looking for without having to scroll through a long list of irrelevant files. With this feature, file search becomes more efficient and effective, saving you time in finding lost files.
Improve Search Accuracy with Sort Feature
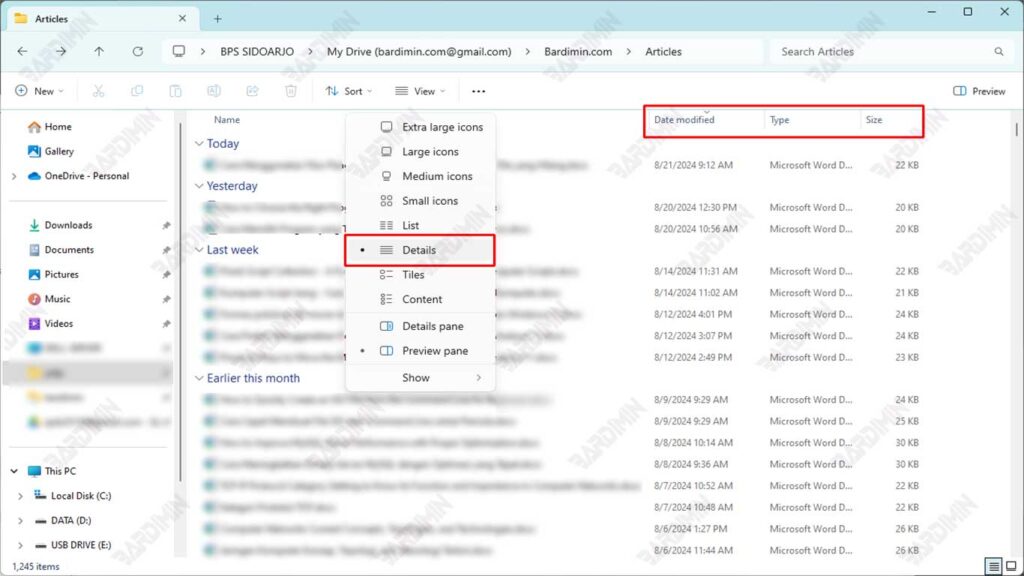
When a box Search folder finds too many matches, you can use another help: headers above each column. For best results, click View on the top edge of the folder and select Details from the drop-down menu.
One effective way to improve the accuracy of file search in Windows is to take advantage of the sorting feature available in the header column inside the folder. At the top of each column in the folder view, there are headers such as Name, Date Modified, and Type. This header allows you to sort files by specific categories, so you can easily find the files you’re looking for.
- Name: Sorts files by name, either alphabetically from A to Z or vice versa.
- Date Modified: Sorts files by date last modified, from newest to oldest, or vice versa.
- Type: Group files by their type or format, such as .docx for Word documents, .jpg for images, etc.
Usage Examples:
- Sorting Files by Name:
If you know the name of the file you are looking for, you can click the Name header to sort all the files in that folder alphabetically. For example, if you are looking for a file that starts with the letter “P”, after sorting, you can go directly to the part of the file that starts with that letter, speeding up the search process. - Sorting Files by Modification Date:
If you remember the last time you changed a lost file, sorting files by Date Modified can be helpful. Click the Date Modified header to display the most recently modified files at the top of the list. For example, if you remember that the file was changed in the past week, you can quickly find it among the top results after sorting.
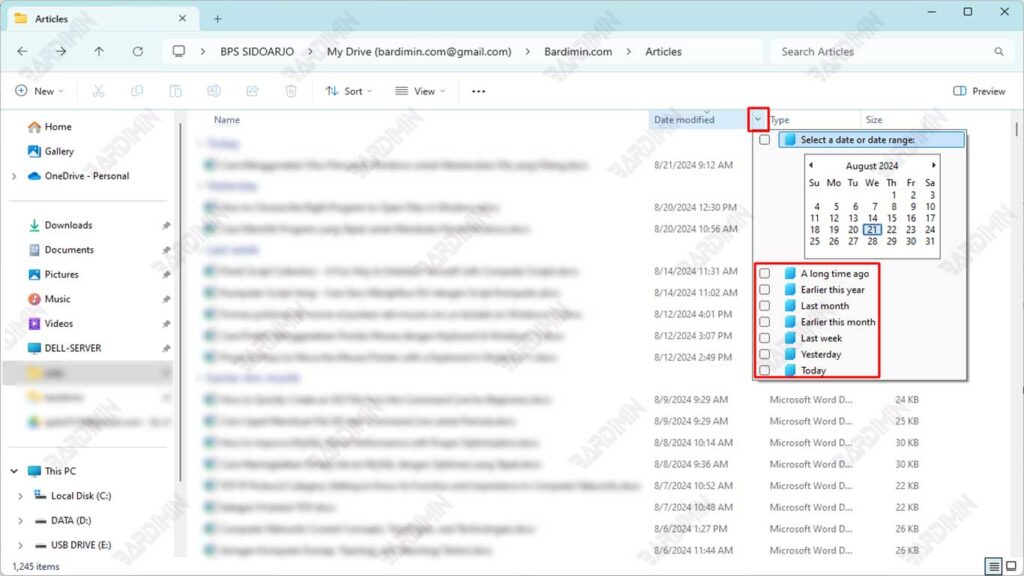
Using Filters for More Specific Searches
For more specific and focused searches, Windows provides Filter features that allow you to utilize columns such as Date Modified and Authors. This feature is useful when you need to search for files with specific criteria, such as files created or modified at a specific time, or files associated with a specific author.
- Date Modified: You can use this filter to display files that were changed at a specific period. For example, you can filter files that were changed in the last 24 hours, the last week, or on a specific date that you remember.
- Authors: This filter allows you to search for files created or modified by a specific author. This is especially useful if you work in a team and the files inside the folder are created by various people.
Practical Examples:
- Search for Files by Modification Date:
Suppose you’re looking for a report that you remember was changed last week. You can click on the Date Modified column and select the “Last week” option to filter the files that were changed in the last week. This way, you’ll only see files that were changed in that period, narrowing your search results and reducing the number of files that need to be checked. - Search for Files by Author:
If you’re working on a project and need a document written by a specific coworker, you can use the Authors filter. For example, you can type the author’s name in the Authors field to display all the files associated with that person. It helps you find the documents you need without having to manually check each file.
These hidden filters can be dangerous, as you can easily forget that you have activated them. If you see a checkmark next to the header of any column, you’ve enabled the filter, and the folder hides some of its files. To turn off the filter and see all the files in that folder, uncheck the box next to the column header and check the drop-down menu. Click the selected checkbox in the drop-down menu to remove the checkmark and remove the filter.
How to Sort by Column Headers
See column headers, such as Name, Date Modified, and Type, above each column. Click on one of those headers to sort your files by that term. Here’s how to sort by some of the column headers you might see in your Documents folder :
- Name: Know the first letter of your filename? Click here to sort your files alphabetically. You can then retrieve your files from the list. (Click Name again to reverse the order of the order.)
- Date Modified: When you remember the estimated date you last changed the document, click the Date Modified header. That will put your most recent files at the top of the list, making them easy to find. (Click Date Modified again will reverse the order, a useful way to get rid of old files that you may no longer need.)
- Type: This header sorts files by their content. All your photos are grouped, for example, and so are all your Word documents. This is a useful way to find some photos that are lost in a sea of text files.
- Size: Sorting here puts your 45-page thesis at one end and your grocery list at the other.
- Authors: Microsoft Word and some other programs add your name to your work. Click this label to sort the files alphabetically by the name of the creator.
- Tags: Windows often allows you to add tags to your documents and photos. Adding the “Moldy Cheese” tag to such a sharp photo session allows you to take the image either by typing the tag or sorting the files in the folder by tags.
Maximizing the Use of the Detail Column in Windows
Folders usually display about five columns of detail, but you can add more columns. You can sort files by word count, song length, photo size, date of creation, and dozens of other details.
Adding Additional Details Columns:
Windows allows you to customize the appearance of folders by adding additional detail fields that are relevant to the type of file you’re looking for. Some useful detail columns include Word Count, Photo Size, and Creation Date. By adding these fields, you can enrich the information displayed, making the process of searching for missing files easier.
How to add columns:
- Open the folder where you want to add additional detail fields.
- Right-click on the column header (such as Name or Date Modified).
- Select the More… option from the menu that appears.
- In the Choose Details window, scroll through the list and check the columns you want to add, such as Word Count, Photo Size, or Creation Date.
- Click OK to add those columns to the folder view.
Benefits of Additional Columns:
Adding additional detail columns can be very helpful in the process of finding missing files, especially when you need to filter or sort files based on more specific information. Here are some of the benefits of additional columns:
- Word Count: If you’re looking for a document with a specific word count, the Word Count column allows you to identify files based on their text length, without having to open each file.
- Photo Size: The Photo Size column is very useful when you are looking for images with a specific file size. For example, if you are looking for high-resolution photos, you can sort or filter the images by file size.
- Creation Date: Columns Creation Date helps you find files based on the date they were created. This is especially useful if you remember when a file was first created, and want to find a file that was created on that date.
Conclusion
Finding missing files within a Windows folder can be a confusing task, especially if the folder contains many files of different types and names. However, by taking advantage of the search, sort, and filter features available in Windows, you can speed up the search process and find your missing files more efficiently.
The Search box allows you to search for files by keyword, while the Sortir and Filter features help narrow down search results based on criteria such as name, modification date, file type, or author. Additionally, adding additional detail columns such as Word Count or Creation Date can provide more in-depth information, which is especially useful in the search process.