Implementing Efficiency Mode in Windows 11 can strategically reduce energy consumption, increase battery life and improve PC performance.
Efficiency Mode is a new feature in Windows 11 to limit the use of system resources by background processes that are inactive or not actively used by applications.
With this mode on, users can run low-priority background programs and use fewer CPU resources to improve the foreground response of the currently active application.
Usually, applications that are not closed and inactive but idle in the system consume a lot of RAMs, waste more heat, affect battery life, and so on, reducing the efficiency of the system.

Efficiency Mode tries to solve this problem by lowering the CPU priority and power usage of individual programs. It also helps to find apps that are already in efficiency mode, such as Microsoft Edge, that will operate in efficiency mode by default.
How to Use Efficiency Mode in Windows 11
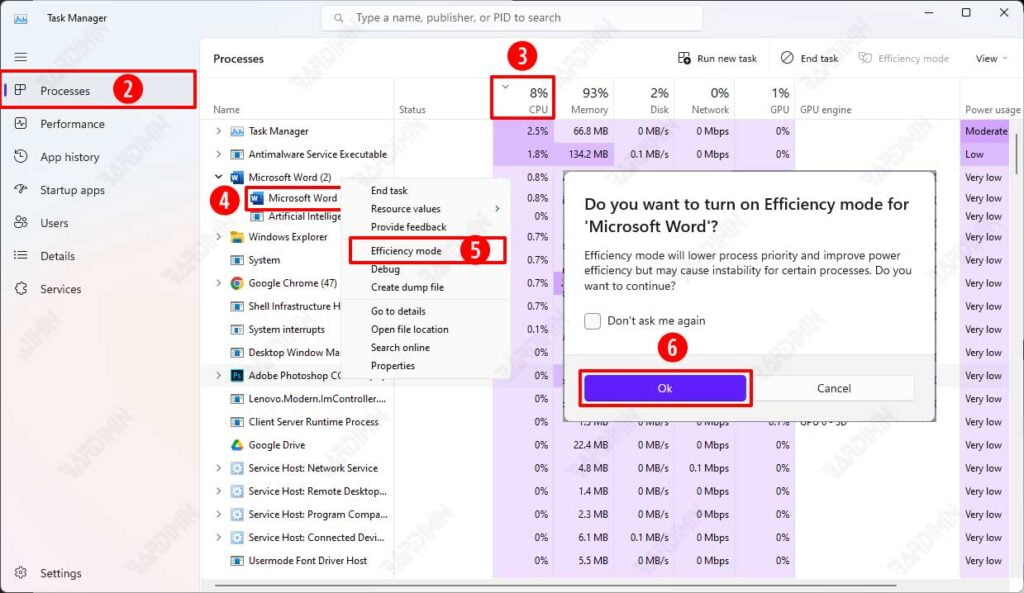
- Open the Windows 11 “Task Manager. You can open it with shortcut keys (CTRL + SHIFT + ESC).
- Go to the “Processes” tab. You’ll see a list of running applications on the system, which may be active or silent.
- In the “CPU“ column, sort the applications that use the highest CPU by clicking the column heading. You can see the application has many processes opened in the system.
- Select and expand the app you want to enable to Efficiency Mode.
- Right-click and select the “Efficiency mode” option.
- Click the OK button on the confirmation dialog box.
- Now you will see a green leaf-shaped icon appear in front of the app.

You may notice that the Efficiency Mode option for some applications or processes becomes grayed out and cannot be enabled. This is because the process is a core system process that must use system resources.
To disable Efficiency Mode, uncheck “Efficiency mode” by repeating the aforementioned steps.


