Windows Defender Firewall Logging is a feature that allows users to log all activities involving firewalls. These logs can be used to monitor and analyze network traffic, detect potential threats, and troubleshoot issues related to network connections.
Computer system security is very important in the increasingly advanced digital era. One of the security features provided by Windows is Windows Defender Firewall. This feature not only serves as a defensive wall against attacks from outside but can also record activities that occur through Firewall Logging.
In addition to serving as a detection tool, Windows 11 Defender Firewall Logging is important to prevent unauthorized access to your system. By logging every connection attempt, both successful and unsuccessful, you can easily track and block IP addresses or apps that try to access the network without permission.
This feature is also very helpful in overcoming network connection issues. For example, if you experience a slow or disconnected internet connection, logs from the firewall can provide valuable information about what is happening. Thus, Windows 11 Defender Firewall Logging not only improves security but also helps maintain the stability and performance of your network.
Why You Should Enable Logging in Windows 11 Defender Firewall
Enabling Logging in Windows 11 Defender Firewall is essential to protect your system and network from cyber threats. Here are some reasons why this feature needs to be enabled:
Improving Network Security
With active logging, you can monitor network activity in real time. Any incoming or outgoing data will be logged so you can see suspicious patterns. This helps prevent cyberattacks before damage occurs.
Better Threat Detection
Firewall Logging helps you find suspicious access to the system. For example, if there is a connection from an unknown IP address, this log will record it. With this information, you can immediately take steps to block threats before they successfully get in.
Troubleshooting Connection Issues
This feature is also useful for analyzing network connection issues. If an app can’t connect, firewall logs can help you figure out what’s causing it. Whether it’s due to a blocking firewall or there are other issues, logging provides the information needed to fix the problem quickly.
By enabling Logging in Windows 11 Defender Firewall, you not only improve system security but also get effective tools to monitor, analyze, and resolve network issues. This feature is a small investment with great benefits for your digital security and stability.
Steps to Enable Windows Defender Firewall Logging
Here’s an easy way to enable Logging in Windows Defender Firewall:
1. Open Windows Defender Firewall with Advanced Security
Press the Windows + S key combination on your keyboard to access the Windows search feature. Next, enter Windows Defender Firewall with Advanced Security in the search field. After that, click on the app to open it.
2. Navigate to Properties
- Once the Windows Defender Firewall with Advanced Security window opens, look at the left panel.
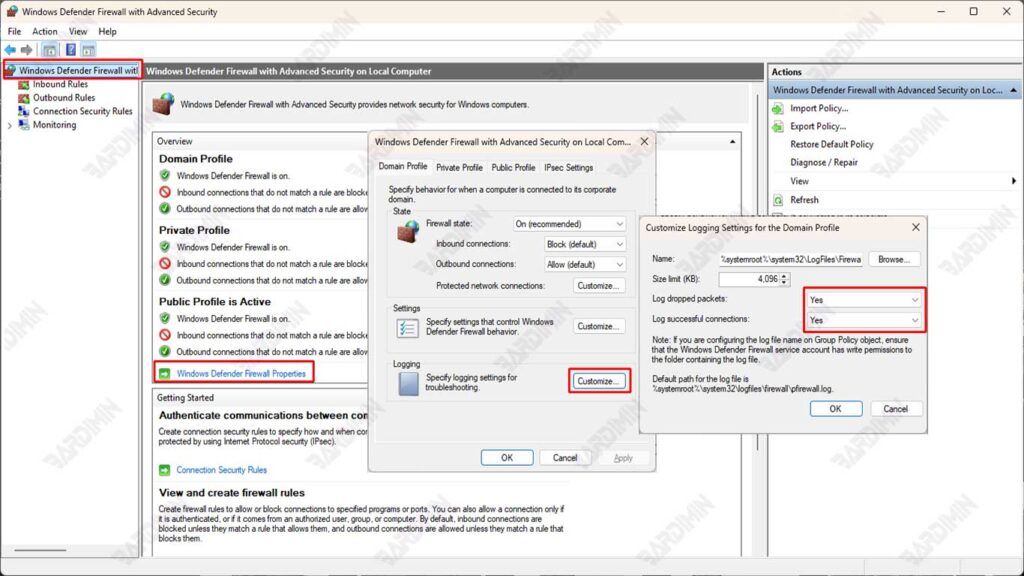
- Click on the Windows Defender Firewall Properties option.
- You will see three profiles: Domain, Private, and Public. Select the profile for which you want to enable logging according to your network needs.
3. Enable Logging
- On the selected profile tab, find the Logging section and click Customize.
- In the Log dropped packets section, select Yes to log all blocked packages.
- In the Log successful connections section, select Yes to record all successful connections.
- Specify the location of the log file by filling in the file name in the Name column in the Log file path section. By default, the log file location is C:\Windows\System32\LogFiles\Firewall\pfirewall.log.
4. Log File Size Setting
– In the same section, you can set the maximum size limit for log files by filling in the value in the Size limit (KB).
– The default size is 4096 KB, but you can customize it as needed. For example, if you need larger logs, you can increase them to 8192 KB or more.
5. Save Changes
Once all the settings are complete, press OK to save the changes that have been made. Make sure you double-check all the settings that have been made to suit your needs.
How to Read and Analyze Firewall Logs
After enabling Windows Defender Firewall Logging, the next step is to read and analyze the log files for useful information. Here is the full guide:
1. Opening the Log File
Firewall log files are typically stored in the following locations:
C:\Windows\System32\LogFiles\Firewall\pfirewall.logYou can open these log files using several tools, such as:
- Notepad++: A lightweight text editor that supports log formatting well.
- Event Viewer: Built-in Windows tools that can be used to view system logs, including firewalls.
- Log Parser: A tool from Microsoft that allows you to analyze logs with SQL queries.
2. Identify Threats
After opening the log file, you will see some important columns that can help you analyze network activity. Some key information to note are:
- IP Address: The IP address of the source or destination involved in the connection.
- Port Number: The port used for the connection (for example, port 80 for HTTP or port 443 for HTTPS).
- Connection Status: Whether the connection was successful (ALLOW) or blocked (DROP).
Example log:
2023-10-15 12:34:56  ALLOW TCP 192.168.1.100203.0.13.45 80 443
2023-10-15 12:35:10  DROP TCP 192.168.110 198.51.10.10 2 54321
From the example above:
- The first line shows the connection allowed from IP 192.168.1.100 to IP 203.0.113.45 on port 80 (HTTP).
- The second line shows the connection is blocked from IP 192.168.1.100 to IP 198.51.100.10 on port 22 (SSH).
3. Using PowerShell for Further Analysis
PowerShell is a very useful tool for analyzing firewall logs in more depth. You can use the following commands to read and filter logs:
Get-Content C:\Windows\System32\LogFiles\Firewall\pfirewall.logFor more specific analysis, you can use PowerShell commands such as:
Search for blocked connections:
Get-Content C:\Windows\System32\LogFiles\Firewall\pfirewall.log | Select-String “DROP”Search for activity from a specific IP:
Get-Content C:\Windows\System32\LogFiles\Firewall\pfirewall.log | Select-String “192.168.1.100”Search for activity on a specific port:
Get-Content C:\Windows\System32\LogFiles\Firewall\pfirewall.log | Select-String “:43”4. Log Analysis Tips
- Monitor Unknown IP Addresses: If you see an unknown IP address trying to access your system, block the IP immediately.
- Check for Unusual Ports: Unusual ports (for example, ports above 50000) can indicate suspicious activity.
- Use Visualization Tools: For large logs, consider using tools such as Microsoft Log Parser Studio or ELK Stack for easier data visualization.