Hard disks are one of the most power-intensive components of a computer. By turning off the drive, you can save up to 10% of battery power.
A hard disk is one of the important components of a computer. Hard disks store important data, such as the operating system, programs, and personal files. To save power and extend battery life, Windows 11 allows you to automatically shut down the hard disk after a certain period of inactivity.
Changing or shutting down a drive after idle time can help you save energy, extend drive life, and reduce system temperature. However, this feature can also have some drawbacks, such as increasing boot time, reducing data access speed, and causing compatibility issues with some applications.
Therefore, you may want to adjust these settings according to your needs and preferences. In this article, Bardimin will explain how to change or turn off a hard disk after idle time in Windows 11 easily and quickly.
Why do you need to set the idle time of the hard disk?
First of all, let’s understand why you might want to set the hard disk idle time in Windows 11. When a computer is not used for some time, Windows tends to shut down the hard disk to save energy.
However, the default settings may not suit your preferences. In some cases, users want to keep the drive active to avoid delays when the drive needs to be active again.
There are several reasons to automatically shut down a drive after a certain period of inactivity. The first reason is to save power. Hard disks are one of the most power-intensive components of a computer. By turning off the drive, you can save up to 10% of battery power.
The second reason is to extend battery life. Frequently used drives can provoke an increase in temperature. This can cause damage to hard disk components and shorten their service life. By shutting down the drive, you can help keep drive temperatures low and extend its lifespan.
Steps to Change or Shut Down Hard Disk After Idle Time in Windows 11
To change or turn off the hard disk after idle time in Windows 11, you can follow these steps:
- Press the keys (Win + R) simultaneously on your keyboard to open the “Run” window.
- In the “Run” window, type “powercfg.cpl” and press Enter to open the “Power Options” window.
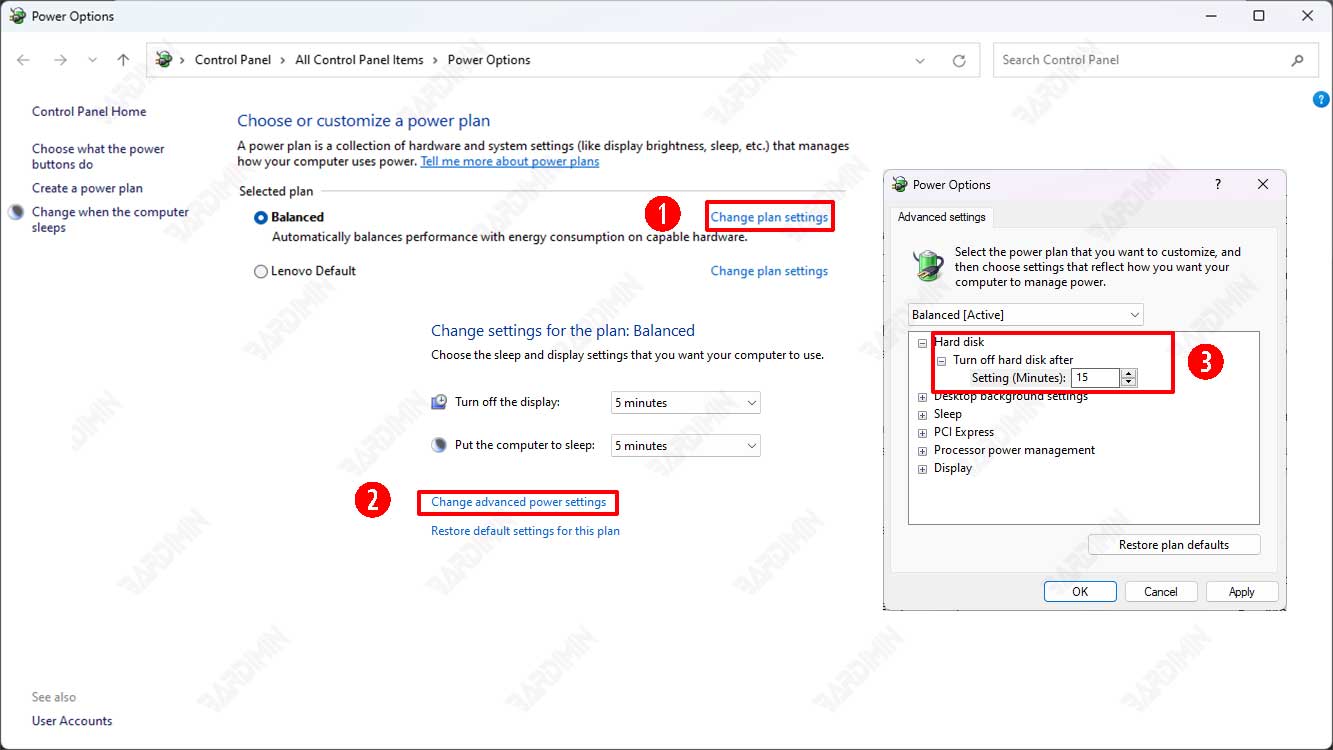
- Click the “Change plan settings” link next to the active power plan on your system.
- Scroll down until you find the “Change advanced power settings” section, then click on the “Change advanced power settings” link.
- In the “Power Options” window, under the “Turn off hard disk after” tree, you will see two options: “On battery” and “Plugged in”. The “On battery” option will appear if your device is on battery, while the “Plugged in” option appears when your device is connected to a power source.
- To change the idle time before the drive shuts down, click on the box next to the option you want, then enter the value in minutes. The minimum value is 1 minute, while the maximum value is 9999 minutes. If you want to turn off this feature, enter the value “Never”.
- Once you are done changing the settings, click on the “Apply” button, then click the OK button.
- Close all open windows and restart your device for the changes to take effect.
Benefits and Risks of Changing or Turning Off a Hard Disk After Idle Time in Windows 11
As we mentioned earlier, changing or shutting down a hard disk after idle time can have several benefits and risks. Here are some of them:
Benefit
- Save energy: By turning off the drive after idle time, you can reduce the power consumption of your device, especially if you are using a battery. This can help you save on electricity costs and improve battery life.
- Extend drive life: By shutting down the drive after idle time, you can reduce the number of turns and head movements of the drive, which can lead to wear and tear. This can help you extend the life of the hard disk and avoid data loss.
- Reduce system temperature: By shutting down the drive after idle time, you can reduce the heat generated by the drive, which can increase the overall system temperature. This can help you prevent overheating and improve system performance.
Risk
- Increase boot time: By shutting down the drive after idle time, you can increase the time it takes to start up your device, as the drive needs to be rolled back and prepared for use. This may cause delays and inconvenience to you.
- Reduce data access speed: By shutting down the drive after idle time, you can reduce the data access speed, as the drive has to be rolled back and search for the data you need. This can cause a decrease in performance and productivity for you.
- Causes compatibility issues with some applications: By shutting down the drive after idle time, you can cause compatibility issues with some applications that require constant access to the drive, such as backup applications, antivirus, or games. This may cause errors, crashes, or data loss for you.
Conclusion
In this article, Bardimin has explained how to change or turn off the hard disk after idle time in Windows 11 easily and quickly. Bardimin has also explained some of the benefits and risks of this feature.
Changing or shutting down the drive after idle time is a personal choice that depends on your needs and preferences. If you want to save energy, extend the life of your hard disk, and reduce system temperature, you may want to use this feature.
However, if you want to improve boot time, data access speed, and application compatibility, you may want to disable this feature.
Hope you find this article useful. If you have any other questions or feedback, please leave a comment below. Thank you for reading this article.