If you share your computer with other people, you may want to set the same desktop wallpaper for all users to make it look neater and more consistent.
Desktop wallpapers are one way to express yourself and customize the look of your computer according to your taste. Attractive wallpapers can make your computer look more attractive and professional.

Changing desktop wallpaper for all Windows 11 users is easy. You can do this in several ways, either by using the default Windows settings or by editing the registry or group policies. This article will explain these methods in a complete and easy-to-understand manner. Keep reading this article until the end to find out how!
How to Change Desktop Wallpaper for All Windows 11 Users
Windows 11 is the latest operating system from Microsoft, with many new features and improvements from Windows 10, including a more modern and elegant interface.
If you are using Windows 11, there are several ways to change the desktop wallpaper for all users, namely:
- Using the TranscodedWallpaper folder
- Using Group Policy Editor
- Using Registry Editor
Using the TranscodedWallpaper Folder
The first way you can try is to use the TranscodedWallpaper folder. This folder contains image files that are used as Windows 11’s default desktop wallpaper. You can replace this image file with any image you want, and it will automatically become desktop wallpaper for all users.
Here are the steps:
- Open File Explorer and navigate to the directory “C:WindowsWebWallpaperWindows”.
- Here, you will see a file named “TranscodedWallpaper”. This file is an image file used as the default desktop wallpaper for Windows 11.
- Right-click on the file and select Rename. Rename the file to “TranscodedWallpaper.old” or any other name you want. It aims to back up the original files in case you want to restore them later.
- Next, copy the images that you want to make desktop wallpapers for all users into this folder. Make sure the image is in JPG format and a size that matches your screen resolution.
- Rename the image to “TranscodedWallpaper” (no extension). This is important so that Windows 11 can recognize the image as desktop wallpaper.
- Close File Explorer and restart your computer.
- After restarting, go to “Settings > Personalization > Background” and select “Picture” as a background type. Here, you’ll see the image you’ve copied earlier as a desktop wallpaper option.
- Select the image and click “Apply”. Now, your desktop wallpaper has changed to that image for all users.
Using Group Policy Editor
The second way you can try is to use the Group Policy Editor, a built-in Windows 11 tool used to edit the operating system’s group policies. Group Policy is a collection of rules and settings that are used to control the behavior of the operating system and the applications installed on your computer.
Using Group Policy Editor, you can change the group policy that is related to desktop wallpapers and make them apply to all users. However, keep in mind that editing Group Policy is a risky action and can cause system damage if done incorrectly. Therefore, make sure that you back up the Group Policy before making any changes.
Here are the steps:
- Press the keyboard keys (WIN + R) and type “gpedit.msc” in the box. Click the OK button to open “Group Policy Editor”.
- In the “Group Policy Editor” window, navigate to the following directory:
User Configuration > Administrative Templates > Control Panel > Personalization
- Here, you’ll see several group policies relating to personalizing the operating system, including desktop wallpapers. Double-click on the Group Policy that is named “Prevent changing desktop background”.
- In the window that appears, select “Enabled” to enable this group policy. This will prevent other users from changing the desktop wallpaper at will without your permission.
- Click “Apply” and OK to save changes.
- Next, navigate to the following directory:
User Configuration > Administrative Templates > Desktop > Desktop

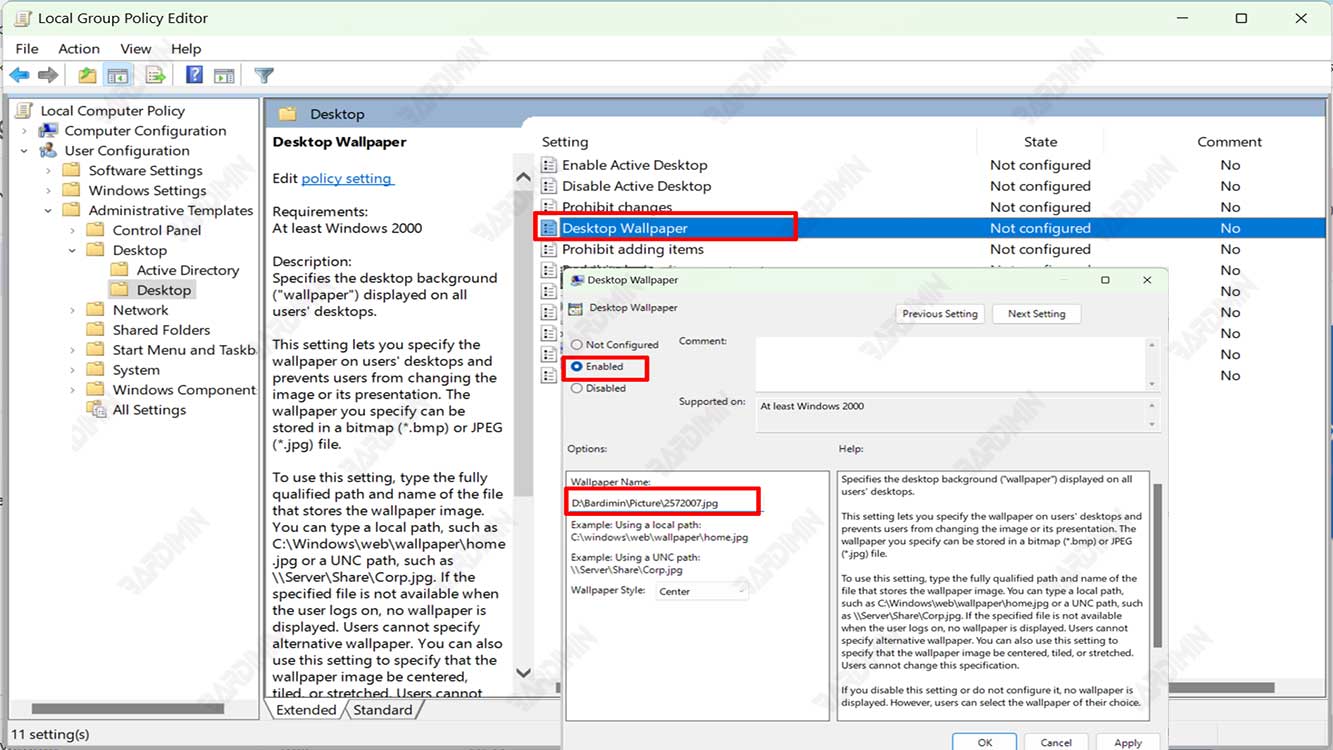
- Double-click on the Group Policy that is named “Desktop Wallpaper”.
- In the window that appears, select “Enabled” to enable this group policy. This allows you to specify the image you want to make desktop wallpaper for all users.
- Under the “Options” section, enter the location of the image you want to make your desktop wallpaper in the Wallpaper Name box. For example, if the image is in the “D:\Bardimin\Picture\2572007.jpg” directory, enter “D:\Bardimin\Picture\2572007.jpg”. Make sure you use the backslash mark (\) as the directory separator, not the slash mark (/).
- Next, select the wallpaper style you want from the Wallpaper Style box. Here is a list of wallpaper styles you can choose from: “Fill, Fit, Stretch, Tile, Center”.
- Click “Apply” and OK to save changes.
- Close “Group Policy Editor” and restart your computer.
Using Registry Editor
The third way you can try is to use the Registry Editor, which is a built-in tool Windows 1 1 uses to edit the operating system registry. The registry is a database that stores important information about the configuration and preferences of the operating system and applications installed on your computer.
Using Registry Editor, you can modify registry values related to desktop wallpapers and make them apply to all users. However, keep in mind that editing the registry is a risky action and can cause system damage if done incorrectly. Therefore, make sure that you back up the registry before making any changes.
Here are the steps:
- Press the keyboard keys (WIN + R) and type “regedit” in the box. Click the OK button to open the “Registry Editor”.
- In the “Registry Editor” window, navigate to the following directory:
HKEY_CURRENT_USER\Software\Microsoft\Windows\CurrentVersion\Policies\System
- If you do not find the “System” folder, just click on the “Policies” folder available with the right mouse button and select “New > Key”. Then you can name the newly created key as “System”.
- Click right on the folder “System” and select “New > String Value”. Name the new value “Wallpaper”.
- Double-click on the Wallpaper value and enter the location of the image you want to make desktop wallpaper for all users in the Value data box. For example, if the image is in the “D:\Bardimin\Picture\2572007.jpg” directory, enter “D:\Bardimin\Picture\2572007.jpg”.
- Click OK to save the changes.
- Next, right-click again on the System folder and select New > String Value. Name the new value “WallpaperStyle”.
- Double-click on the value “WallpaperStyle” and enter the number corresponding to the wallpaper style you want in the Value data box. Here is a list of numbers and wallpaper styles you can choose from: “0=Tiled, 1=Centered, 2=Stretched, 3=Fit, 4=Fill”
- Click OK to save the changes.
- Close Registry Editor and restart your computer.
Conclusion
In this article, we have described ways to change the desktop wallpaper for all Windows 11 users by using the TranscodedWallpaper folder, Registry Editor, or Group Policy Editor. All of these methods have their advantages and disadvantages, so you can choose the one that best suits your needs and abilities.
We hope this article was useful for those of you who want to change the desktop wallpaper for all Windows 11 users easily and quickly. Thanks for reading!


