PowerShell is a command-line and scripting platform designed to assist system administrators in managing and automating tasks in a Windows environment.
Built on the .NET Framework, PowerShell has better capabilities than the traditional command line. It supports Cmdlets, objects, and pipelines, which allow users to perform complex tasks with ease.
PowerShell is a very important tool in Windows administration. With the existing features, administrators can:
- Manage systems more efficiently without the need to use graphical interfaces.
- Automate routine tasks such as service management, system setup, or performance monitoring.
- Reduce the chances of human error by using standardized scripts.
PowerShell not only increases productivity but also provides more flexibility to solve problems directly, even in large and complex system environments. This makes it a go-to tool for modern administrators who need a quick and precise solution.
What is Cmdlets?
Cmdlets are small programs that are created to perform specific tasks in PowerShell. They serve as a tool to manage and automate various aspects of the Windows operating system.
Cmdlets are written in the form of .NET classes, usually using the C. Cmdlets can be included in PowerShell or be part of other applications and services, such as VMware or Windows Server features. With cmdlets, users can easily retrieve information, change settings, and perform various other operations.
Examples of Popular Commands
Two examples of commonly used cmdlets are:
1. Get-Process
These cmdlets are used to get information about all the processes that are running on the system. For example, running the following command will display a list of all active processes:
Get-Process2. Get-Service
These cmdlets are used to get information about all the services listed in the system. With this command, the user can see the status of the service (whether running or stopped):
Get-ServiceAdvantages of Using Noun-Verb Syntax in Cmdlets
One of the standout features of cmdlets is the strict use of noun-verb syntax. This means that each cmdlet is named with a clear pattern, where the first part (noun) indicates the managed object and the second part (verb) indicates the action performed on the object. Examples:
- Get: Retrieving information.
- Set: Change the configuration.
- Remove: Delete an object.
Advantages of this syntax include:
- Users can easily find other relevant cmdlets by understanding the naming pattern.
- Consistent syntax helps new users to learn and use cmdlets more quickly.
- Clear cmdlets names make scripts easier to read and understand.
Objects in PowerShell
In PowerShell, an object is a data structure that describes a specific entity in a system, such as a file, process, or service. Each object has properties (attributes) and methods (methods) that provide information and functions related to that entity.
Properties are the characteristics of an object, while methods are actions that can be performed on an object. For example, a process object can have properties such as process name, CPU usage, and status.
How Get-Process Generates Objects with Properties Like CPU Usage
When you run the Get-Process cmdlet, PowerShell generates an object that represents all the processes that are active on the system. Each of these process objects has various properties, including:
- Name: The name of the process.
- Id: Unique identification for the process.
- CPU: CPU usage by processes.
Example command:
Get-ProcessThis command will give you a list of process objects, and if you want to see more information about one of the objects, you can use the Get-Member cmdlet to find out the properties and methods that exist:
Get-Process | Get-Member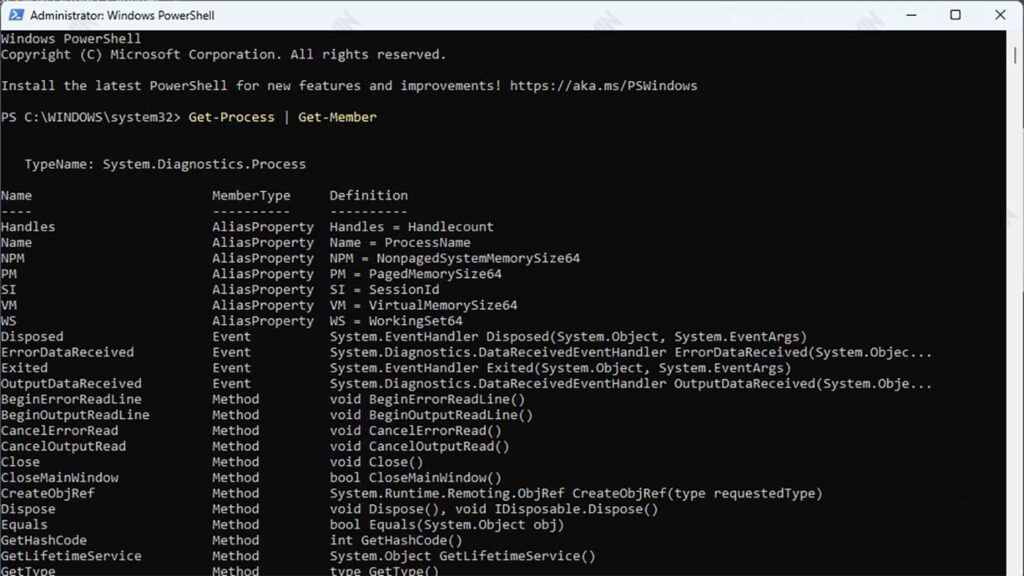
This will display all the properties and methods of the object generated by the Get-Process, including CPU usage.
Benefits of Objects for Administrative Task Automation
The use of objects in PowerShell has many advantages for the automation of administrative tasks:
- With objects, administrators can easily access and modify data without having to perform complex text processing. This speeds up information management and improves accuracy.
- Objects make PowerShell scripts clearer and easier to understand. Administrators can directly use the properties of objects in the script to perform specific actions.
- PowerShell allows users to connect cmdlets through pipelines, where the output of one cmdlet can be used as input to other cmdlets. This makes it easier to process data sequentially and efficiently.
- Because PowerShell is built on .NET, every object in PowerShell is a .NET object. It provides access to a rich range of methods and properties, expanding the system’s management capabilities.
Benefits of Objects for Administrative Task Automation
The use of objects in PowerShell has many advantages for the automation of administrative tasks:
1. Ease of Data Manipulation
You can filter, sort, or modify the data easily. For example:
Get-Process | Where-Object {$_.CPU -gt 5}This command will only show processes with more than 5% CPU usage.
2. Integration with Other Cmdlets
Objects can be passed to other cmdlets through the pipeline, allowing for the creation of complex scripts. Example:
Get-Process | Sort-Object CPU -Descending | Select-Object -First 5This command displays the 5 processes with the highest CPU usage.
3. Script Efficiency
With objects, you can create more accurate and efficient scripts, reducing the risk of frequent errors in raw text parsing.
Using Pipelines for Automation
Pipeline is a great feature in PowerShell that allows you to stream results from one cmdlet to another. This concept uses the symbol | (pipe) to connect cmdlets, so you can create a more efficient and flexible automation process.
In PowerShell, pipelines serve to flow objects from one cmdlet to another. Symbol | Separate cmdlets and allow the results from the first cmdlet to be passed to the second cmdlet without storing temporary data.
A simple example:
Get-Process | Sort-Object CPU -Descending- Get-Process: Retrieves a list of all active processes on the system.
- Sort-Object CPU -Descending: Sorts processes based on CPU usage from highest.
The result is a list of processes that have been sorted by CPU usage.
Grouping processes based on virtual memory usage
For example, let’s say you want to know which apps use Virtual Memory (VM) the most and group processes by the company that created them. Here are the steps:
- Use Get-Process to get all the processes running.
- Sort processes by VM usage.
- Take a specific number of processes, such as the top 10.
- Group processes by Company properties.
The full code:
Get-Process |
Sort-Object VM -Descending |
Select-Object -First 10 |
Group-Object Company- Sort-Object VM -Descending: Sorts processes based on usage Virtual Memory from highest.
- Select-Object -First 10: Select the top 10 processes with the highest VM usage.
- Group-Object Company: Group processes by the name of the company that created them.
The output will show the highest Company mana yang memiliki proses dengan penggunaan Virtual Memory.
How to Combine Cmdlets for More Complicated Solutions
Pipelines make it easy to combine cmdlets and create more complex solutions without the need to write difficult code. For example, if you want to find a process that is using a high CPU and stop it, you can use the following pipeline:
Get-Process |
Where-Object {$_.CPU -gt 50} |
Stop-Process- Where-Object {$_.CPU -gt 50}: Filters processes that have more than 50% CPU usage.
- Stop-Process: Stops the filtered process.
This pipeline allows you to automate tasks with clear and organized steps. You can also add parameters to make the solution more specific, such as sending a report of the results:
Get-Process |
Where-Object {$_.CPU -gt 50} |
Export-Csv -Path “HighCPUProcesses.csv”
This pipeline will store the data of the CPU-intensive process in a CSV file.
Automation with PowerShell
One very useful cmdlet in PowerShell is Get-WindowsOptionalFeature. This cmdlet allows users to view optional features available in Windows, including their status (whether enabled or disabled). Using these cmdlets, administrators can easily manage and audit existing features.
To display all the optional features in Windows, you can run the following command:
Get-WindowsOptionalFeature -OnlineThis command will generate a list of objects that represent each optional feature, complete with properties such as FeatureName, State, and a description of the feature.
Steps to Create a Simple Script for Automation
Here are the steps to create a simple script that uses Get-WindowsOptionalFeature to automatically audit and enable certain features:
- Run PowerShell with administrator privileges to make sure you have the necessary permissions.
- Use the Get-WindowsOptionalFeature cmdlet to get a list of all optional features.
$features = Get-WindowsOptionalFeature -Online- For example, if you want to check whether the “TelnetClient” feature is enabled or not, you can filter the results.
$telnetFeature = $features | Where-Object { $_. FeatureName -eq 'TelnetClient' }- If the feature is not active, you can enable it by using the Enable-WindowsOptionalFeature cmdlet.
if ($telnetFeature.State  -eq 'Disabled') {
Enable-WindowsOptionalFeature -Online -FeatureName 'TelnetClient' -All
Write-Host “TelnetClient feature has been enabled.”
} else {
Write-Host “TelnetClient feature is now active.”
}- Save this script as a .ps1 file, for example, EnableTelnet.ps1, and run it in PowerShell.