“Each screenshot immediately gets stuck on the C drive, makes it full, and the laptop slows down. Don’t worry, you can easily reset the storage location!”
Did you know that whenever you press the Print Screen button in Windows 11, all screenshots are automatically saved in C:\Users\[Username]\Pictures\Screenshots? This is the main cause of secretly depleting your precious storage space! But don’t worry, there’s a handy solution that allows you to switch your screenshot storage location to another drive, cloud storage like OneDrive, or even an external SSD, all without the need to install additional software!
In this comprehensive guide, we’ll walk you through 3 effective methods: from the easiest way anyone can do it, to the most advanced users. As a bonus, we’ll also share a clever way to use symbolic links to keep screenshots accessible even if they’re stored in different locations!
By moving the screenshot storage folder, you’ll get:
- Up to 10GB of storage space savings (depending on screenshot frequency)
- Significant system performance improvements
- Protect critical files from the risk of loss in the event of a system failure
- A neater and more efficient document organization system
All you need is 5 minutes and a willingness to try! Let’s start your Windows 11 optimization process right now!”
3 Practical Methods to Change the Location of Screenshot Storage in Windows 11
Want your screenshots saved directly to your preferred folder? Check out the 3 most practical ways to change the location of screenshots in Windows 11. Choose the method that best suits your needs!
1. Change the Location of the Screenshot Store in the Snipping Tool (Built-in Application Method)
If you use the app Snipping Tool frequently, you can change the save location directly from the app’s settings:
- Open the Snipping Tool app in Windows 11.
- Click on the Settings icon within the app.
- Scroll to the Screenshots are saved to option, then click Change.
- Select the new folder you want, for example, D:\Screenshot or another folder you created.
- Click Select Folder to save the settings.
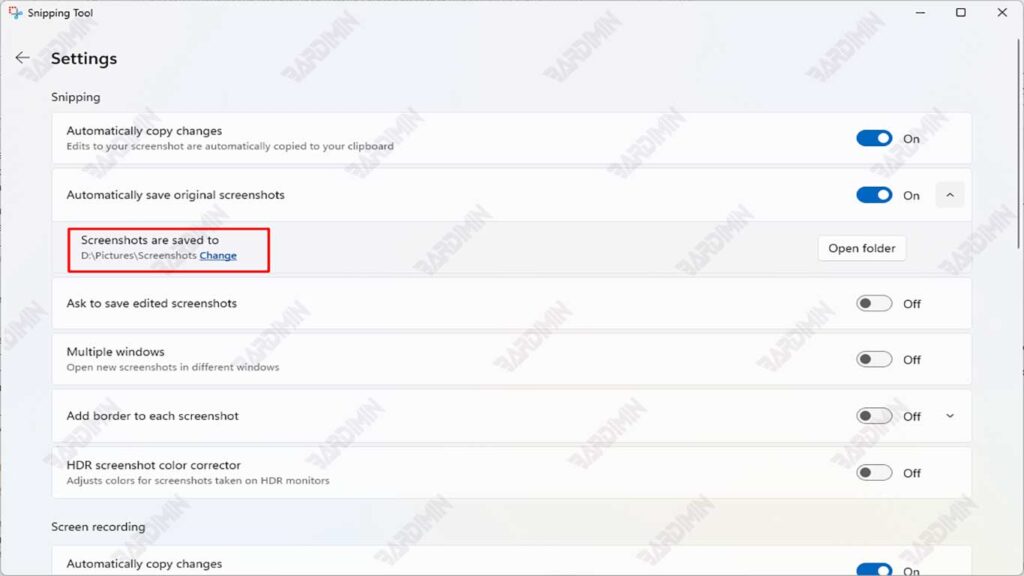
After this, all the screenshots taken through the Snipping Tool will be saved in your selected folder.
2. Change the Location of the Screenshot Folder via File Explorer (Standard Method)
This method is common and has been used for a long time, suitable for users who want full control:
- Open File Explorer → navigate to the default folder of screenshots usually at C:\Users\[Username]\Pictures\Screenshots.
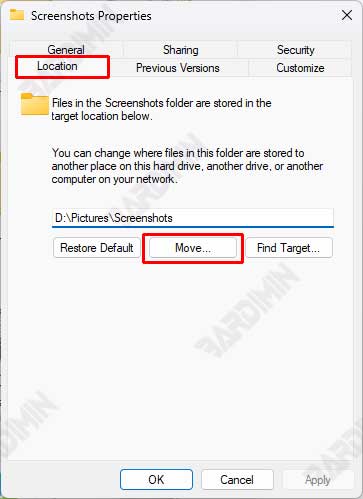
- Right-click on the Screenshots folder → select Properties.
- Go to the Location tab → click on the Move button.
- Select the new folder as desired (make sure it’s a different name from “Screenshots”).
- Click Apply, then select Yes to move all the old files to the new location.
- Click OK.
Now, any screenshots you take with the Win + Print Screen buttons will be saved in this new folder.
3. Symbolic Link Method (Advanced Solution for Experienced Users)
This method is often used by power users and IT professionals because it provides high flexibility. You can move your screenshot location to another drive, but you can still access it as usual through the Pictures folder.
Symbolic Link works like an advanced shortcut that makes the system assume that the file/folder is in its original location, when it is stored on a different drive.
Symbolic Link Advantages:
- Maintains the default folder structure. The system still recognizes the storage location as if it were in the original folder.
- The file is saved in a new location (e.g., drive D:), but it still looks like it’s stored in the old folder. Users can access files through the original path even if they are physically on a different drive.
- Maintain app compatibility. Does not interfere with the functionality of the Print Screen button or third-party applications that rely on the default path.
- There is no need to change other system settings. Solutions are permanent without requiring additional configuration of systems or applications.
- Save space on system drives. Physical files are completely moved to another drive, reducing the storage load on the main drive.
