Printer management in the digital age has become very important, especially with the increasing need for productivity and efficiency in an increasingly mobile work environment. In an age where many people work from multiple locations, the ability to manage printers well can reduce wasted time and improve the user experience. Windows 11 offers a variety of features to make it easier for users to set up and manage their printers, both at home and in the office.
Bardimin will provide detailed guidance on how to manage printers in Windows 11. Bardimin will discuss the important steps in setting the default printer, managing printing preferences, and addressing common issues that may arise. With this information, it is hoped that users can maximize the functionality of their printers and avoid obstacles that can disrupt the workflow.
Understanding Printer Settings in Windows 11
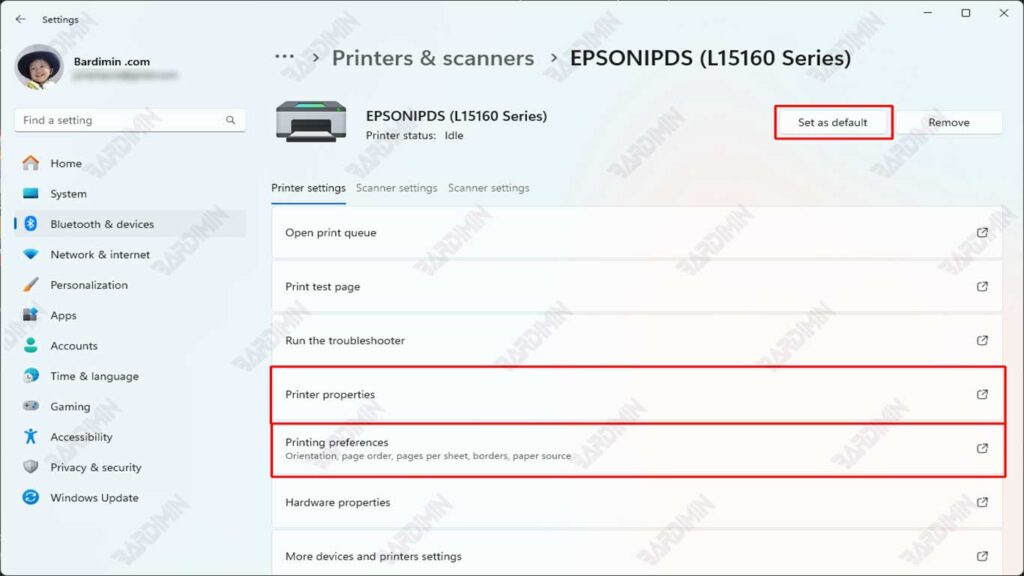
The printer settings in Windows 11 can be accessed through the Settings menu, which is the control center for various system configurations. To access the printer settings, users can follow these steps:
- Open the Settings Menu: Click on the Start icon in the bottom-left corner of the screen, then select Settings.
- Navigate to Devices: In the Settings menu, select the Bluetooth & Devices option.
- Select Printers & Scanners: On the left, click on Printers & scanners to see all the printers connected to your device.

This is where users can manage all the settings related to the printer, including adding new printers, removing unused printers, and changing existing settings.
Setting the Default Printer in Windows 11
Setting the default printer is very useful, especially for users who have more than one printer connected. By setting a default printer, you don’t have to choose a printer every time you want to print a document. Windows 11 will automatically send documents to the printer that has been set as the default
Setting the default printer in Windows 11 is very easy to do. Here are the steps:
- Open the Settings menu and select Bluetooth & Devices.
- Click Printers & scanners in the right panel.
- Find the printer you want to default to in the list that appears.
- Click on the printer.
- Click the “Set as default” button at the top of the printer options.
Manage Printing Preferences in Windows 11
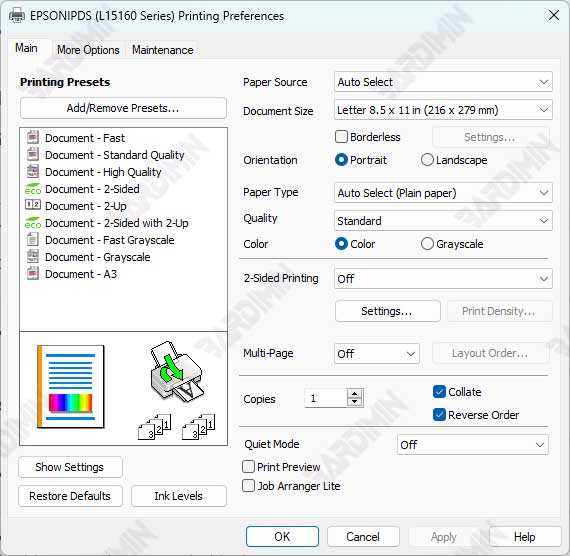
The printing preference settings in Windows 11 give users the flexibility to customize how documents are printed according to their needs. These preferences can include a variety of settings, such as print quality, paper size, orientation, and duplex printing options. Users can access these settings through the Printers & scanners menu in the Settings. Click Printing Preferences as seen in the previous image.
Here, you’ll find a variety of options to customize your printing preferences. This setting allows users to choose options such as:
- Print Quality: Choose between draft mode to save ink or high quality for better prints.
- Paper Size: Determines the size of the paper used, such as A4 or Letter.
- Orientation: Choose between portrait or landscape orientation.
- Double-Sided Printing: Enables or disables printing on both sides of the paper.

Differences in Printer Management Interface
The printer management interface may vary depending on the printer manufacturer. For example, printers from Epson, Canon, and Brother have different interfaces in the setting of printing preferences.
- Epson: Epson’s printer management interface offers options for accessing printer maintenance menus, such as Nozzle Check and Head Cleaning. Users can easily monitor the status of the ink and perform routine maintenance to maintain optimal print quality
- Canon: Canon’s printer management interface often provides additional options such as settings for different types of paper and custom printing modes, such as photo printing. Users can easily select their desired settings through intuitive menus.
- Brother: On the other hand, Brother printers may offer a simpler interface, but with quite complete options for basic setup. Users can quickly access settings such as print quality and paper size, but they may not have the special features present in Epson or Canon printers.
This difference suggests that each manufacturer has a unique approach to designing user interfaces, which can affect the user experience in managing printing preferences. Users need to understand the interface they are using to be able to adjust the printing settings to their needs
Managing Printer Properties in Windows 11
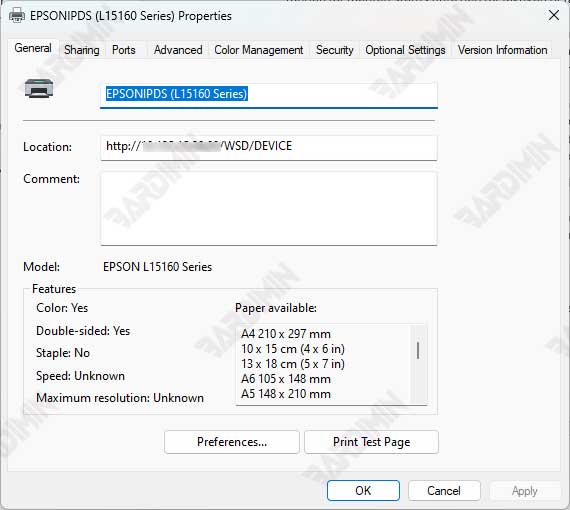
Managing printer properties in Windows 11 allows users to manage various aspects of their printers, thereby improving usage efficiency and optimizing print results. Access to the printer’s properties can be done through the Printer properties dialog.

Inside the Printer properties dialog, you’ll find various tabs that allow you to set the printer’s settings, such as General, Preferences, Sharing, Ports, Advanced, and Security.
Some of the settings that can be made to improve the efficiency of using the printer include:
- Printer Usage Time: In the Advanced tab, you can specify a specific time in which the printer can be used. This is useful for managing the use of printers in an office environment, ensuring that the printers are not used outside of specified working hours.
- Color and Profile Settings: If you work in an industry that requires color accuracy, you can manage color profiles in the Color Management tab. It allows you to set and load appropriate color profiles for printers and monitors, ensuring accurate printouts.
Setting Up Printer Security and Sharing in Windows 11
Sharing a printer on a network allows other users to access and use printers connected to a specific computer. To share a printer in Windows 11, follow these steps:
- Open the Settings menu and select Bluetooth & Devices.
- Click Printers & scanners in the right panel.
- Find the printer you want to default to in the list that appears.
- Click on the printer.
- Click Printer properties.
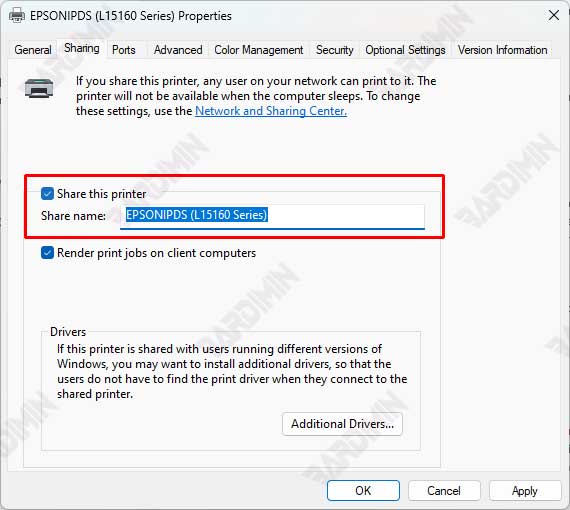
- Select the Sharing tab.
- Check the “Share this printer” option.
- Optional: Change the name of the printer share if desired.
- Click OK to save the settings.

Once the printer is shared, other users can connect to the printer over the network by using the host computer name and the printer’s shared name.
To restrict access to the printer by user group, you can use the security settings in the Security tab on
- Select the Security tab.
- Click the Add button to add a user group or individual users.
- Select the group or user you want to set permissions for.
- Select the type of permission you want, such as “Print” or “Manage Printers”.
- Click Apply to apply the security settings
Troubleshooting Common Problems with Printers
Printing issues can arise from a variety of sources, from hardware errors to software issues. Here are some tips and tricks for troubleshooting common problems that printer users often face, as well as steps that can be taken to resolve printing issues.
Troubleshooting Printer Not Detected:
- Make sure the printer is connected to your computer and turned on.
- Try replacing the USB cable with a different port.
- Restart the printer and computer.
Overcoming Paper Jams:
- Turn off the printer and open the cover to remove the jammed paper.
- Check if there are any small pieces of paper left inside the printer.
- After removing the paper, turn the printer back on and try printing again.
Dealing with Offline Printers:
- Make sure the printer is connected to the same network as your computer.
- Open Settings > Devices > Printers & scanners, select the Offline printer. Make sure the Set as default option is enabled.
- Try restarting your printer and computer.
Troubleshooting Print Quality Issues:
- Check the print settings in the Printer properties dialog and make sure the print quality is set to the appropriate mode (e.g., draft or high quality).
- Perform a printhead cleaning if using an inkjet printer, which can be accessed through the printer software.
Conclusion
Managing printers effectively in Windows 11 provides many benefits, both for individuals and organizations. By setting a default printer, choosing the right printing preferences, and taking advantage of paper/ink-saving features, users can print documents more efficiently, reduce resource waste, and increase productivity.
By implementing the tips and tricks discussed in this article, Windows 11 users can manage their printers more effectively, save time and money, and improve overall productivity. Good printer management is key to ensuring that printing technology remains a valuable tool in the modern work environment.


