In today’s digital era, computers are not only a work tool but also an important store of personal data. In every computer, there are special partitions called OEM and recovery partitions. OEM partitions, which stand for Original Equipment Manufacturer, usually contain programs and settings pre-installed by the computer maker. Meanwhile, the recovery partition serves as a safety net that allows restoring the operating system to its original state in case of damage or problems.
However, sometimes this partition may need to be deleted. The reasons for this can vary, ranging from the desire to free up limited disk space, eliminate bloatware, or as a preparatory step for reinstating the operating system. Whatever the motivation, the first and most crucial step before deleting this partition is to back up the data. These backups are essential to avoid irreplaceable data loss and ensure that you can still access important information after the partition is deleted.
By understanding the function and importance of these partitions, and following the proper steps, you can optimize the use of your disk space and improve computer performance. Let’s explore more about OEM partition and recovery, as well as how to delete them safely and effectively.
Getting to Know OEM Partitions and Recovery
An OEM (Original Equipment Manufacturer) partition is a segment on a hard drive created by a computer manufacturer to store the original operating system, drivers, and preinstalled applications. The main function of OEM partitions is to facilitate the system recovery process in case of damage or technical problems, without the need to use external installation media.
A recovery partition is a special area on the hard drive that contains important data to restore the computer to its factory settings. This includes the operating system, built-in software, and necessary drivers. This partition is very useful when the operating system is seriously damaged and needs to be reset or restored to its original state.
To locate the OEM and recovery partition on the computer, you can follow these steps:
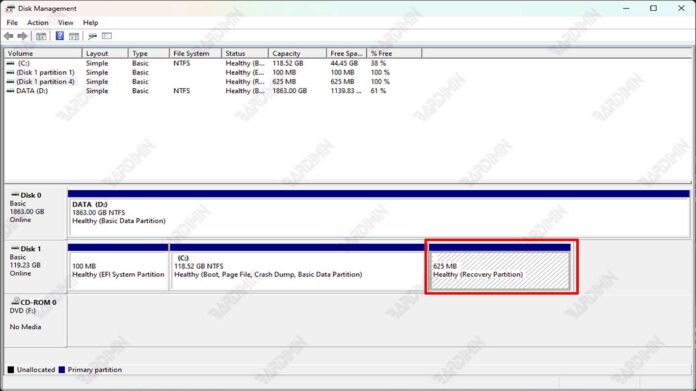
- Open Disk Management by typing diskmgmt.msc in the Windows search box and pressing Enter.
- In the Disk Management window, look for the drive labeled OEM Partition or Recovery Partition.
- You can also use the diskpart command in Command Prompt to view a list of partitions and identify OEM and recovery partitions.
Main functions of OEM partition
- Restore a pre-installed operating system: If your operating system has a problem and won’t boot, you can use an OEM partition to reinstall the pre-installed operating system.
- Run diagnostic tools: OEM partitions usually contain diagnostic tools that can be used to test your laptop’s hardware and software.
- Restoring laptop to factory settings: If you want to restore your laptop to factory settings, you can use an OEM partition to do so.
The Role of Recovery Partition in System Restore
Recovery partitions are similar to OEM partitions but usually contain more complete files for system recovery. This partition can contain:
- Full system files: A recovery partition can contain a complete copy of your operating system files, allowing you to reinstall the operating system without needing to use an installation disc.
- Device drivers: The recovery partition can also contain the necessary device drivers for your laptop, which can help you reinstall the drivers if you don’t have a backup copy.
- Pre-installed applications: The recovery partition may also contain a copy of the pre-installed applications that came with your laptop.
Reasons to Delete OEM Partition and Recovery
There are several reasons why laptop users may want to delete OEM and recovery partitions:
1. Free Up Limited Disk Space:
- OEM partitioning and recovery can take up significant storage space, especially on laptops with small hard drives.
- Deleting this partition can free up valuable disk space for your files, programs, and personal data.
- This is especially important for users who often work with large files, such as video editors or photographers, or for those who have a lot of files that need to be stored on their laptops.
2. Eliminate Unwanted Factory Built-in Software:
- Many laptops come with factory-built software that you may not use or want.
- This software can eat up disk space and can even slow down the performance of your laptop.
- Deleting OEM partition and recovery will permanently remove this software from your laptop.
3. Preparation for Operating System Reinstallation or Hardware Upgrade:
- If you want to reinstall your operating system with a clean install, you may need to delete the OEM and recovery partitions to ensure a clean install and free of unnecessary software.
- In addition, if you want to upgrade your laptop’s hardware, such as replacing the hard drive with a larger SSD, you may need to delete the OEM and recovery partitions to free up space needed for the new drive.
Preparation Before Removing
Before you proceed with OEM partition removal and recovery on your laptop, it is imperative to perform some crucial preparatory steps to ensure a safe and risk-free process. Here are the important steps you need to follow:
1. Backup Important Data:
- Prioritize Data Security: The first and most important step is to back up all important data stored on your laptop hard drive. OEM and recovery partitions may contain system files and factory backup images, however, these partitions may also contain your files stored in other locations on the hard drive.
- Use External Storage: To perform backups, you can use an external hard drive, flash drive, cloud storage service, or other storage media that has enough storage capacity to hold all your data.
- Ensure Complete Backups: Make sure you back up all important files and folders, including documents, photos, videos, music, projects, and other data. Double-verify that all important data has been backed up securely before proceeding.
2. Create System Restore Media:
- Take Care of Recovery Possibilities: Even if you intend to delete the recovery partition, it is important to have an alternative way to restore your system in case of problems later on.
- Create Installation Media: Use the built-in tools of your operating system (such as the Media Creation Tool on Windows) or download the ISO file from the developer’s official website to create your operating system installation media.
- Prepare Physical Media: Burn the ISO file to a DVD or create a bootable USB flash drive to use as recovery media.
3. Ensure Access to Required Tools:
- Choose the Right Tool: To delete OEM partition and recovery, you need a disk management tool that suits your operating system. You can use built-in tools like Disk Management on Windows, Disk Utility on macOS, or GParted on Linux.
- Download Third-Party Tools: If you want more advanced functionality or need visual aids, you can download third-party disk management tools that offer additional features and a more user-friendly interface.
- Understand the Instructions: Before you begin, make sure you read and carefully understand the instructions for using the selected tool, be it built-in guides or documentation from third-party developers.
Steps to Delete OEM Partition
Step-by-step instructions using the built-in Windows tool (Disk Management):
- Right-click on the Start button and select Disk Management.
- Look for partitions that have the label OEM Partition.
- Right-click on the OEM partition and select Delete Volume. Make sure you have backed up all important data before proceeding.
- A warning will appear that deleting a partition will delete all data. When you’re ready, click Yes to continue.
Use of Third-Party Software for Partition Deletion:
- Use reliable partition management software such as EaseUS Partition Master or MiniTool Partition Wizard.
- Each software has its steps, but generally, you will select the OEM partition, and then select the option to delete or delete the partition.
- Follow the instructions provided by the software to delete the partition. Make sure not to interrupt this process so that data corruption does not occur.
Steps to Delete Recovery Partition
Removal methods via BIOS settings:
- Restart your computer and press the appropriate key (usually F2, F10, F12, or DEL) to enter BIOS.
- Inside the BIOS, look for the menu related to boot or security to find options related to the recovery partition.
- If there is an option to disable or delete the recovery partition, do it according to the instructions given. Make sure to save the changes before exiting BIOS.
How to Remove Using Command Prompt and Diskpart:
- Right-click on Start and select Command Prompt (Admin) or Windows PowerShell (Admin).
- Type diskpart and press Enter.
- Type list disk, press Enter, then select disk X (replace X with the number of the disk containing the recovery partition).
- Type list partition, press Enter, then select partition Y (replace Y with the recovery partition number).
- Type delete partition override and press Enter to delete the recovery partition.
Removal Alternatives with Third-Party Software:
- Use trusted partition management software, such as EaseUS Partition Master or MiniTool Partition Wizard.
- Open the software and follow the instructions to find and select the recovery partition.
- Usually there will be an option to delete or delete the partition. Follow the steps given by the software to complete the removal process.
After deletion
Once you have successfully deleted the OEM and recovery partitions, there are some important steps to ensure that the process has been completed correctly and your system remains secure.
Verify that the Partition Has Been Deleted Correctly:
- Reopen Disk Management to make sure that the partition is no longer visible.
- You can also use Command Prompt by typing diskpart and then list partition to verify that the partition has been deleted.
How to Allocate Unused Space:
- You can create a new partition with unused space via Disk Management by right-clicking on the unallocated space and selecting New Simple Volume.
- If you want to add space to an existing partition, right-click on the partition and select Extend Volume.
Post-Deletion Security Measures:
- Use a trusted antivirus to perform a full scan of your system to make sure there is no malware or virus left.
- Ensure that your operating system and all hardware drivers are updated to avoid security vulnerabilities.
- Make it a habit to back up data periodically, so you have up-to-date copies of all your important files.
Conclusion
Through this article, we have explored the step-by-step process of deleting OEM partition and recovery. Starting from understanding the definition and function of such partitions to the necessary preparations before deletion, and finally the execution of the deletion itself. It is important to remember that each step must be done carefully and according to the instructions given to avoid the risk of system damage or data loss.
Although this article provides comprehensive guidance, the process of deleting partitions can involve technical risks. Therefore, it is highly recommended to perform a thorough data backup before starting this process. If you feel unsure or have doubts during the removal process, do not hesitate to consult a professional IT expert. They can provide more specific help and guidance according to your system configuration.
Hope this article is useful and helps you in managing partitions on your computer more effectively and safely.