Preparation Before Combining Hard Drives
1. Backup Important Data
Before starting the process of merging several Hard Drive into one volume, it is very important to backup all important data in the Hard Drive. This step is to ensure that your data remains safe and is not lost during the merge process. This process may require reformatting or changes to the storage structure that may result in data loss. Use an external storage device or cloud service to keep copies of your important data.
2. Ensure Hard Drive Condition
Before combining Hard Drives using Storage Spaces, make sure all Hard drives are in good condition and functioning optimally. Check the condition of the Hard Drive by using diagnostic tools to make sure there is no physical damage or disk health problems. Good Hard Drive conditions will ensure the merging process goes smoothly and avoid problems in the future. Also, make sure that all Hard Drive to be used are compatible with Windows 11 and have the correct connection to avoid problems when setting up Storage Spaces.
Steps to Merge Hard Drives in Windows 11
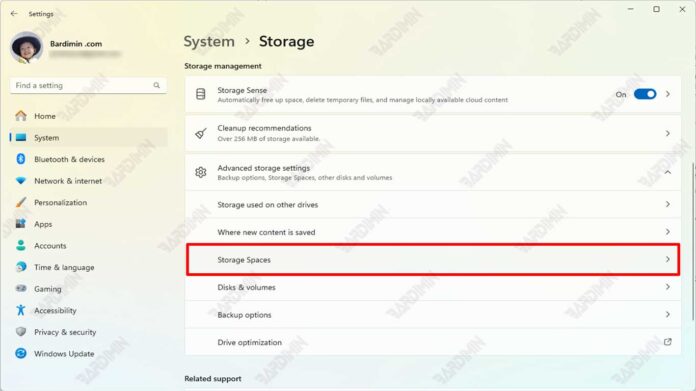
1. Open Storage Spaces
The first step in merging multiple Hard drives in Windows 11 is to unlock the Storage Spaces feature. You can access Storage Spaces in the following ways:
- Go to Control Panel and select System and Security.
- Click Storage Spaces.
- Or, go to Settings, select System, then select Storage, and click Advanced Storage Settings at the bottom of the page. Click Storage Spaces.
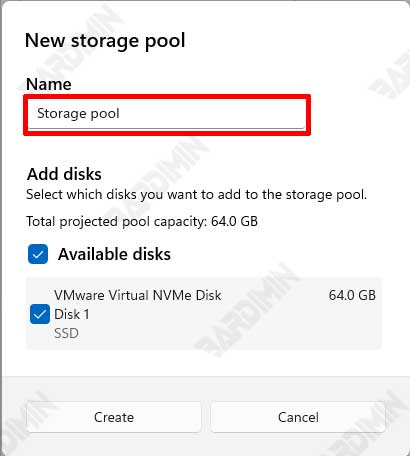
2. Create a Storage Pool
After opening Storage Spaces, the next step is to make a storage pool. A Storage Pool is a collection of several Hard drives combined into one storage unit.
a. Selecting a Hard Drive
Select the Hard Drive you want to merge. Make sure all selected Hard drives are in good condition and compatible to be combined into a storage pool.
b. Adding a Hard Drive
Add the selected Hard Drive into the storage pool. In Storage Spaces, click the Create a new pool and storage space option. Follow the on-screen instructions to add a Hard Drive to a new storage pool.
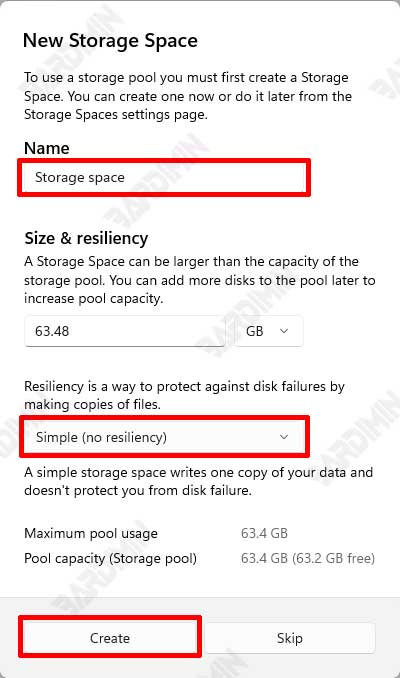
3. Create a Storage Space
Once the storage pool is created, the next step is to create a storage space within the pool. Storage Space is the virtual storage volume created inside the storage pool.
a. Determine the Type of Storage Space
Choose the type of storage space that suits your needs:
- Simple (No Resiliency): Combines the capacity of all Hard drives into one large volume without data protection. Suitable for temporary or less important data.
- Mirror: Data is copied to two or more Hard drives to ensure data remains safe in case one of the drives is corrupted. There is a choice of two or three copies for different levels of security.
- Parity: Using data dissemination methods with parity information to provide data protection by using less space compared to mirrors. Suitable for storing archive data or data that is rarely accessed but still important.
b. Configure Storage Space
Set the size and name for the new storage space. You can also determine the level of resiliency according to your needs. After configuring, click Create storage space to complete the process.