Locked out of a Lenovo laptop because you forgot the BIOS password? Use the Lenovo BIOS Password Reset Tool to bypass passwords easily! Step-by-step guide + recommended trusted tools. Read now!
You are in a hurry to get an important job done, suddenly your Lenovo laptop displays the message ‘Enter BIOS Password’. Problem? You don’t remember the password at all! This situation is more than just annoying, it can hinder deadlines, lose access to important data, or even make a newly purchased used laptop unusable.
Most Lenovo BIOS passwords can be reset by yourself without the need to take them to a service center or spend a lot of money. With the right tools and guidance, you can unlock the BIOS of your Lenovo ThinkPad, Ideapad, or Legion series in just a few minutes.
Why Can Forgetting Lenovo BIOS Password Be a Big Problem?
Ever experienced a Lenovo laptop screen suddenly asking for “BIOS Password” when you’re sure it never set it? This is not just a matter of forgetting your usual password, you know! The BIOS password is like a digital vault that locks access to the heart of your laptop’s system.
Unlike Windows login passwords that can be reset via email or recovery mode, BIOS passwords work at a much lower system level. It serves as the main safeguard before the operating system loads, so if you forget or lose this password, the impact can be very serious. This becomes even more complicated because the BIOS does not provide an easy or automatic recovery method like modern operating systems.
What the hell is the danger?
1. You Can Be Locked Out of Your System
Imagine you want to change the operating system or reinstall Windows, but can’t enter the BIOS to set boot priority. It’s like having a car but not having access to the steering wheel!
2. Hardware Upgrades Become a Nightmare
Want to add RAM or replace a faster SSD? Unfortunately, some important settings for new hardware are in the BIOS.
Interesting fact: On the tech forum, 30% of Lenovo hardware upgrade failures turned out to be due to BIOS passwords!
3. Used Laptops Can Be Expensive Bricks
Many second-hand laptops in the marketplace are still locked BIOS. The buyer only realizes after the transaction, a pity, right?
4. Chain Security Issues
Some of the latest models, such as the ThinkPad X1, even lock the TPM security feature along with the BIOS.
As a result, important data encrypted by BitLocker cannot be accessed, even though Windows passwords are still remembered.
3 Lenovo BIOS Password Reset Method (Tool & Manual)
Dealing with a locked BIOS password on a Lenovo laptop can be a serious challenge, but some effective methods can be used to reset it. Whether using third-party tools or manual methods, you still need to be careful about choosing the approach that is most secure and suitable for your device. Here are three commonly used methods:
1. Use Custom Tools – The Quickest & Easiest Solution (Recommended)
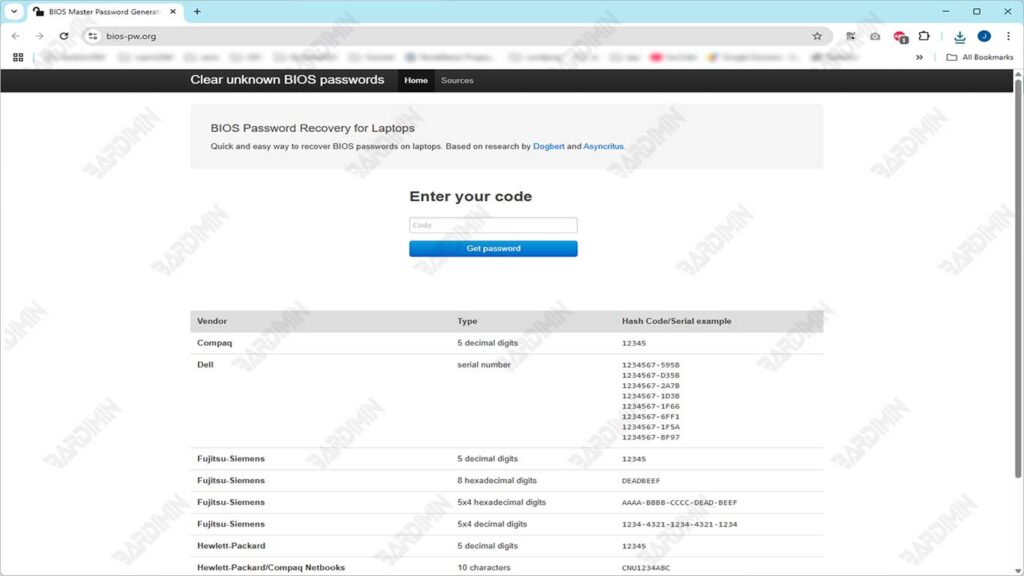
The first and most recommended method to get around a locked BIOS is to use Lenovo BIOS Password Reset Tools. Some popular tools that are widely used by technicians and advanced users are CMOS De-Animator and BIOS-PW.org. This tool works by generating a unique master password, based on specific information from your device, such as:
- Serial number (example: PF-1234567)
- Laptop model (example: ThinkPad T470)
How to find out the Serial Number
- Open cmd → type wmic bios get serialnumber
- Or check under the laptop/sticker box (example: PF-1A2B3C4)
Steps of Use BIOS-PW.org:
- Turn on the laptop and note the error message or serial number that appears when it fails to enter the BIOS.
- Open the site BIOS-PW.org using another device (other HP/PC/laptop).
- Enter the serial number or challenge code into the fields provided.
- The site will provide several possible master passwords. The site will display 3-5 password combinations. Passwords are case sensitive!
- Restart the laptop → press F1/F2 at startup. When the BIOS password prompt appears, try to input the password one by one that you got. Press Enter after each input
Steps to Use CMOS De-Animator:
1. Download CMOS De-Animator
Visit an official website or trusted repository that provides the De-Animator CMOS installer file (version 3 or later recommended). Make sure you download a version that is compatible with your system (32-bit or 64-bit).
2. Run on an Accessible Computer
Install and run the program on another computer (if your Lenovo laptop has its BIOS locked). This tool is portable, does not require any special installation.
3. Create a Bootable Flash Drive (Optional but Recommended)
Copy the CMOS De-Animator file into a bootable flash drive if you want to run it directly from startup. You can create a bootable USB using a tool like Rufus with the FreeDOS system.
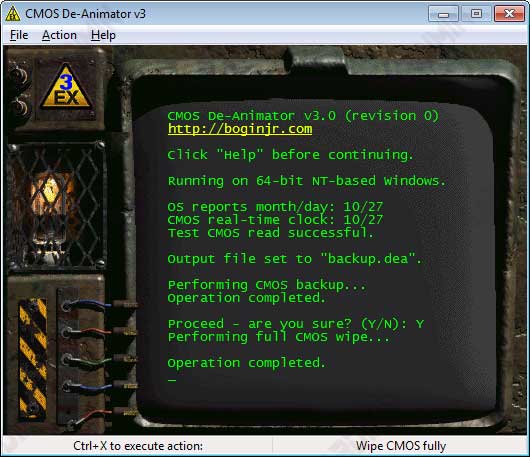
4. Run the Program and Reset the CMOS
When the tool is running, click the “De-Animate (Clear CMOS)” button. The program will schedule CMOS removal at the time of the next system reboot. You’ll see a notification that your changes have been saved.
5. Restart and Enter the BIOS
After a reboot, the BIOS will lose all the old configurations, including the password. Try entering the BIOS with the F1, F2, or DEL keys, depending on the model. You should now be able to access the BIOS without being asked for a password.
2. Reset via CMOS Battery (for older models)
The BIOS over CMOS battery reset method is a long-standing manual approach to remove all BIOS configurations, including passwords. This method is effective for older Lenovo models that are not equipped with advanced security features such as the Absolute Persistence Module (APM). However, this method requires basic skills for opening the laptop case.
Steps to Reset Lenovo BIOS via CMOS Battery:
1. Turn Off the Laptop and Unplug All Resources
Make sure the laptop is completely off. Remove the adapter, the main battery (if removable), and all connected external devices.
2. Open the Back Case of the Laptop
Use a small screwdriver to unscrew the bottom casing cover. Do so carefully so as not to damage the internal clip or socket.
3. Find a CMOS Battery
Look for a coin-shaped battery (such as a watch battery) on the motherboard. It is usually silver in color with a small socket or connector.
4. Remove the battery for ±10 minutes
Unplug the CMOS battery from its connector and let it sit for 10–15 minutes. This will remove the entire BIOS configuration, including the password.
5. Reinstall and Turn on the Laptop
After enough time, plug in the CMOS battery, close the case, and turn on the laptop. The BIOS will revert to the default settings without a password.
This method is not effective for modern Lenovo series that use an Absolute Persistence Module (APM), such as the ThinkPad X1 Extreme, P1 Series, or models with an encrypted BIOS. On this device, the BIOS configuration is stored on a special chip that will not be reset by simply removing the CMOS battery.
3. Contact Lenovo Support (Last Resort)
If all self-reliance methods don’t work or your device is the latest model with a high-level security system, then the safest and legal step is to contact official Lenovo support. This method not only ensures data security but also ensures that the reset process is carried out according to the manufacturer’s standards.
Steps to Contact Lenovo Support to Reset BIOS Password:
1. Prepare Proof of Official Ownership.
Lenovo is very strict in verifying BIOS reset requests. You should prepare:
- Original purchase invoice, or
- Proof of payment is valid with identity information and device serial number.
2. Contact Lenovo Support through official channels.
- Access the official support page: https://support.lenovo.com
- Choose a live chat, email, or hotline number option according to your region.
- Tell them that you want to reset the BIOS password and have prepared proof of ownership.
3. Verification Process by Lenovo.
Once the documents are verified, Lenovo can:
- Provide a unique master password (specific to some models), or
- Directs you to an authorized service center for immediate handling.
4. Reset Performed by a Certified Technician.
In most cases, an authorized Lenovo technician will perform the reset process using a special device to maintain the integrity of your device’s security system.