In the digital age full of vibrant colors and attractive visual effects, black-and-white photo conversion still has strong appeal. Although technology continues to evolve, black-and-white photos remain relevant due to their high artistic value and ability to convey deep emotions.
Without color interference, black-and-white photos can highlight important elements such as texture, shape, and composition, making them suitable for a wide range of photography types, from intimate portraits to dramatic landscapes to story-rich street photography.
One of the best tools to turn photos into black and white is Photoshop. With the flexibility and control it offers, Photoshop allows photographers and editors to customize the conversion process as needed.
From simple methods like grayscale and desaturation to more advanced techniques like Gradient Map, Channel Mixer, and Black & White Adjustment, Photoshop offers a wide range of options for producing accurate and high-quality results. In this article, we will discuss the various methods and how you can use them to create stunning black-and-white photos.
1. Changing Images to Greyscale
Greyscale is an image mode that removes all colors, leaving only shades of black, white, and gray. This is the most basic way to turn a colored image into black and white. Although it looks simple, this method often results in images that appear flat and less attractive due to the lack of tonal variation.
The greyscale method removes all color information directly, without giving control over how the tonality of the original color is converted to the grayscale. This often causes the image to lose contrast and details that would have stood out more if it had used more advanced conversion methods. As a result, the image looks “flat” because its tonality tends to be linear without rich variation.
Although the results are limited, the greyscale method is still useful in some situations:
- If you want to convert an image to Duotone (a black and white image with two colors), grayscale is the first step necessary.
- If you just need a quick conversion without detailed controls, greyscale could be a great choice.
Steps to Change Image to Greyscale
- Open the color image you want to turn black and white in Photoshop.
- Select Image > Mode > Grayscale. On the main menu, select Image, then Mode, and select Grayscale.
- Photoshop will prompt you to confirm the deletion of the color information. Click Discard to continue.
- Once you’re done, you’ll get a black-and-white image with a flat, less attractive tonality.
If you want more interesting results, try other methods such as Desaturasi, Gradient Map, or Channel Mixer for better control.
2. Desaturasi: How to Quickly Remove Color
Desaturasi is a technique that reduces the intensity of colors to zero so that the image becomes black and white without erasing all color information. This method is more flexible than Grayscale, as it preserves details in shadows and highlights.
Difference between Grayscale and Desaturation
- Grayscale removes all color information and converts the image to black and white permanently.
- Desaturasi only reduces the intensity of the colors, but remains in the original color mode (RGB or CMYK), allowing for further editing.
- The result of desaturation often looks brighter than grayscale because it still retains the light distribution of the original color.
While the desaturation process is quick and easy, there are some drawbacks to be aware of. First, this method does not provide full control over the color balance in black-and-white images. Second, some colors may appear lighter or darker after desaturation, which can make the final result less satisfying.
Finally, desaturation is less flexible for further adjustment when compared to methods such as Black & White Adjustment Layer or Channel Mixer.
How to Desaturate an Image in Photoshop
1. Using Desaturate (The Easiest Way)
- Open the image in Photoshop.
- Select Image > Adjustments > Desaturate or press Shift + Ctrl + U.
- The color will disappear immediately, but without any further control.
2. Using Hue/Saturation
- Select Image > Adjustments > Hue/Saturation or press Ctrl + U.
- Slide the Saturation slider to the left until you reach -100.
- Click OK to apply the effect.
3. Using an Adjustment Layer (Non-Destructive)
- Click Layer > New Adjustment Layer > Hue/Saturation.
- Slide the Saturation slider to -100 to remove the color.
- Advantages: This method does not damage the original image and allows for further editing.
3. Utilizing Gradient Map for Better Control
Gradient Map is an advanced technique in Photoshop that changes the pixels of an image based on the selected color gradient. This technique gives you more control over the tonality of the image, so you can create a more dynamic and artistic black-and-white effect.
With Gradient Map, you can not only convert the image to black and white, but you can also adjust how the tonality of the original color is changed to grayscale, providing more flexibility than basic conversion methods such as grayscale or desaturation.
Steps to Use a Gradient Map
1. Select Image > Adjustments > Gradient Map:
- Open your image in Photoshop.
- In the main menu, select Image, then Adjustments, and then Gradient Map.
- By default, Gradient Map will use a gradient from black to white, resulting in a standard black-and-white effect.
2. Edit the Gradient by Clicking the Gradient Bar:
- To adjust the tonality, click on the gradient bar in the center of the screen. This will unlock Gradient Editor.
- Here, you can change the gradient by adding or shifting the control points (stops) on the slider. For example, you can add a gray dot in the middle to create a smoother tonal effect.
3. Use Gradient Map Adjustment Layer for Non-Destructive Results:
- If you are using Photoshop CS4 or a later version, you can use the Gradient Map Adjustment Layer for non-destructive results. To do this, click the Adjustment Layer icon in the Layers panel, then select Gradient Map.
- This way, you can edit the gradient at any time without damaging the original image.
To adjust the brightness of the image, you can slide the center point slider. In the Gradient Editor, this slider helps you adjust the brightness without losing details in shadows or highlights. If you want the image to look brighter, slide the slider to the left, while to make it darker, swipe right.
Try to use custom gradients. You can add specific colors to the gradient to create a more interesting black-and-white effect, such as a sepia effect or blue toning.
4. Channel Mixer: Full Control over Color
Channel Mixer is a very useful tool in Photoshop to set the contribution of red, green, and blue (RGB) colors in an image. This tool is ideal for creating more interesting and artistic monochrome effects. With Channel Mixer, you can adjust the intensity of each color channel to produce a black-and-white image that has better contrast, detail, and tonality than simple conversion methods such as grayscale or desaturation.
How to Use a Channel Mixer
1. Select Image > Adjustments > Channel Mixer:
- Open your color image in Photoshop.
- In the main menu, select Image, then Adjustments, and then Channel Mixer.
- If you are using Photoshop CS4 or a later version, you can use the Channel Mixer Adjustment Layer for non-destructive results. Click the Adjustment Layer icon in the Layers panel, then select Channel Mixer.
2. Check Monochrome to Convert Images to Black and White:
- In the Channel Mixer window, check the Monochrome option. It will turn your image into black and white by combining red, green, and blue channels.
- By default, Photoshop sets the red and green channels to +40% and the blue channels to +20%, resulting in a black-and-white image with balanced tonality.
3. Adjust the Red, Green, and Blue Sliders to Get the Desired Tonality:
You can adjust the sliders for each color channel (red, green, and blue) to control the contribution of each color to the final black-and-white image.
Example:
- Increasing the red slider will make areas that were previously red look brighter.
- Reducing the blue slider will increase the contrast and make areas that were previously blue look darker.
- Make sure that the total percentage of the three sliders remains around +100% to keep the image exposure balanced. If the total exceeds +100%, the image will appear overexposed, and if it is less, the image will appear underexposed.
5. Black & White Adjustment: Best Techniques for Professional Results
Black & White Adjustment is an advanced feature in Photoshop that is used to turn images into black and white. This filter mimics classic monochrome photography techniques, giving you high control over the tonality of the image. With Black & White Adjustment, you can adjust the brightness of six basic colors (red, yellow, green, cyan, blue, and magenta) to produce black and white images with good contrast, sharp details, and rich nuances.
Steps to Use Black & White Adjustment:
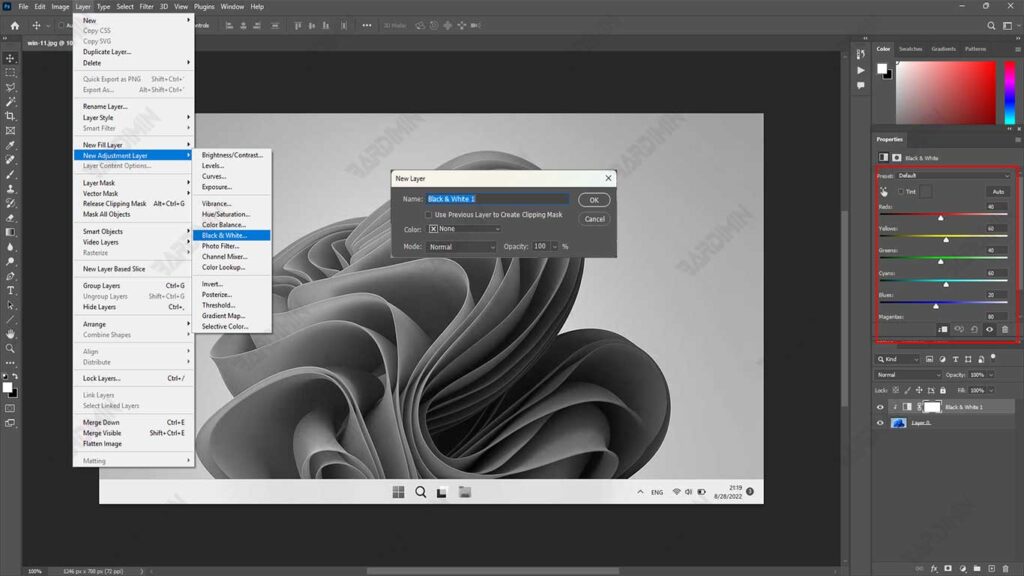
1. Create a Black & White Adjustment Layer:
- Open your image in Photoshop.
- In the Layers panel, click the Adjustment Layer icon (black and white semicircle icon) and select Black & White.
- This will create a new adjustment layer on top of the original image, allowing you to edit non-destructively.
2. Customize Sliders for Red, Yellow, Green, Cyan, Blue, and Magenta:
- After creating the Black & White Adjustment Layer, you will see six sliders that each represent a color: red, yellow, green, cyan, blue, and magenta.
- Slide this slider to control the brightness of the area of the image that previously had that color. For example:
- Merah: Swipe right to brighten areas that were previously red, such as skin or the twilight sky.
- Biru: Swipe left to darken areas that were previously blue, such as sky or water.
- By adjusting this slider, you can create a black-and-white image that has better contrast and detail.
3. Use the Auto Feature or Choose from the Available Presets:
- If you want quick results, you can use the Auto button at the top of the Black & White Adjustment panel. It will automatically adjust the slider based on Photoshop analysis of your image.
- In addition, you can choose from a variety of presets available in the dropdown menu at the top of the panel. These presets mimic the color filter effects used in traditional monochrome photography, such as red, yellow, or blue filters.
The advantages of using Black & White Adjustment are very diverse. With six sliders representing different colors, you can set in great detail how each color will be turned into a grayscale. The results obtained are also more attractive compared to the simple conversion method, because Black & White Adjustment is able to produce black and white images with good contrast and preserved details.
In addition, because it uses the Adjustment Layer, you can change the settings at any time without damaging the original image. There are also presets that make it easy for you to get certain effects quickly, such as a red filter effect to increase the contrast of the sky or a yellow filter to brighten the skin.
Examples of using Black & White Adjustment are very useful. For example, if you want to increase the contrast in the sky, you can choose the Red Filter preset, which will darken the blue sky and brighten the red areas. For portraits, the Yellow Filter preset can be used to brighten the skin and give it a more natural look. If you feel confused about adjusting the slider, you can click Auto to get a balanced result automatically.
With Black & White Adjustment, you can create black-and-white images that are not only visually appealing but also have strong depth and emotion, according to your creative needs. This technique is ideal for photographers and editors who want complete control over the black-and-white conversion process.