Users of Photoshop often face the same problem when editing photos, which is slow performance. This issue can be very annoying, especially when working with high-resolution images or when adding a variety of complex effects. This slow performance not only reduces productivity but can also make the editing process longer and more laborious.
However, there are various ways to overcome this problem and improve Photoshop performance. In this article, we will discuss various effective tips and tricks to speed up your Photoshop performance. From Preferences setup to storage space management, we’ll provide a complete guide to help you optimize your Photoshop performance and improve your work efficiency.
The Importance of Setting Preferences in Photoshop
Adjusting the performance settings in Preferences based on the specific needs of the user is essential to ensure that Photoshop runs optimally. Each user may have different needs, depending on the type of work being done and the hardware capabilities they have. By setting your preferences precisely, you can improve Photoshop performance, reduce wait times, and increase your work productivity.
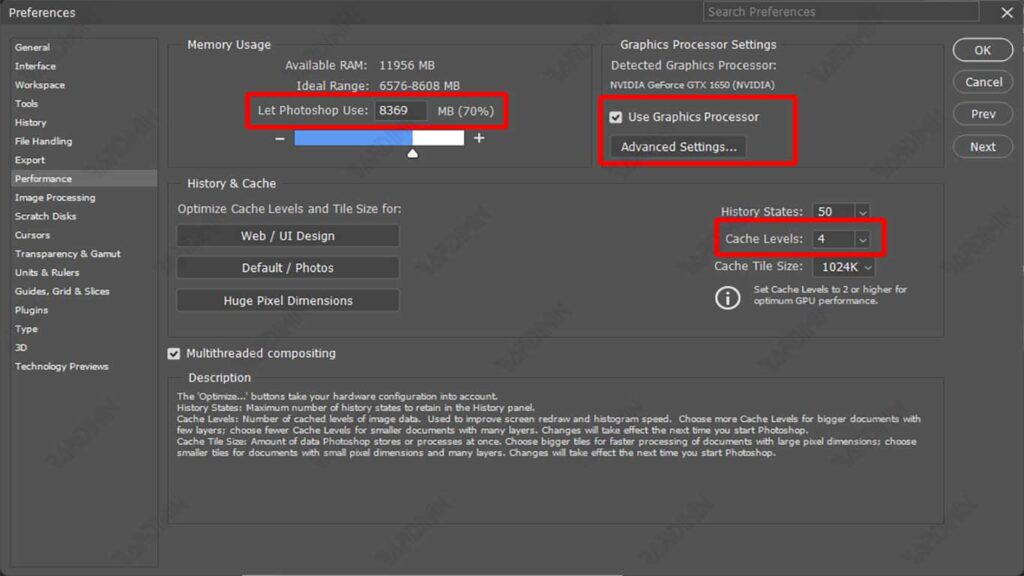
One of the main settings in the Performance tab is RAM allocation. You can specify how much RAM to allocate to Photoshop. The more RAM you allocate, the better the performance of Photoshop, especially when working with large files or performing complex tasks.
Scratch Disks are the temporary storage space used by Photoshop to store data while working. Using fast and large-capacity Scratch Disks, such as SSD, can improve the speed and efficiency of Photoshop.
Photoshop can leverage GPU to speed up the rendering process and streamline user interaction with the interface. In Performance settings, make sure to enable the GPU usage option and adjust the settings according to your hardware capabilities.
This section allows you to set the amount of History States and the level of Cache Levels. Increasing the number of History States allows you to have more undo moves, but it can affect performance. Adjusting the Cache Levels can help speed up the display of the image on the screen.
Steps to Access and Set Performance:
- Open the Edit Menu: To access the performance settings on Photoshop, the first step is to open the Edit menu at the top of the screen.
- Select Preferences: After opening the Edit menu, hover down and select Preferences.
- Click Performance: In the Preferences sub-menu, click on Performance to open the performance settings.
Scaling Techniques to Speed Up Photo Editing
Scaling is a technique used to resize an image or photo without changing the original proportions of the image. In the context of photo editing in Photoshop, scaling is often used to speed up the editing process by reducing the size of the image temporarily, so that the application can process faster.
Benefits of Using Scaling Techniques to Speed Up the Editing Process:
- Improved Performance: Editing images at lower resolutions while improving Photoshop responsiveness as smaller files require less memory and processing power.
- Time Efficiency: Scaling allows you to apply effects and other changes faster, as the time required for each editing step is reduced.
- Smoother Editing: This technique helps reduce lag or lag when working with large or complex files.
Steps to Use Scaling Techniques
Practical Example: Editing Photos with a Size of 20 x 30 cm Resolution of 300 pixels/inch
- File Preparation: Start by opening the photo you want to edit in Photoshop. For example, the photo has a size of 20 x 30 cm with a resolution of 300 pixels/inch.
- Scale to Smaller Size: To speed up editing, resize the photo to 2 x 3 cm with a resolution of 1200-1500 pixels/inch.
- Open the Image menu and select Image Size.
- Change the dimensions of the photo to 2 x 3 cm and increase the resolution to 1200-1500 pixels/inch to preserve details while editing.
