Using tables is one efficient and organized way to display data in rows and columns. Good table formatting will make the table visually appealing.
If you often work with Microsoft Word documents, chances are you need to periodically use tables when recording data. In certain situations, tables can contain extensive data that spans multiple pages, making it difficult to insert table headers on each page individually.
If you create a table in Microsoft Word that spans multiple pages, you may notice that headings on the first page are not repeated on subsequent pages. If the table spans multiple pages, it is recommended to duplicate the table header to increase its visibility and clarity.
In the following article, Bardimin will explain techniques for repeating and maintaining table headings on each page in Microsoft Word
How to Repeat and Keep Table Headings on Each Page in Microsoft Word
The utilization of tables in Word is an efficient and organized way to display data in rows and columns. Also, using the enhanced table formatting options in Word makes the table visually appealing and professional-looking. This can be done easily, with just a click of the mouse.
Despite the advantages, multi-page tables have significant drawbacks. The header row (table heading) is only visible on the start page, resulting in a loss of clarity when navigating to the next page. This condition will cause the information contained in it to be more difficult to understand.
You don’t need to worry, there are several methods you can do to overcome this:
- Using the “Split Window” feature.
- Use the “Repeat row header” feature.
1] Using the “Split Window” feature in Microsoft Word
One effective way to solve the multi-page table problem is to split the document window into two parts. In Microsoft Word, the “Split” feature lets you split a document window into two or more panes, each displaying a different part of the same document.
This feature is very useful when you want to view and work on different parts of a document at the same time. This way, you can keep the table header row visible in the top pane and leverage the bottom panel to browse the remaining table content.


To use the “Split Window” feature in Microsoft Word, you can follow these steps:
- Open Microsoft Word and open the document you want to work on.
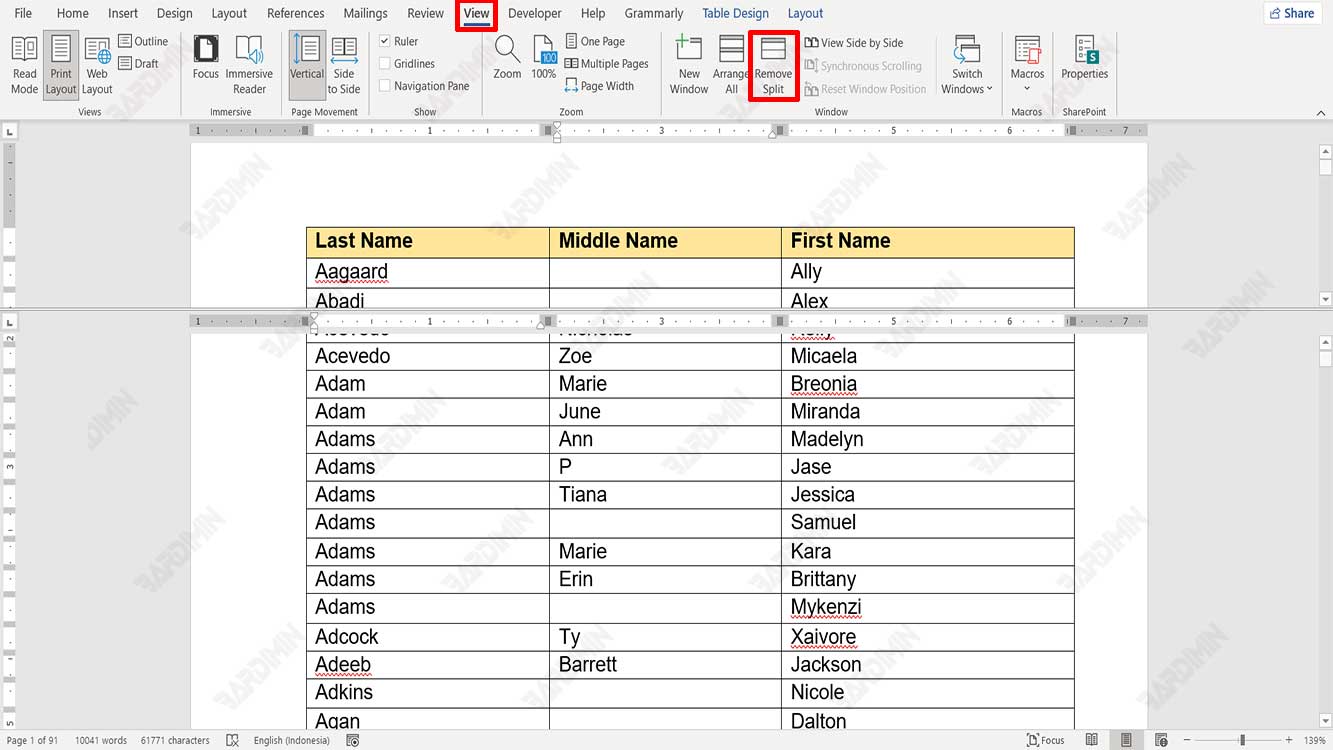
- Select the “View” tab on the Microsoft Word menu.
- In the “Window” section of the ribbon, click the “Split “ button.
- The document window will now be split into two panes, with a divider bar in the middle. You can adjust the panel size by clicking and dragging the split bar up or down. Each panel works independently, so you can scroll, edit, and format the text in each pane separately.
- If you want to remove the split and return to single-window view, reopen the “View” tab and click the “Remove Split” button in the “Windows “ section of the ribbon.
2] Using the “Repeat row header” feature in Microsoft Word
Using the “Repeat row header” feature in Microsoft Word will make the multi-page table view look professional. With this feature, the table title will appear on each page so that readers more easily understand the data.
To make table headings appear on each page, follow these instructions:
- Open Microsoft Word and open the document you want to work on.
- Select the first row of the table (table heading).
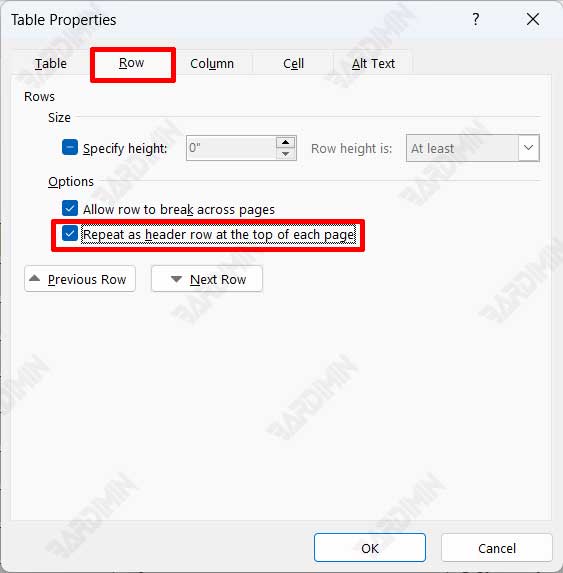
- Then, right-click on the table title and select the “Table Properties” option.


- In the dialog box, select the “Row” tab.
- Then tick on the item “Repeat as header row at the top of each page”.
- Click the OK button to apply the changes.


Alternatively, you can’t do it by:
- Open Microsoft Word and open the document you want to work on.
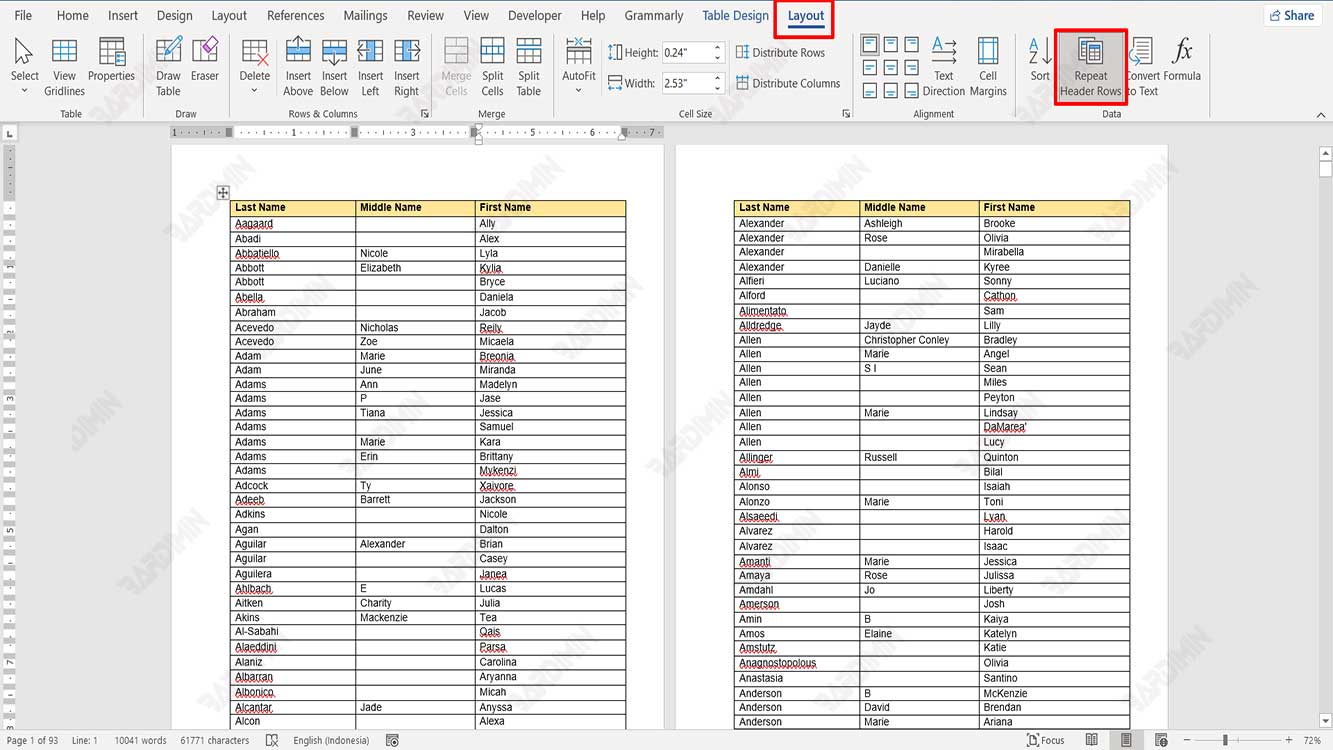
- Select the first row of the table (table heading).
- On the tab menu, select the “Layout” tab.
- Then click the “Repeat header rows” button.

