Line spacing is one of the important elements in the look of your document. It affects how the text is read and understood by the reader. In Microsoft Word, you have various options to set the line spacing according to your needs.
Line and paragraph spacing is the vertical spacing between lines of text or between paragraphs in a document. This spacing can affect the look, readability, and tidiness of your document. Therefore, you need to know how to set line and paragraph spacing in Microsoft Word according to your needs and purpose.
In this article, we will explain how to set line and paragraph spacing in Microsoft Word with easy and practical steps. We will also provide some tips and tricks to make your documents more attractive and professional. Check out the full review below.

How to Set Line Spacing in Microsoft Word
Line spacing is the distance between lines of text in a paragraph. Line spacing can affect your eye comfort when reading documents. If the line spacing is too tight, then the text will look dense and difficult to read. If the line spacing is too wide, then the text will look sparse and inefficient.
To set line spacing in Microsoft Word, you can use one of the following two ways:
1] Using Line and Paragraph Spacing Menu
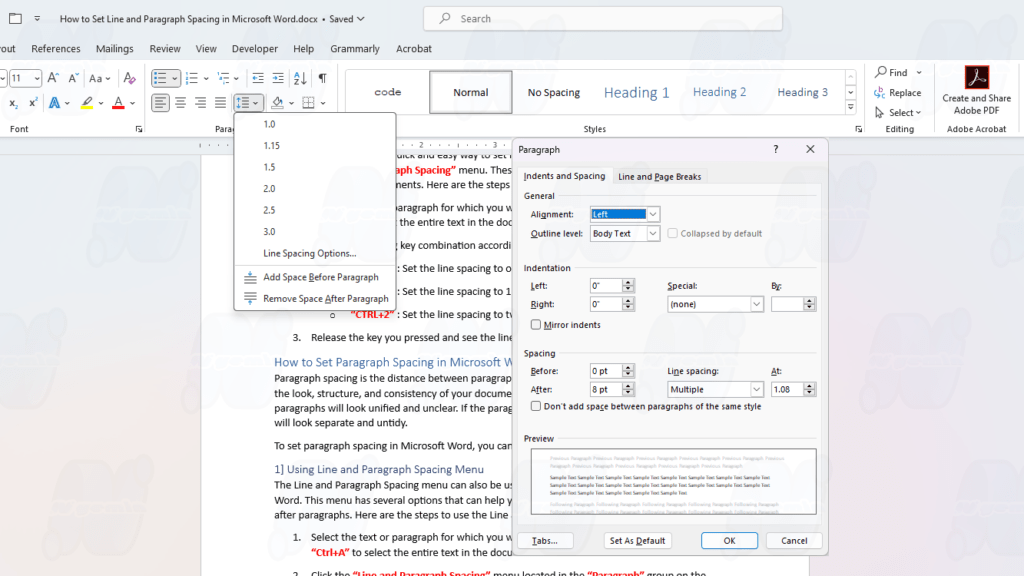
The Line and Paragraph Spacing menu is a menu located on the “Home” tab on the Microsoft Word ribbon. This menu allows you to select several predefined line spacing options, such as “Single”, “1.5 lines”, “Double”, “At least”, “Exactly”, or “Multiple”. Here are the steps to use the Line and Paragraph Spacing menu:
- Select the text or paragraph for which you want to set line spacing. You can also press “Ctrl+A” to select the entire text in the document.
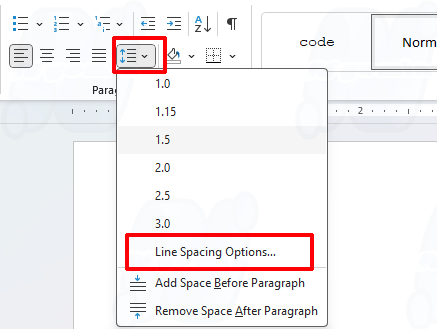
- Click the “Line and Paragraph Spacing” menu located in the “Paragraph” group on the “Home” tab. This menu has icons such as two horizontal lines with up and down arrows.
- Select the line spacing option you want from the list that appears. You can preview changes to line spacing in your document.

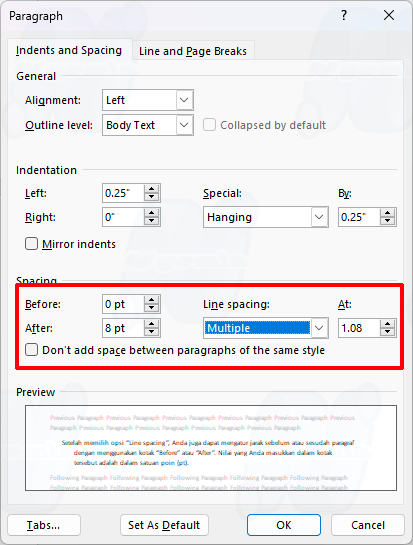
- If you want to set the line spacing in more detail, you can select the option “Line Spacing Options…” from the list. A “Paragraph” dialog box will appear that has an “Indents and Spacing” tab.
- In the “Spacing” section, you can adjust the line spacing by using the “Line spacing” drop-down menu. Choose one of the following six options:
- Single: Set the line spacing to one time the font size.
- 1.5 lines: Set the line spacing to 1.5 times the font size.
- Double: Set the line spacing to twice the font size.
- At least: Set the line spacing to at least according to the value you entered in the “At” box.
- Exactly: Set the line spacing to exactly match the value you entered in the “At” box.
- Multiple: Set the line spacing to multiples according to the value you entered in the “At” box.

- After selecting the “Line spacing” option, you can also adjust the spacing before or after the paragraph by using the “Before” or “After” boxes. The value you enter in the box is in units of points (pt).
- Click OK to apply the line spacing settings that you want.
2] Using Keyboard Shortcuts
Keyboard shortcuts are a quick and easy way to set line spacing in Microsoft Word without having to open the “Line and Paragraph Spacing” menu. These keyboard shortcuts can help you save time and effort when creating documents. Here are the steps to use keyboard shortcuts:
- Select the text or paragraph for which you want to set line spacing. You can also press “Ctrl+A” to select the entire text in the document.
- Press the following key combination according to the line spacing options that you want:
- “Ctrl+1” : Set the line spacing to one time the font size (Single).
- “Ctrl+5” : Set the line spacing to 1.5 times the font size (1.5 lines).
- “Ctrl+2” : Set the line spacing to twice the font size (Double).
- Release the key you pressed and see the line spacing change in your document.
How to Set Paragraph Spacing in Microsoft Word
Paragraph spacing is the distance between paragraphs in a document. Paragraph spacing can affect the look, structure, and consistency of your document. If the paragraph spacing is too tight, then the paragraphs will look unified and unclear. If the paragraph spacing is too wide, then the paragraphs will look separate and untidy.
To set paragraph spacing in Microsoft Word, you can use one of the following two ways:
1] Using Line and Paragraph Spacing Menu
The Line and Paragraph Spacing menu can also be used to adjust paragraph spacing in Microsoft Word. This menu has several options that can help you easily add or decrease the spacing before or after paragraphs. Here are the steps to use the Line and Paragraph Spacing menu:
- Select the text or paragraph for which you want to set paragraph spacing. You can also press “Ctrl+A” to select the entire text in the document.
- Click the “Line and Paragraph Spacing” menu located in the “Paragraph” group on the “Home” tab. This menu has icons such as two horizontal lines with up and down arrows.
- Select one of the following three options from the list that appears:
- “Add Space Before Paragraph” : Increases the spacing before each selected paragraph by 12 pt.
- “Add Space After Paragraph” : Increase the spacing after each selected paragraph by 12 pt.
- “Remove Space After Paragraph” : Remove the spacing after each selected paragraph.
- If you want to set the paragraph spacing in more detail, you can select the option “Line Spacing Options…” from the list. A “Paragraph” dialog box will appear that has an “Indents and Spacing” tab.
- In the Spacing section, you can adjust the spacing before or after the paragraph by using the “Before” or “After” boxes. The value you enter in the box is in units of points (pt).
- Click OK to apply the paragraph spacing settings that you want.
2] Using Enter Key and Backspace
The Enter and Backspace keys are keys located on your computer keyboard. The Enter key is used to create a new line or start a new paragraph in a document. The Backspace key is used to remove characters or lines before the cursor in a document.
Enter and Backspace keys can also be used to set paragraph spacing in Microsoft Word manually. Here are the steps to use the Enter and Backspace keys:
- Position the cursor at the end of the paragraph for which you want to set paragraph spacing.
- Press the Enter key one or more times to increase the spacing after the paragraph to your liking.
- Position the cursor at the beginning of the next paragraph for which you want to set paragraph spacing.
- Press the Backspace key one or more times to reduce the distance before the paragraph to your liking.
- Repeat steps 2-4 for any other paragraphs for which you want to set paragraph spacing.
Tips and Tricks to Set Line and Paragraph Spacing in Microsoft Word
In addition to using the methods we have explained above, you can also use the following tips and tricks to adjust line and paragraph spacing in Microsoft Word more easily and effectively:
- You can set the default line and paragraph spacing for all new documents you create by using the “Set as Default” menu in the “Paragraph” dialog box. Select the “All documents based on the Normal.dotm template” option if you want to apply those settings to all new documents that use the Normal template. Select the “This document only” option if you only want to apply those settings to the document you’re working on.
- You can automatically adjust the spacing of lines and paragraphs according to the formatting style you are using by using the “Styles” menu on the “Home” tab. Select the formatting style you want from the list, then right-click on it and select “Modify…” A “Modify Style” dialog box will appear that has a “Format” button. Click the “Format” button and select “Paragraph”. A “Paragraph” dialog box will appear that is the same as we explained earlier. Set the line and paragraph spacing to your liking, and then click OK. Click OK again on the “Modify Style” dialog box. Line and paragraph spacing settings that you create are automatically applied to all text that uses that formatting style.
Conclusion
Thus our article on how to set line and paragraph spacing in Microsoft Word. We hope this article has helped you create documents more easily and professionally. Thank you for reading our article. See you in the next article.


