Google Chrome is one of the most popular web browsers in the world, with advanced features that make the surfing experience easier and more enjoyable. One feature recently introduced by Google is tab groups, which allow you to group and label the tabs you have opened in your browser.
This tab group feature is very useful for organizing your tabs according to your topic, urgency, progress, or preferences. You can also color your tab groups to easily distinguish them. You can also close or hide your tab groups with a single click, so you can save space and focus on the important ones.
This tab group feature is already available by default to all users of Chrome version 83 and above, which was released in May 2020. This feature is also available for Chrome on Android, so you can manage your tabs on your mobile device in the same way. If you want to try this tab group feature, here are the steps you should follow.
How to Create a Tab Group in Chrome
To create a tab group in Chrome, you need to open several tabs first. You can open tabs related to the same topic, or tabs that you want to group. For example, you can open tabs containing articles, videos, or websites that you want to read, watch, or visit later.
After you have multiple tabs that you want to group, follow these steps:
- Right-click on the tab you want to put in the group.
- Select the Add Tab to New Group option from the menu that appears.
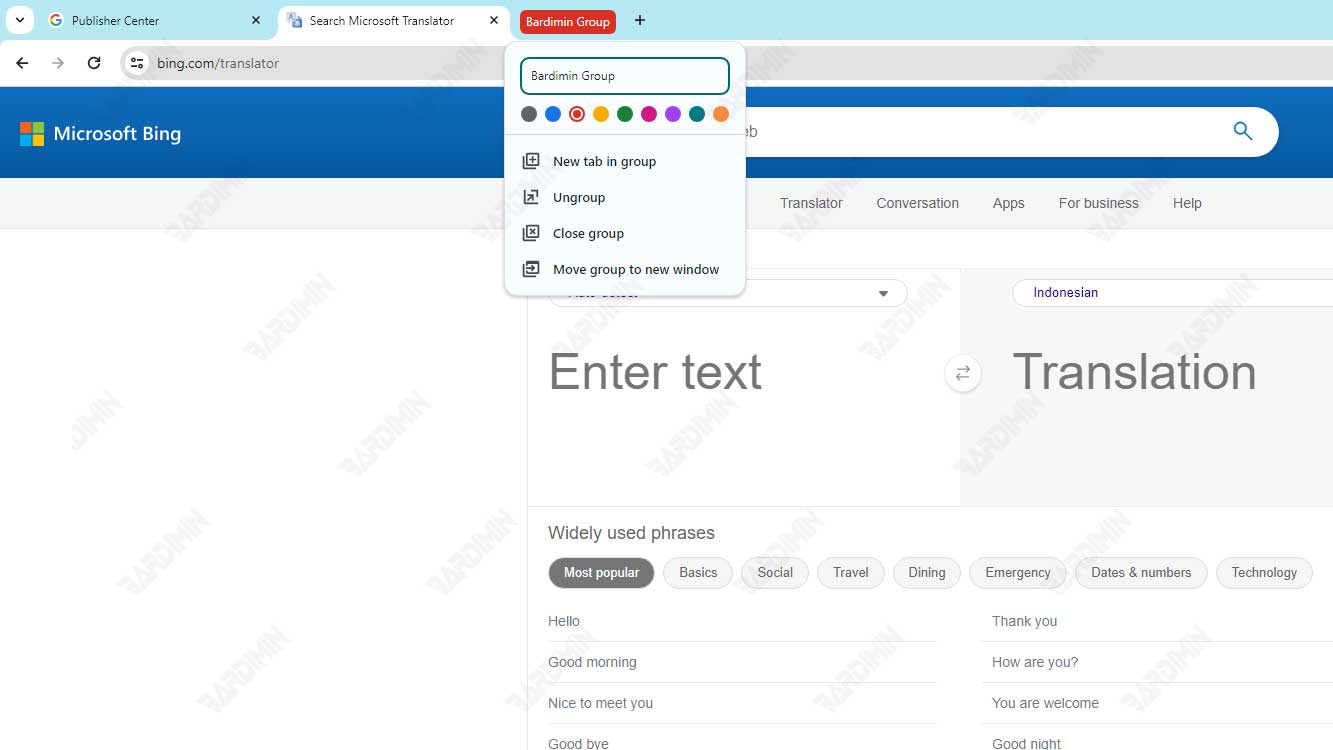
- Enter a name for your group in the text box provided. You can name your group according to topic, urgency, progress, or whatever you want.
- You can also choose a color for your group by clicking on the dot. There are eight colors you can choose from, namely gray, blue, red, yellow, green, pink, purple, and cyan.
- Once you’ve given your group a name and color, you’ll see a colored circle appear next to the tab you selected. If you click on the tab or circle, you’ll see your tab group menu, which lets you change the name and color, add a new tab, delete the group, or close the group.
You can repeat these steps to create another tab group with different tabs. You can also add tabs to an existing group in the following ways:
- Right-click on the tab you want to add to an existing group.
- Select the Add Tab to Existing Group option from the menu that appears.
- Select the group you want to add your tab to. You can see the available group names and colors on the menu.
- Your tab will join the group you selected, and you’ll see the same colored circle next to that tab.
You can also add tabs to an existing group by dragging them to the desired group. The method is as follows:
- Click and hold the tab you want to add to an existing group.
- Drag the tab to the desired group, until you see the color of the group surrounding the tab.
- Release the tab, and your tab will join the group you selected.
You can create as many tab groups as you want, and group your tabs according to your needs. You can also change the order of your tab groups by dragging the group name or icon in the tab bar until you are satisfied with its position.
How to Save Tab Groups in Chrome
One of the advantages of the tab groups feature in Chrome is that you can save your tab groups, so you can reopen them later. This is especially useful if you have a lot of tabs you want to save for later, or if you want to continue your work or projects at a later time.
To save tab groups in Chrome, you need to use the bookmarks feature, which allows you to save web pages you want to revisit. You can save your tab groups as bookmarks in the following ways:
- Right-click on the name or icon of the tab group you want to save.
- Select the Bookmark All Tabs option from the menu that appears.
- You will see a dialog window asking you to select the folder where you want to save your bookmarks. You can select an existing folder, or create a new folder by clicking the New Folder option.
- Name your folder according to the name of your tab group, or any other name you want.
- Click the Save button to save your bookmark.
After you save your tab group as a bookmark, you can reopen it in the following ways:
- Click the three horizontal lines icon in the top-right corner of your browser to open the Chrome menu.
- Select the Bookmarks option from the menu.
- Find the folder containing your tab group bookmarks, and click on the folder name.
- You will see all the tabs included in your tab group, and you can open them by clicking on the desired tab, or by clicking on the Open All option to open all tabs at once.
You can also open your tab group bookmarks in another way, namely by using the Recently Closed feature found in the Chrome menu. This feature lets you view and open tabs or groups of tabs that you just closed. The method is as follows:
- Click the three horizontal lines icon in the top-right corner of your browser to open the Chrome menu.
- Select the History option from the menu.
- You will see a list of tabs or groups of tabs that you just closed, and you can open them by clicking on the name of that tab or tab group.
How to Close or Hide Tab Groups in Chrome
If you want to close or hide your tab group, you can do so easily with the tab group feature in Chrome. This feature lets you close or hide all tabs included in your tab group with a single click, so you can save space and focus on other tabs or tab groups.
To close a tab group in Chrome, you can do the following:
- Right-click on the name or icon of the tab group you want to close.
- Select the Close Group option from the menu that appears.
- All tabs included in your tab group will be closed, and your tab group will be deleted.
You can also close a tab group in another way, by clicking on the cross icon next to the name or tab group icon. This will close all tabs included in your tab group, and delete your tab group.
However, if you don’t want to close your tab group, but just want to hide it temporarily, you can do so with the Collapse feature built into Chrome. This feature lets you hide all tabs included in your tab group so that only the tab group name or icon is visible in the tab bar. This can help you save space and reduce clutter in your tab bar.
To hide tab groups in Chrome, you can do just as
next:
- Click on the name or icon of the tab group you want to hide.
- You’ll see a small arrow next to the name or tab group icon. Click on the arrow to hide all tabs included in your tab group.
- You’ll notice that only the tab group name or icon is visible in the tab bar, and all tabs included in your tab group are not visible. You’ll also notice that the arrow changes direction, indicating that your tab group is being hidden.
You can restore your tab groups in the following ways:
- Click on the name or icon of the tab group you want to restore.
- You’ll see a small arrow next to the name or tab group icon. Click on the arrow to return all the tabs included in your tab group.
- You will see that all the tabs included in your tab group are again visible in the tab bar, and you can click on the desired tab to open it. You’ll also notice that the arrow changes direction, indicating that your tab group is being displayed.
Advantages and Disadvantages of Tab Group Feature in Chrome
The tab group feature in Chrome is a very useful and useful feature to better manage your tabs. This feature has several advantages, including:
- You can group and label your tabs according to your topic, urgency, progress, or preference, so you can find and open the tabs you need more easily.
- You can color your tab groups to easily distinguish them, so you can quickly see the tabs associated with a particular group.
- You can close or hide your tab groups with a single click, so you can save space and focus on other tabs or tab groups.
- You can save your tab groups as bookmarks, so you can reopen them later, without having to search or open them one by one.
- You can use the tab group feature in Chrome on Android, so you can manage your tabs on your mobile device in the same way.
However, the tab group feature in Chrome also has some drawbacks, including:
- You’ll have to do a few clicks to create, change, or delete your tab groups, which may take up your time and effort.
- You’ll have to manually name and color your tab groups, which may require your creativity and memory.
- You cannot change the size or position of your tab groups in the tab bar, which may interfere with your appearance or comfort.
- You can’t share or export your tab groups to other browsers or devices, which might limit your access or collaboration.
Conclusion
The tab group feature in Chrome is a very useful and useful feature to better manage your tabs. This feature lets you group and label your tabs according to your topic, urgency, progress, or preference. You can also color, close, hide, or save your tab groups easily. This feature is also available for Chrome on Android, so you can manage your tabs on your mobile device in the same way.
However, the tab group feature in Chrome also has some drawbacks, such as requiring multiple clicks, creativity, and memory, and not being able to resize, position, or share your tab groups. You can consider the advantages and disadvantages of this feature before you use it, and customize it to your needs and preferences.
Thanks for reading this article, and good luck with the tab group feature in Chrome.