In Excel, you can restrict users by only allowing data input with the values you have specified. In this article, Bardimin will share some tricks to only allow the input of specific values in Excel cells.
Data entry errors are a problem for any Excel user who wants accurate results. Even if your formula is perfect, if the processed input data contains errors, then the values returned by the formula will be incorrect as well.
If you create a spreadsheet for others to use or if you share a workbook with other users, how do you reduce or even eliminate the risk of poor data input that could ruin a good model you’ve created?
The best way to do this is to use Excel’s data validation feature. Data Validation is a tool in Excel that you can use to limit what users can enter into cells. This is a great tool for creating forms or just about anything where you want to make sure that incorrect values aren’t entered into a spreadsheet.
You can create one or more rules that specify the type of data or range of values that users can enter into cells. If a user tries to enter something that violates the rules, you can configure Excel to display an error message and reject the entry.
How to Restrict Data Input in Excel with Data Validation Tool
- Select the cells where you want to apply the data validation rule.
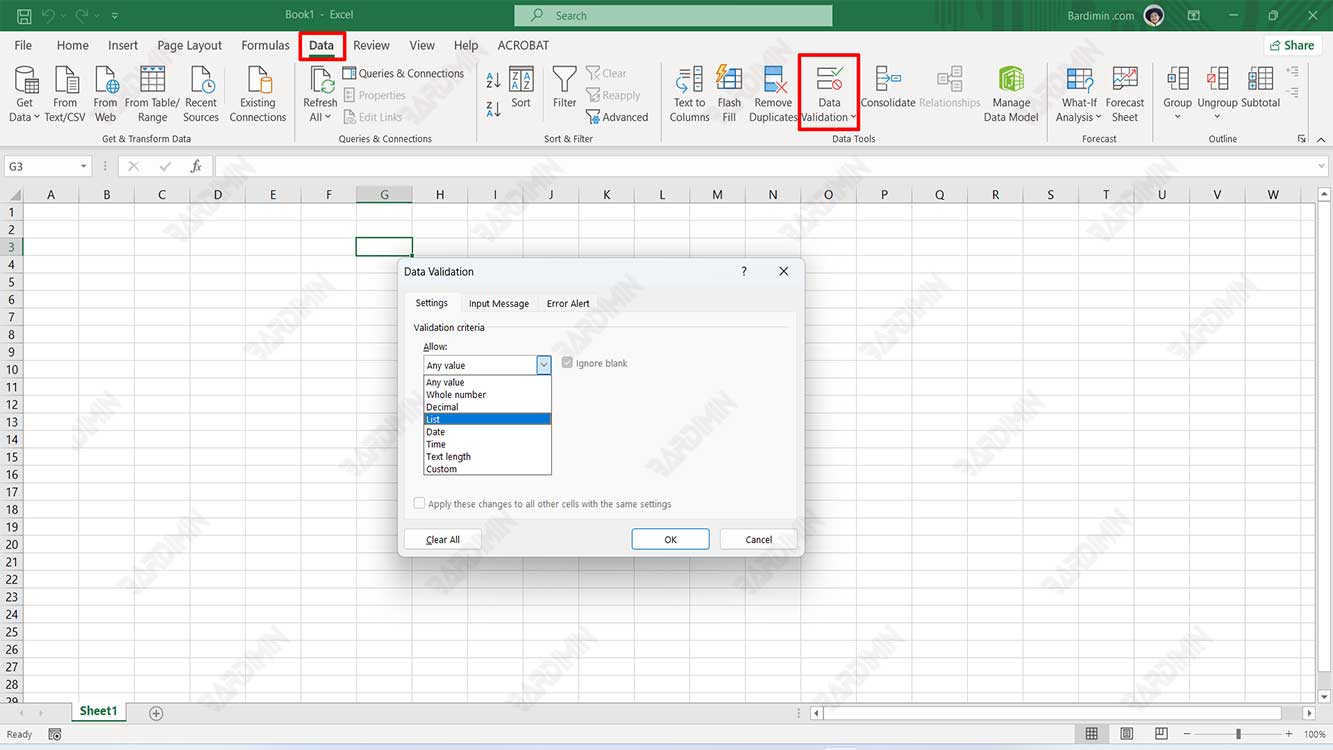
- Then select the “Data” tab menu and click the “Data Validation” button.
- In the dialog box, select the “Settings” tab and click the dropdown button under “Allow”. You can choose the type of validation you want to apply.
- “Whole Number” to limit the cell to accept only integers.
- “Decimal” to limit cells to accept only decimal numbers.
- “List” to select data from the drop-down list.
- “Date” to limit the cell to accept only dates.
- “Time” limits the cell to accept only time.
- “Text Length” to limit the length of the text.
- “Custom” for custom formulas.

- Under “Data,” select the condition you want to use. In this section, you can specify the rules that you use depending on the options that you selected in the previous step. If you choose:
- “Whole Number, Decimal, Text Length > between”, you can specify its minimum and maximum values.
- “List”, you can specify the value based on a range of cells on the sheet (for example: “=$A$2:$A$8” ). You can also specify the value by typing directly and separating it with a comma (for example: “Honda, Toyota, Suzuki” ).
- “Date, Time”, you can specify the start date and end date.
- If you want a pop-up box to be displayed when the user selects a restricted cell or any cell in the restricted range, select the “Input Message” tab and check the “Show Input Message When Cell Is Selected” option. Then fill in the title and message you want to convey to the user.
- Select the “Error Alert” tab to configure the error message and message style.
- Click OK to apply the data validation rule.

