One problem that Excel users often face is blank rows in the data. These blank rows can be caused by various factors, such as data input errors, or partially deleted data.
Excel is one of the most popular data processing applications in the world. These applications are often used to store and manage data in various formats, including tables, graphs, and diagrams.
However, sometimes the data we insert into Excel is not neat and there are many blank rows that interfere with the appearance and function of an Excel worksheet. These blank lines can come from copy-paste, data deletion, or input errors.
Deleting blank rows in Excel is a critical step in maintaining the cleanliness and quality of your data. Blank rows can affect your data analysis and make your spreadsheet look untidy. Also, when you share a spreadsheet with others, having blank rows can interfere with their understanding of the data.
Whatever the cause, these blank rows need to be removed to make our data more organized and easy to analyze. There are several ways to delete blank rows in Excel, depending on the number and location of the blank rows.
In this article, we will discuss some of the most common and effective ways to delete blank rows in Excel easily and quickly. Let’s get started!
Manually delete empty rows
This method is suitable for deleting blank rows, which are few or only exist in some parts of an Excel worksheet. This method is also quite easy and fast to do. Here are the steps:
- Select the row you want to delete by clicking the row number on the left side of the Excel window. If you want to select multiple rows at once, press the “Ctrl” key on the keyboard and click on the row number you want to delete.
- Right-click on one row you have selected, then select the “Delete” option on the menu that appears. You can also use the shortcut “Ctrl + -” (minus sign) on the keyboard to delete selected rows.
- Repeat steps 1 and 2 to remove any other blank rows that exist in your Excel worksheet.
Using “Go To Special” Feature to Delete Blank Rows in Excel
This method is suitable for deleting blank rows which are large or scattered throughout the Excel worksheet. This method is also more efficient and practical than the first method, because you don’t have to select blank rows one by one. Here are the steps:
- Select all existing data in your Excel worksheet by pressing the shortcut “Ctrl + A” on the keyboard or by clicking the “Select All” key in the upper right corner of the Excel window.
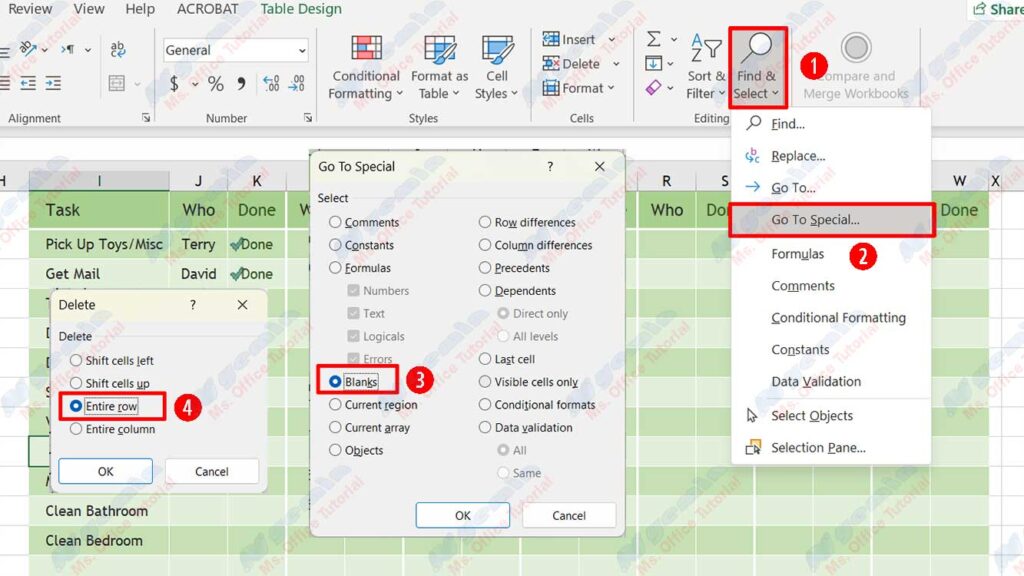
- Click the “Home” tab on the ribbon, then click “Find & Select” in the “Editing” group. Select the “Go To Special” option on the menu that appears.
- In the “Go To Special” dialog box, select the “Blanks” option, and then click OK. Excel selects all blank cells that are in your worksheet.
- Right-click on one of the selected blank cells, and then select the option “Delete” on the menu that appears. In the “Delete” dialog box, select the “Entire row” dialog box, and then click OK. Excel deletes all existing blank rows in your worksheet.
Using Filters to Delete Blank Rows in Excel
This method is suitable for deleting empty rows that are between data that have header or title columns. It also allows you to filter data based on certain criteria before deleting its blank rows. Here are the steps:
- Select all existing data in your Excel worksheet by pressing the shortcut “Ctrl + A” on the keyboard or by clicking the Select All button located in the upper left corner of the Excel window.
- Click the “Data” tab on the ribbon, then click “Filter” in the “Sort & Filter” group. Excel will add a small arrow in each column header or heading.
- Click the small arrow in one of the header or title columns, then uncheck the “Select All” option. Check only the “Blanks” option, and then click OK. Excel displays only the empty rows that are in that column.
- Select all blank rows displayed by pressing the shortcut “Ctrl + A” on the keyboard or by clicking the “Select All” key located on the Excel ribbon.
- Right-click on one of the selected blank rows, and then select the “Delete” option on the menu that appears. In the “Delete” dialog box, select the “Entire row” dialog box, and then click OK. Excel deletes all empty rows in that column.
- Repeat steps 3 through 5 for any header columns or other headings that have blank rows between their data.
Using Macros to Delete Blank Rows in Excel
This method is suitable for deleting a large number of empty rows or if you often do this task and want to shorten your time and effort. This method requires you to create and run a macro or VBA code that can delete blank rows automatically. Here are the steps:
- Open the Excel worksheet that you want to delete blank rows from, and then press the shortcut “Alt + F11” on your keyboard to open the “Visual Basic Editor” window.
- Click the “Insert” menu, then select the “Module” option. Excel will add a new module under “Project Explorer”.
- Type the following code in the module window:
Sub DeleteBlankRows()
Dim ws As Worksheet
Dim rng As Range
Dim lastRow As Long
Dim i As Long

Set ws = ActiveSheet
lastRow = ws.Cells(ws.Rows.Count, 1).End(xlUp).Row
Set rng = ws.Range("A1:A" & lastRow)

Application.ScreenUpdating = False

For i = lastRow To 1 Step -1
    If WorksheetFunction.CountA(rng.Rows(i)) = 0 Then
        rng.Rows(i).EntireRow.Delete
    End If
Next i

Application.ScreenUpdating = True

MsgBox "Blank rows have been deleted."

End Sub- End SubClick the Run menu, then select the Run Sub/UserForm option or press the F5 shortcut on your keyboard to run the macro. Excel will delete all existing blank rows in your worksheet and display a confirmation message.
Conclusion
In this article, we have discussed four ways to delete blank rows in Excel easily and quickly, namely:
- Delete blank rows manually
- Use Go To Special
- Use filters
- Using macros
You can choose the way that best suits your needs and preferences. Hope this article was useful and good luck!