Often we need to manipulate images to create interesting and informative presentations. One common task is to make the background image transparent.
One feature available in Excel is the ability to insert images. Images can beautify the appearance of reports or graphs. However, sometimes make the image transparent so that someone can see partially it or completely.
Images are one element that can enrich the look and function of your Excel document. You can add an image as a background, illustration, or part of a graphic. However, sometimes make the image transparent so as not to block the text or other data underneath. How to do it?
There are several ways to make a picture transparent in Excel, depending on the purpose and the result you want. In this article, I will explain the three main methods you can use, which are:
- Set a transparent color for an image
- Change the opacity level of an image
- Use external image editing tools
Let’s look at each of the methods in more detail.
Setting the Transparent Color for the Image
This method allows you to make parts of the image that have a certain color transparent. For example, if you have a logo image on a white background, you can make the white background transparent so that the logo can be placed on top of text or other colors without any blank space around it.
Here are the steps to set a transparent color for an image in Excel:
- Insert a picture into your Excel document by clicking the “Insert” tab, then clicking “Pictures” and selecting the picture you want to insert from your computer.
- Right-click on the image you’ve inserted, then select “Format Picture” from the menu that appears.
- In the “Format Picture” panel that appears on the right, click on the “Picture” icon (scissors image) under the “Picture Format” label.
- Under the “Picture Transparency” options, click on the “Color” button and select the color you want to make transparent from the available color palette. You can also use the eyedropper to select a color directly from the image.
- After selecting the color, click on the “OK” button. You’ll notice that the part of the image that has that color becomes transparent.
- You can adjust the size and position of the image by using the adjustment handles that are around the image.
Note that this method only makes one color transparent, not the entire image. If your image has a lot of colors or gradients, this method may not give optimal results.
Changing the Opacity Level of an Image
This method allows you to make the entire image blurry or clearer by changing its opacity. Opacity is a measure of how much light can pass through an object.
The higher the opacity, the darker and denser the image. The lower the opacity, the brighter and more translucent the image.
Here are the steps to change the opacity level of a picture in Excel:
- Insert the image into your Excel document in the same way as the previous method.
- Right-click on the image you’ve inserted, then select “Format Picture” from the menu that appears.
- In the “Format Picture” pane that appears on the right, click on the “Picture” icon under the “Picture Format” label.
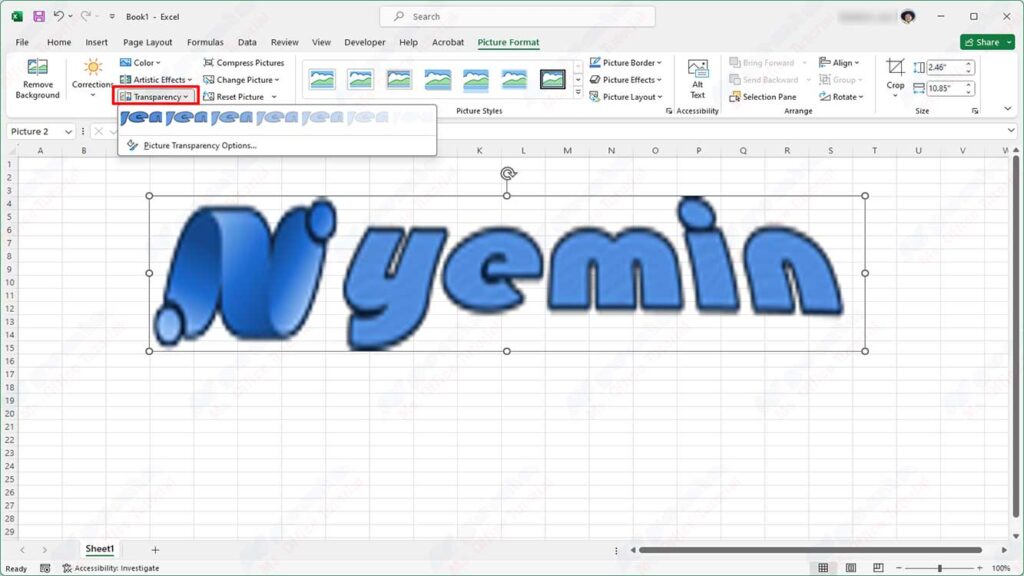
- Under the “Picture Transparency” options, slide the “Transparency” slider left or right to adjust the opacity level of the image. You can also enter a percentage value manually in the text box next to the slider.
- After adjusting the opacity level, click on the “Close” button to close the “Format Picture” panel.
- If necessary, you can adjust the size and position of the image by using the adjustment handles that are around the image.
Note that this method makes the entire image transparent, not just a specific part. If you want to create a transparent image with a specific shape, such as a circle or a star, you can use external image editing tools.
Using External Image Editing Tools
This method allows you to create a transparent image with any shape you want by using external image editing tools, such as Photoshop, GIMP, or Paint.NET.
You can remove the background of the image or crop the image according to the shape you want, then save it as a PNG file with transparency.
Here are the general steps for using external image editing tools to make images transparent:
- Open the image you want to make transparent with the external image editing tools you selected.
- Feel free to use the available selection or crop tools to select or crop the part of the image that you want to make transparent. For example, you can use the color selection tool to select the background of an image, and then delete it by pressing the Delete key.
- After selecting or cropping the part of the image that you want to make transparent, save the image as a PNG file with transparency. Usually, you can do this by clicking the “File” menu, then selecting “Save As” or “Export”, then selecting PNG format from the list of available formats.
- Insert the saved PNG image into your Excel document by clicking the “Insert” tab, then clicking “Pictures”, and selecting the saved PNG image from your computer.
- If necessary, you can adjust the size and position of the image by using the adjustment handles that are around the image.
Note that this method requires additional skills and software to edit images. If you don’t have both, you can use the first or second method which is easier and faster.
Conclusion
In this article, I have described three ways to make a picture transparent in Excel, namely:
- Set a transparent color for an image
- Change the opacity level of an image
- Use editing tools
I hope this article can help you to make your Excel document more attractive and professional by using transparent images. Thank you for reading this article.