In the world of business and administration, Microsoft Excel is one of the most important and widely used software. From managing data to creating financial reports, Excel is an irreplaceable tool. One of the basic tasks that is often required is to insert, delete, and hide rows or columns in an Excel worksheet.
With Excel, you can create all kinds of documents such as tables, graphs, reports, and others. However, to create a neat and efficient Excel document, you need to know how to add, delete, and hide rows or columns in Excel.
Rows and columns are the basic elements of an Excel worksheet. A row is a collection of cells arranged horizontally, while a column is a collection of cells arranged vertically. Each row and column has a number or letter that indicates its position on the worksheet. For example, the first row is marked with the number 1, the first column is marked with the letter A, and so on.
Adding a row or column inserts a new row or column between existing rows or columns. Deleting rows or columns removes unnecessary rows or columns from the worksheet. Hiding rows or columns makes them invisible on the screen, but still on the worksheet.
There are several reasons why you may want to add, delete, or hide rows or columns in Excel. For example:
- You want to add rows or columns to insert additional data that didn’t exist before.
- You want to delete rows or columns to remove incorrect, duplicate, or irrelevant data.
- You want to hide rows or columns to simplify the appearance of the worksheet, protect sensitive data, or save print space.
Whatever your goal, you can do all these things easily and quickly in Excel. Here are the ways you can use to add, delete, and hide rows or columns in Excel.
How to Add Rows or Columns in Excel
There are several ways you can use to add rows or columns in Excel. Here are some of them:
1] Using the Insert Menu
This method is the most common and easy way to add rows or columns in Excel. Here are the steps:
- Select any cell in the row or column adjacent to where you want to add a new row or column. For example, if you want to add a new row above row 5, select any cell in row 4. If you want to add a new column to the right of column C, select any cell in column D.
- Click the “Home” tab on the “Ribbon”, that is, the main menu located at the top of the Excel window.
- Click the “Insert” button in the “Cells” group. This will open a drop-down menu with several options.
- Select the “Insert Sheet Rows” option to add new rows, or the “Insert Sheet Columns” option to add new columns. It will insert a new row or column according to the position of your previously selected cell.
- Repeat these steps to add more than one row or column.
2] Using Right Click
This method is an alternative way that is also quite easy to add rows or columns in Excel. Here are the steps:
- Select any cell in the row or column adjacent to where you want to add a new row or column, just like the previous way.
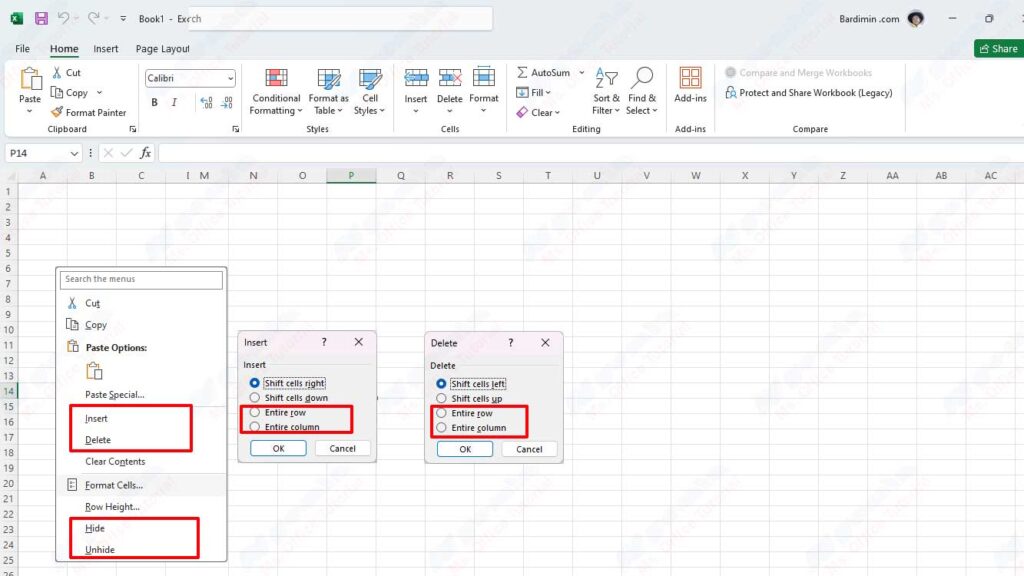
- Right-click on the selected cell. This will open a context menu with several options.
- Select the “Insert…” option. This will open an “Insert” dialog box with several options.
- Select the “Entire Row” option to add a new row, or the “Entire Column” option to add a new column. It will insert a new row or column according to the position of your previously selected cell.
- Click OK to apply the changes.
- Repeat these steps to add more than one row or column.
3] Using Keyboard Shortcuts
This method is the fastest and most practical way to add rows or columns in Excel, especially if you are used to using the keyboard. Here are the steps:
- Select any cell in the row or column adjacent to where you want to add a new row or column, just like the previous way.
- Press the following keyboard shortcut according to the operating system that you are using:
- This will open the same “Insert” dialog box as the previous way.
- Select the “Entire Row” option to add a new row, or the “Entire Column” option to add a new column. It will insert a new row or column according to the position of your previously selected cell.
- Click OK to apply the changes.
- Repeat these steps to add more than one row or column.
How to Delete Rows or Columns in Excel
There are several ways you can use to delete rows or columns in Excel. Here are some of them:
1] Using the Delete Menu
This method is the most common and easy way to delete rows or columns in Excel. Here are the steps:
- Select any cell in the row or column you want to delete. For example, if you want to delete row 5, select any cell in row 5. If you want to delete column C, select any cell in column C.
- Click the “Home” tab on the “Ribbon”, just like the previous method.
- Click the “Delete” button in the “Cells” group. This will open a drop-down menu with several options.
- Select the “Delete Sheet Rows” option to delete the selected rows, or the “Delete Sheet Columns” option to delete the selected columns. It will delete rows or columns according to the position of your previously selected cells.
- Repeat these steps to delete more than one row or column.
2] Using Right Click
This method is an alternative way that is also quite easy to delete rows or columns in Excel. Here are the steps:
- Select any cell in the row or column you want to delete, just like the previous way.
- Right-click on the selected cell. This will open a context menu with several options.
- Select the “Delete…” option. This will open a “Delete” dialog box with several options.
- Select the Entire Rows option to delete the selected rows, or the Entire Columns option to delete the selected columns. It will delete rows or columns according to the position of your previously selected cells.
- Click OK to apply the changes.
- Repeat these steps to delete more than one row or column.
3] Using Keyboard Shortcuts
This method is the fastest and most practical way to delete rows or columns in Excel, especially if you are used to using the keyboard. Here are the steps:
- Select any cell in the row or column you want to delete, just like the previous way.
- Press the following keyboard shortcut according to the operating system that you are using:
- For Windows, press “Ctrl + -” (minus sign).
- For Mac, press “Command + -” (minus sign).
- This will open the same “Delete” dialog box as the previous way.
- Select the “Entire Row” option to delete the selected rows, or the “Entire Column” option to delete the selected columns. It will delete rows or columns according to the position of your previously selected cells.
- Click OK to apply the changes.
- Repeat these steps to delete more than one row or column.
How to Hide Rows or Columns in Excel
There are several ways you can use to hide rows or columns in Excel. Here are some of them:
1] Using the Format Menu
This method is the most common and easy way to hide rows or columns in Excel. Here are the steps:
- Select any cell in the row or column you want to hide. For example, if you want to hide row 5, select any cell in row 5. If you want to hide column C, select any cell in column C.
- Click the “Home” tab on the “Ribbon”, just like the previous method.
- Click the “Format” button in the “Cells” group. This will open a drop-down menu with several options.
- Hover over the “Hide & Unhide” option. This will open a sub-menu with two options.
- Select the “Hide Rows” option to hide the selected rows, or the “Hide Column” option to hide the selected columns. It will hide the rows or columns according to the cell position you selected earlier.
- Repeat these steps to hide more than one row or column.
2] Using Right Click
This method is an alternative way that is also quite easy to hide rows or columns in Excel. Here are the steps:
- Select any cell in the row or column you want to hide, just like the previous way.
- Right-click on the selected cell. This will open a context menu with several options.
- Select the “Hide” option. It will hide the rows or columns according to the cell position you selected earlier.
- Repeat these steps to hide more than one row or column.
3] Using Width or Height Adjustments
This method is the most manual and flexible way to hide rows or columns in Excel because you can specify the width or height of the rows or columns you want to hide exactly. Here are the steps:
- Select any cell in the row or column you want to hide, just like the previous way.
- Hover over the border between two-row numbers or two-letter columns above the selected cell. For example, if you want to hide row 5, hover over the border between numbers 4 and 5 over any cell in row 5. If you want to hide column C, hover over the border between letters B and C above any cell in column C.
- The cursor will change to the shape of two arrows opposite each other. This indicates that you can adjust the width or height of rows or columns by dragging the cursor.
- Drag the cursor towards the left or up until the width or height of the row or column becomes zero. It will hide the rows or columns according to the cell position you selected earlier.
- Repeat these steps to hide more than one row or column.
How to Show Hidden Rows or Columns in Excel
If you want to reshow rows or columns that you have hidden before, you can use the following ways:
1] Using the Format Menu
This method is the most common and easy way to show hidden rows or columns in Excel. Here are the steps:
- Select any cell in the row or column adjacent to the hidden row or column. For example, if you want to show hidden row 5 again, select any cell in row 4 or 6. If you want to show hidden column C again, select any cell in column B or D.
- Click the “Home” tab on the “Ribbon”, just like the previous method.
- Click the “Format” button in the “Cells” group, just like the previous way.
- Hover over the “Hide & Unhide” option, just like the previous method.
- Select the “Unhide Rows” option to show hidden rows again, or the “Unhide Column” option to show hidden columns again. It will display the rows or columns again according to the cell position you selected earlier.
- Repeat these steps to redisplay more than one row or column.
2] Using Right Click
This method is an alternative way that is also quite easy to show hidden rows or columns in Excel. Here are the steps:
- Select any cell in the row or column adjacent to the hidden row or column, just like the previous way.
- Right-click on the selected cell. This will open a context menu with several options.
- Select the “Unhide” option. It will display the rows or columns again according to the cell position you selected earlier.
- Repeat these steps to redisplay more than one row or column.
3] Using Width or Height Adjustments
This method is the most manual and flexible way to show hidden rows or columns in Excel because you can specify the width or height of the rows or columns you want to display exactly. Here are the steps:
- Hover over the border between two-row numbers or two-letter columns adjacent to the hidden row numbers or column letters. For example, if you want to show hidden row 5 again, hover over the border between numbers 4 and 6 over any cell in rows 4 or 6. If you want to show hidden column C again, hover over the border between the letters B and D above any cell in column B or D.
- The cursor will change to the shape of two arrows opposite each other, just like the previous way.
- Drag the cursor towards the right or bottom until the width or height of the row or column becomes your best. It will display the row or column again according to the previous cell position. You can see the hidden row numbers or column letters are grayed out between contiguous row numbers or column letters.
- Repeat these steps to redisplay more than one row or column.
Conclusion
By knowing how to add, delete, and hide rows or columns in Excel, you can make your Excel worksheet neater and more efficient. You can also manipulate data according to your needs, either to insert additional data, delete unnecessary data, or hide sensitive data.
There are several ways you can do these things, either by using menus, right-clicking, or keyboard shortcuts. You can also adjust the width or height of rows or columns by dragging the cursor. If you want to show back rows or columns that you have hidden before, you can use the same ways.
Hope this article will be helpful for those of you who want to learn more about how to add, delete, and hide rows or columns in Excel. Good luck!